know-how:linux
Inhaltsverzeichnis
![]()
Read Only Root
- Getestet mit Debian Buster
Overlayfs von Ubuntu
- Funktioniert grundsätzlich „out of the box“
est mit overlaoverlayroot Paket von Ubuntu


 wget http://mirrors.kernel.org/ubuntu/pool/main/c/cloud-initramfs-tools/overlayroot_0.45ubuntu1_all.deb

root@mrWorkstation:~# dpkg -i overlayroot_0.45ubuntu1_all.deb
(Reading database ... 90093 files and directories currently installed.)
Preparing to unpack overlayroot_0.45ubuntu1_all.deb ...
Unpacking overlayroot (0.45ubuntu1) over (0.45ubuntu1) ...
Setting up overlayroot (0.45ubuntu1) ...
Processing triggers for man-db (2.8.5-2) ...
Processing triggers for initramfs-tools (0.133+deb10u1) ...
update-initramfs: Generating /boot/initrd.img-4.19.0-16-amd64
cryptsetup: WARNING: The initramfs image may not contain cryptsetup binaries
    nor crypto modules. If that's on purpose, you may want to uninstall the
    'cryptsetup-initramfs' package in order to disable the cryptsetup initramfs
    integration and avoid this warning.


---

Warning tritt auf weil in meinem Testbeispiel kein cryptsetup benutzt wird / Für das Ubuntu Paket ist es jedoch eine Abhängigkeit (cryptsetup-initramfs)


root@mrWorkstation:~# echo "overlay" >> /etc/initramfs-tools/modules


Overlay ist grundsätzlich ein Kernel Module für overlayfs:

root@mrWorkstation:~# modprobe overlay
root@mrWorkstation:~# lsmod | grep -i overlay
overlay               131072  0


----

Overlayroot deaktiviert d.h. overlayroot="disabled":

root@mrWorkstation:~# grep -v ^# /etc/overlayroot.conf
overlayroot_cfgdisk="disabled"

overlayroot="disabled"

Overlayroot aktivieren d.h. overlayroot="tmpfs":

root@mrWorkstation:~# grep -v ^# /etc/overlayroot.conf
overlayroot_cfgdisk="disabled"

overlayroot="tmpfs:recurse=0"

reboot
----

Overlayroot aktiv:

Filesystem      Size  Used Avail Use% Mounted on
udev            2.0G     0  2.0G   0% /dev
tmpfs           395M  5.8M  389M   2% /run
/dev/sda1        20G  2.7G   16G  15% /media/root-ro
tmpfs-root      2.0G  6.3M  2.0G   1% /media/root-rw
overlayroot     2.0G  6.3M  2.0G   1% /
tmpfs           2.0G     0  2.0G   0% /dev/shm
tmpfs           5.0M  4.0K  5.0M   1% /run/lock
tmpfs           2.0G     0  2.0G   0% /sys/fs/cgroup
tmpfs           395M  4.0K  395M   1% /run/user/108
tmpfs           395M   12K  395M   1% /run/user/1000


user@mrWorkstation:~$ touch test123
user@mrWorkstation:~$ ls -al test123
-rw-r--r-- 1 user user 0 Apr 29 11:18 test123

reboot

user@mrWorkstation:~$ ls -al test123
ls: cannot access 'test123': No such file or directory
user@mrWorkstation:~$

----
user@mrWorkstation:~$ su -
Password:
root@mrWorkstation:~# lsblk
NAME   MAJ:MIN RM  SIZE RO TYPE MOUNTPOINT
sda      8:0    0   20G  0 disk
└─sda1   8:1    0   20G  0 part /media/root-ro
sr0     11:0    1 58.2M  0 rom
root@mrWorkstation:~# mount -o remount,rw /dev/sda1 /media/root-ro/
root@mrWorkstation:~# touch /media/root-ro/home/user/test123

reboot

user@mrWorkstation:~$ ls -al test123
-rw-r--r-- 1 root root 0 Apr 29 11:20 test123
---
bilibop
root@mrWorkstation:~# apt-get install search bilibop-lockfs
Reading package lists... Done
Building dependency tree
Reading state information... Done
E: Unable to locate package search
root@mrWorkstation:~# apt-get install  bilibop-lockfs
Reading package lists... Done
Building dependency tree
Reading state information... Done
The following additional packages will be installed:
  bilibop-common
Suggested packages:
  bilibop-device-policy lvm2 aufs-dkms gnome-icon-theme libnotify-bin
The following NEW packages will be installed:
  bilibop-common bilibop-lockfs
0 upgraded, 2 newly installed, 0 to remove and 0 not upgraded.
Need to get 124 kB of archives.
After this operation, 310 kB of additional disk space will be used.
Do you want to continue? [Y/n] y


user@mrWorkstation:~$ cat /etc/bilibop/bilibop.conf
# /etc/bilibop/bilibop.conf

# Global configuration file for bilibop-* packages. For a comprehensive list
# of possible default or custom settings, read the bilibop.conf(5) manpage,
# and see the examples provided by each concerned bilibop-* package in
# /usr/share/doc/bilibop-*/examples/bilibop.conf


BILIBOP_LOCKFS="true"

reboot

user@mrWorkstation:~$ df -h
Filesystem      Size  Used Avail Use% Mounted on
udev            2.0G     0  2.0G   0% /dev
tmpfs           395M  5.8M  389M   2% /run
tmpfs           2.0G  5.9M  2.0G   1% /overlay
/dev/sda1        20G  2.7G   16G  15% /overlay/ro
overlay         2.0G  5.9M  2.0G   1% /
tmpfs           2.0G     0  2.0G   0% /dev/shm
tmpfs           5.0M  4.0K  5.0M   1% /run/lock
tmpfs           2.0G     0  2.0G   0% /sys/fs/cgroup
tmpfs           395M   12K  395M   1% /run/user/1000

root@mrWorkstation:~# mount -o remount,rw /dev/sda1 /overlay/ro/
mount: /overlay/ro: cannot remount /dev/sda1 read-write, is write-protected.


reboot -> im grub menü bei den kernel paramtern -> nolockfs

user@mrWorkstation:~$ df -h
Filesystem      Size  Used Avail Use% Mounted on
udev            2.0G     0  2.0G   0% /dev
tmpfs           395M  5.8M  389M   2% /run
/dev/sda1        20G  2.7G   16G  15% /
tmpfs           2.0G     0  2.0G   0% /dev/shm
tmpfs           5.0M  4.0K  5.0M   1% /run/lock
tmpfs           2.0G     0  2.0G   0% /sys/fs/cgroup
tmpfs           395M   12K  395M   1% /run/user/1000


whitelist devices zB: /boot /var

user@mrWorkstation:~$ cat /etc/bilibop/bilibop.conf
# /etc/bilibop/bilibop.conf

# Global configuration file for bilibop-* packages. For a comprehensive list
# of possible default or custom settings, read the bilibop.conf(5) manpage,
# and see the examples provided by each concerned bilibop-* package in
# /usr/share/doc/bilibop-*/examples/bilibop.conf


BILIBOP_LOCKFS="true"

BILIBOP_LOCKFS_WHITELIST="/var /boot"
Manuell - ROOT Read Only
 Ziel des ganzen näher definieren Tamper Protection ?
- home r/w wegen XFCE bzw. Xserver Logins
root@mrWorkstation:~# cat /etc/fstab
# /etc/fstab: static file system information.
#
# Use 'blkid' to print the universally unique identifier for a
# device; this may be used with UUID= as a more robust way to name devices
# that works even if disks are added and removed. See fstab(5).
#
# <file system> <mount point>   <type>  <options>       <dump>  <pass>
# / was on /dev/sda1 during installation
UUID=b9eff194-fb64-42a9-88d0-27f7a9475526 /               ext4    ro,errors=remount-ro 0       1
# /boot was on /dev/sda3 during installation
UUID=1606e738-3b31-4423-9658-ff87d41f4427 /boot           ext4    defaults,ro        0       2
# /var was on /dev/sda2 during installation
UUID=2372c780-d18e-4b99-9677-ec5ea0e3249d /var            ext4    defaults        0       2
/dev/sda4	/home	ext4	defaults
tmpfs	/tmp	tmpfs	defaults,size=100M	0	0
- Basierend auf http://wiki.psuter.ch/doku.php?id=solve_raspbian_sd_card_corruption_issues_with_read-only_mounted_root_partition / Getestet auf Debian Buster /sbin/overlayRoot.sh / beim booten init=/sbin/overlayRoot.sh angeben und testen
- /dev/default/grub
root@mrWorkstation:~# grep -i cmdline_linux_default /etc/default/grub
GRUB_CMDLINE_LINUX_DEFAULT="init=/sbin/overlayRoot.sh"
- /sbin/overlayRoot.sh
#!/bin/bash
#  Read-only Root-FS for Raspian using overlayfs
#  Version 1.1
#
#  Version History:
#  1.0: initial release
#  1.1: adopted new fstab style with PARTUUID. the script will now look for a /dev/xyz definiton first
#       (old raspbian), if that is not found, it will look for a partition with LABEL=rootfs, if that
#       is not found it look for a PARTUUID string in fstab for / and convert that to a device name
#       using the blkid command.
#
#  Created 2017 by Pascal Suter @ DALCO AG, Switzerland to work on Raspian as custom init script
#  (raspbian does not use an initramfs on boot)
#
#  This program is free software: you can redistribute it and/or modify
#  it under the terms of the GNU General Public License as published by
#  the Free Software Foundation, either version 3 of the License, or
#  (at your option) any later version.
#
#  This program is distributed in the hope that it will be useful,
#  but WITHOUT ANY WARRANTY; without even the implied warranty of
#  MERCHANTABILITY or FITNESS FOR A PARTICULAR PURPOSE.  See the
#  GNU General Public License for more details.
#
#    You should have received a copy of the GNU General Public License
#    along with this program.  If not, see
#    <http://www.gnu.org/licenses/>.
#
#
#  Tested with Raspbian mini, 2018-10-09
#
#  This script will mount the root filesystem read-only and overlay it with a temporary tempfs
#  which is read-write mounted. This is done using the overlayFS which is part of the linux kernel
#  since version 3.18.
#  when this script is in use, all changes made to anywhere in the root filesystem mount will be lost
#  upon reboot of the system. The SD card will only be accessed as read-only drive, which significantly
#  helps to prolong its life and prevent filesystem coruption in environments where the system is usually
#  not shut down properly
#
#  Install:
#  copy this script to /sbin/overlayRoot.sh, make it executable and add "init=/sbin/overlayRoot.sh" to the
#  cmdline.txt file in the raspbian image's boot partition.
#  I strongly recommend to disable swapping before using this. it will work with swap but that just does
#  not make sens as the swap file will be stored in the tempfs which again resides in the ram.
#  run these commands on the booted raspberry pi BEFORE you set the init=/sbin/overlayRoot.sh boot option:
#  sudo dphys-swapfile swapoff
#  sudo dphys-swapfile uninstall
#  sudo update-rc.d dphys-swapfile remove
#
#  To install software, run upgrades and do other changes to the raspberry setup, simply remove the init=
#  entry from the cmdline.txt file and reboot, make the changes, add the init= entry and reboot once more.

fail(){
	echo -e "$1"
	/bin/bash
}

# load module
modprobe overlay
if [ $? -ne 0 ]; then
    fail "ERROR: missing overlay kernel module"
fi
#2021-05-12 cc: debian is managing proc
#mount /proc
#mount -t proc proc /proc
#if [ $? -ne 0 ]; then
#    fail "ERROR: could not mount proc"
#fi


# create a writable fs to then create our mountpoints
mount -t tmpfs inittemp /mnt
if [ $? -ne 0 ]; then
    fail "ERROR: could not create a temporary filesystem to mount the base filesystems for overlayfs"
fi
mkdir /mnt/lower
mkdir /mnt/rw
mount -t tmpfs root-rw /mnt/rw
if [ $? -ne 0 ]; then
    fail "ERROR: could not create tempfs for upper filesystem"
fi
mkdir /mnt/rw/upper
mkdir /mnt/rw/work
mkdir /mnt/newroot

rootDev="/dev/sda1"

[[ -b "$rootDev" ]] || fail "$rootDev cannot be found change it manually"


#2021-05-12 cc: Removed all the magic to find root device / nevertheless it needs to be specified manually now !
mount -o ro "$rootDev"  /mnt/lower

if [ $? -ne 0 ]; then
    fail "ERROR: could not ro-mount original root partition"
fi
mount -t overlay -o lowerdir=/mnt/lower,upperdir=/mnt/rw/upper,workdir=/mnt/rw/work overlayfs-root /mnt/newroot
if [ $? -ne 0 ]; then
    fail "ERROR: could not mount overlayFS"
fi
# create mountpoints inside the new root filesystem-overlay
mkdir /mnt/newroot/ro
mkdir /mnt/newroot/rw
# remove root mount from fstab (this is already a non-permanent modification)
grep -v "$rootDev" /mnt/lower/etc/fstab > /mnt/newroot/etc/fstab

echo "#the original root mount has been removed by overlayRoot.sh" >> /mnt/newroot/etc/fstab
echo "#this is only a temporary modification, the original fstab" >> /mnt/newroot/etc/fstab
echo "#stored on the disk can be found in /ro/etc/fstab" >> /mnt/newroot/etc/fstab
# change to the new overlay root
cd /mnt/newroot
pivot_root . mnt
exec chroot . sh -c "$(cat <<END
# move ro and rw mounts to the new root
mount --move /mnt/mnt/lower/ /ro
if [ $? -ne 0 ]; then
    echo "ERROR: could not move ro-root into newroot"
    /bin/bash
fi
mount --move /mnt/mnt/rw /rw
if [ $? -ne 0 ]; then
    echo "ERROR: could not move tempfs rw mount into newroot"
    /bin/bash
fi
# unmount unneeded mounts so we can unmout the old readonly root
umount /mnt/mnt
umount /mnt/proc
umount /mnt/dev
umount /mnt
# continue with regular init
exec /sbin/init
END
)"
X2Go
- Getestet mit Debian Buster (Server)
- Getestet mit Debian Buster (Client)
X2GO - Server
- Installation aus den vorhandenen Debian Repositories
- OpenSSH ist installiert, konfiguriert (ausschließlich Key Login) und läuft - Kommunikation läuft über SSH
- XFCE läuft auf dem Server als grafische Oberfläche
- apt-get install x2goserver
. apt-get install x2goserver

root@debian:~# apt-get install x2goserver
Reading package lists... Done
Building dependency tree
Reading state information... Done
The following additional packages will be installed:
  bc gir1.2-atk-1.0 gir1.2-freedesktop gir1.2-gdkpixbuf-2.0 gir1.2-glib-2.0 gir1.2-gtk-3.0 gir1.2-pango-1.0 libauthen-sasl-perl
  libcapture-tiny-perl libconfig-simple-perl libdata-dump-perl libdbd-pg-perl libdbd-sqlite3-perl libdbi-perl libencode-locale-perl
  libfile-basedir-perl libfile-desktopentry-perl libfile-listing-perl libfile-mimeinfo-perl libfile-which-perl libfont-afm-perl libfs6
  libgirepository-1.0-1 libhtml-form-perl libhtml-format-perl libhtml-parser-perl libhtml-tagset-perl libhtml-tree-perl libhttp-cookies-perl
  libhttp-daemon-perl libhttp-date-perl libhttp-message-perl libhttp-negotiate-perl libio-html-perl libio-socket-ssl-perl libio-stringy-perl
  libipc-system-simple-perl liblwp-mediatypes-perl liblwp-protocol-https-perl libmailtools-perl libnet-dbus-perl libnet-http-perl
  libnet-smtp-ssl-perl libnet-ssleay-perl libnx-x11-6 libpangoxft-1.0-0 libpq5 libswitch-perl libtie-ixhash-perl libtimedate-perl
  libtry-tiny-perl libwww-perl libwww-robotrules-perl libx11-protocol-perl libx2go-config-perl libx2go-log-perl libx2go-server-db-perl
  libx2go-server-perl libx2go-utils-perl libxcomp3 libxcompshad3 libxml-parser-perl libxml-twig-perl libxml-xpathengine-perl net-tools
  nx-x11-common nxagent perl-openssl-defaults psmisc pwgen python3-gi sshfs x11-xfs-utils x2goserver-common x2goserver-extensions
  x2goserver-fmbindings x2goserver-printing x2goserver-x2goagent x2goserver-xsession xdg-utils
Suggested packages:
  libdigest-hmac-perl libgssapi-perl libclone-perl libmldbm-perl libnet-daemon-perl libsql-statement-perl libcrypt-ssleay-perl
  libauthen-ntlm-perl libunicode-map8-perl libunicode-string-perl xml-twig-tools rdesktop cups-x2go
The following NEW packages will be installed:
  bc gir1.2-atk-1.0 gir1.2-freedesktop gir1.2-gdkpixbuf-2.0 gir1.2-glib-2.0 gir1.2-gtk-3.0 gir1.2-pango-1.0 libauthen-sasl-perl
  libcapture-tiny-perl libconfig-simple-perl libdata-dump-perl libdbd-pg-perl libdbd-sqlite3-perl libdbi-perl libencode-locale-perl
  libfile-basedir-perl libfile-desktopentry-perl libfile-listing-perl libfile-mimeinfo-perl libfile-which-perl libfont-afm-perl libfs6
  libgirepository-1.0-1 libhtml-form-perl libhtml-format-perl libhtml-parser-perl libhtml-tagset-perl libhtml-tree-perl libhttp-cookies-perl
  libhttp-daemon-perl libhttp-date-perl libhttp-message-perl libhttp-negotiate-perl libio-html-perl libio-socket-ssl-perl libio-stringy-perl
  libipc-system-simple-perl liblwp-mediatypes-perl liblwp-protocol-https-perl libmailtools-perl libnet-dbus-perl libnet-http-perl
  libnet-smtp-ssl-perl libnet-ssleay-perl libnx-x11-6 libpangoxft-1.0-0 libpq5 libswitch-perl libtie-ixhash-perl libtimedate-perl
  libtry-tiny-perl libwww-perl libwww-robotrules-perl libx11-protocol-perl libx2go-config-perl libx2go-log-perl libx2go-server-db-perl
  libx2go-server-perl libx2go-utils-perl libxcomp3 libxcompshad3 libxml-parser-perl libxml-twig-perl libxml-xpathengine-perl net-tools
  nx-x11-common nxagent perl-openssl-defaults psmisc pwgen python3-gi sshfs x11-xfs-utils x2goserver x2goserver-common x2goserver-extensions
  x2goserver-fmbindings x2goserver-printing x2goserver-x2goagent x2goserver-xsession xdg-utils
0 upgraded, 81 newly installed, 0 to remove and 36 not upgraded.
Need to get 9,454 kB of archives.
After this operation, 28.2 MB of additional disk space will be used.
Do you want to continue? [Y/n] y

....
- Achtung Bei Linux Mint Server - konnte mich nicht verbinden
https://x2go-dev.x2go.narkive.com/zd4sA6FJ/x2go-client-session-kicks-user-back-to-the-session-login-screen

I had a similar issue while connecting from X2Go Client v. 4.0.5.0 on
MS Windows to X2Go Server v. 4.0.1.19-0~1064~ubuntu14.04.1 on Linux
Mint 17.2 (using MATE session): the user was kicked back to the
session login screen.

The problem was in the .Xauthority* files in the user's home directory
on the server side. One of the files was owned by the root, which
was a problem.

The user solved the issue by running the following command on the X2Go server:

sudo rm ~/.Xauthority*

Hope this helps.
-- rpr.
X2GO - Client
- Installation Client aus den offiziellen Debian Repositories apt-get install x2goclient
- SSH Key für den Zugriff auf den User wurde per Agent geladen
- x2goclient


- Um per Remote Support geben zu können wie bei zB: Teamviewer - zum lokalen Desktop verbinden, insofern der lokale Benutzer aktuell eine Session hat


RAID6 + LVM + Debian
- Getestet auf Debian Buster in Virtualbox VM mit 4 Platten / BIOS kein UEFI
- Ausfall von bis zu 2 beliebigen Platten möglich
- RAID6 → pvcreate → volume Group → 1x Logical Volume für ROOT
- Die Partitionen werden für linux software raid verwendet

- Die zuvor spezifizierten linux software raid Partitionen werden zu einem RAID6 zusammen gefasst

- Das durch den installer erstellte md0 Device wird für LVM verwendet


- In diesem Beispiel gibt es eine root logical volume für das root Dateisystem (ext4) als Einhängpunkt

- Nach dem ersten erfolgreichen booten wird der grub noch auf jeder Platte installiert und gewartet bis das RAID6 gesynced ist


- Beim Ausfall von 2 Platten und reboot findet er offenbar für kurze Zeit die volume Group nicht / möglicherweise wird in dieser Zeitspanne die Parity berechnet für die „Daten“

- 2 platten fehlen und es läuft :

- Reattachen der zuvor „defekten“ Platten mdadm –manage –add /dev/md0 /dev/sda1 /dev/sdb1 und recovery beginnt

Android
- Dateien vom Smartphone auf Notebook kopieren (Debian Buster / backports Kernel 5.8 apt-get install jmtpfs )
- Getestet auf Android 10 / Nokia 7 / USB Dateiübertragung aktiviert (Dieses Gerät/Dateiübertragung)
root@mrWhiteGhost:/mnt# jmtpfs -l
Device 0 (VID=2e04 and PID=c025) is a Nokia 6.
Available devices (busLocation, devNum, productId, vendorId, product, vendor):
1, 25, 0xc025, 0x2e04, 6, Nokia

root@mrWhiteGhost:/mnt# jmtpfs /mnt/tmp/
Device 0 (VID=2e04 and PID=c025) is a Nokia 6.
Android device detected, assigning default bug flags

root@mrWhiteGhost:/mnt# ls -al /mnt/tmp/
total 4
drwxr-xr-x  3 root root    0 Jan  1  1970  .
drwxr-xr-x 10 root root 4096 Oct 28 13:20  ..
drwxr-xr-x 25 root root    0 Jan  1  1970 'Interner gemeinsamer Speicher'

root@mrWhiteGhost:/mnt# umount tmp
root@mrWhiteGhost:/mnt# ls -al /mnt/tmp/
total 8
drwxrwxrwt  2 root root 4096 Oct 28 13:19 .
drwxr-xr-x 10 root root 4096 Oct 28 13:20 ..
wireguard
- Getestet auf Debian Buster mit Backports kernel (apt-get -t buster-backports install wireguard) - auch auf Kernel achten gegenwärtig 5.5.0-0.bpo.2-amd64
- Use Case ist mein Smartphone auf dem ich Wireguard testen will um meine Mails zu checken / IMAP und SMTPS sollen nur mehr über VPN erreichbar sein um die Angriffsfläche auf die Infrastruktur zu reduzieren
- Kernel Module müssen für Ubuntu 20.04 NICHT gebaut werden d.h. keine build-tools Abhängigkeiten
Server
- Keys erstellen ähnlich zu SSH d.h. aus dem Private Key kann er den Public Key ableiten
- Das Verzeichnis in dem die Keys liegen ist ausschließlich root zugänglich (chmod 700)
   wg genkey > server_key.key
   wg genkey > smartphone_key.key

   wg pubkey > server_public.key < server_key.key
   wg pubkey > smartphone_public.key < smartphone_key.key
- /etc/wireguard/wg0.conf
[Interface]
Address = 10.0.181.3/24
ListenPort = 51820
PrivateKey = PRIVATE_KEY
PostUp = iptables -t nat -A POSTROUTING -j MASQUERADE
PostDown = iptables -t nat -F

[Peer]
PublicKey = PUBLIC_KEY
AllowedIPs = 10.0.181.4
- ip addr ls wg0
- Quasi der Server Peering Point ist die 10.0.181.3 und für den Peer d.h. mein Smartphone erlaube ich die 10.0.181.4
root@wireguard:~# ip addr ls wg0
3: wg0: <POINTOPOINT,NOARP,UP,LOWER_UP> mtu 1420 qdisc noqueue state UNKNOWN group default qlen 1000
    link/none
    inet 10.0.181.3/24 scope global wg0
       valid_lft forever preferred_lft forever
- Konfiguration aktivieren und deaktivieren
root@wireguard:~# wg-quick up wg0
[#] ip link add wg0 type wireguard
[#] wg setconf wg0 /dev/fd/63
[#] ip -4 address add 10.0.181.3/24 dev wg0
[#] ip link set mtu 1420 up dev wg0
[#] iptables -t nat -A POSTROUTING -j MASQUERADE


root@wireguard:~# wg-quick down wg0
[#] ip link delete dev wg0
[#] iptables -t nat -F
- systemd Konfiguration
 systemctl enable wg-quick@wg0.service
 systemctl stop wg-quick@wg0.service
 systemctl start wg-quick@wg0.service
- Debugging aktivieren für Logging
- vim /usr/bin/wg-quick +11
#2020-05-11 cc: Enable kernel debugging get debugging info
/usr/sbin/modprobe wireguard && echo module wireguard +p > /sys/kernel/debug/dynamic_debug/control
Client
- Smartphone - Android 10
- 10.0.24.244 - DNS Server für das Resolving der IMAP/SMTPS Hostnamen von Pannonia IT
- 10.0.24.249 - Interner Mailserver zum Abrufen der Mails
- 10.0.181.4 - „Meine Peering Point“ IP Adresse auf dem Smartphone

gvm - openvas
- GVM Installation auf Kali Linux
- Im wesentlichne nach der installation von gvm / immerwieder gvm-check-setup ausführen und sukzessive Vorschläge durchführen / Der User muss für GVMD_DATA d.h. die Default Portlisten und Default Scankonfigurationen gelinkt werden
└─# apt-get install gvm
Reading package lists... Done
Building dependency tree... Done
Reading state information... Done
The following additional packages will be installed:
  doc-base dvisvgm fonts-droid-fallback fonts-lmodern fonts-noto-mono
  fonts-texgyre fonts-urw-base35 gnutls-bin greenbone-security-assistant
  greenbone-security-assistant-common gvm-tools gvmd gvmd-common
  libapache-pom-java libcommons-logging-java libcommons-parent-java
  libfontbox-java libgnutls-dane0 libgnutls30 libgs9 libgs9-common libgvm21
  libhiredis0.14 libical3 libijs-0.35 libjbig2dec0 libjemalloc2 libkpathsea6
  liblua5.1-0 liblzf1 libmicrohttpd12 libpaper-utils libpaper1 libpdfbox-java
  libptexenc1 libradcli4 libsynctex2 libteckit0 libtexlua53 libtexluajit2
  libunbound8 libuuid-perl libyaml-tiny-perl libzzip-0-13 lmodern lua-bitop
  lua-cjson openvas-scanner ospd-openvas preview-latex-style
  python3-deprecated python3-gvm python3-ospd python3-psutil python3-wrapt
  redis-server redis-tools t1utils tcl tex-common tex-gyre texlive-base
  texlive-binaries texlive-fonts-recommended texlive-latex-base
  texlive-latex-extra texlive-latex-recommended texlive-pictures
  texlive-plain-generic tipa tk tk8.6 xml-twig-tools
Suggested packages:
  dhelp | dwww | dochelp | doc-central | yelp | khelpcenter fonts-noto
  fonts-freefont-otf | fonts-freefont-ttf libavalon-framework-java
  libcommons-logging-java-doc libexcalibur-logkit-java liblog4j1.2-java
  dns-root-data pnscan strobe python-gvm-doc python-psutil-doc ruby-redis
  debhelper ghostscript gv | postscript-viewer perl-tk xpdf | pdf-viewer xzdec
  texlive-fonts-recommended-doc texlive-latex-base-doc icc-profiles
  libfile-which-perl libspreadsheet-parseexcel-perl texlive-latex-extra-doc
  texlive-latex-recommended-doc texlive-luatex texlive-pstricks dot2tex prerex
  ruby-tcltk | libtcltk-ruby texlive-pictures-doc vprerex
The following NEW packages will be installed:
  doc-base dvisvgm fonts-droid-fallback fonts-lmodern fonts-noto-mono
  fonts-texgyre fonts-urw-base35 gnutls-bin greenbone-security-assistant
  greenbone-security-assistant-common gvm gvm-tools gvmd gvmd-common
  libapache-pom-java libcommons-logging-java libcommons-parent-java
  libfontbox-java libgnutls-dane0 libgs9 libgs9-common libgvm21 libhiredis0.14
  libical3 libijs-0.35 libjbig2dec0 libjemalloc2 libkpathsea6 liblua5.1-0
  liblzf1 libmicrohttpd12 libpaper-utils libpaper1 libpdfbox-java libptexenc1
  libradcli4 libsynctex2 libteckit0 libtexlua53 libtexluajit2 libunbound8
  libuuid-perl libyaml-tiny-perl libzzip-0-13 lmodern lua-bitop lua-cjson
  openvas-scanner ospd-openvas preview-latex-style python3-deprecated
  python3-gvm python3-ospd python3-psutil python3-wrapt redis-server
  redis-tools t1utils tcl tex-common tex-gyre texlive-base texlive-binaries
  texlive-fonts-recommended texlive-latex-base texlive-latex-extra
  texlive-latex-recommended texlive-pictures texlive-plain-generic tipa tk
  tk8.6 xml-twig-tools
The following packages will be upgraded:
  libgnutls30
1 upgraded, 73 newly installed, 0 to remove and 152 not upgraded.
Need to get 162 MB of archives.
After this operation, 513 MB of additional disk space will be used.
Do you want to continue? [Y/n] Y

......

└─# gvm-check-setup

gvm-check-setup 21.4.0
  Test completeness and readiness of GVM-21.4.0
Step 1: Checking OpenVAS (Scanner)...
        OK: OpenVAS Scanner is present in version 21.4.0.
        ERROR: No CA certificate file for Server found.
        FIX: Run 'sudo runuser -u _gvm -- gvm-manage-certs -a -f'.

 ERROR: Your GVM-21.4.0 installation is not yet complete!

Please follow the instructions marked with FIX above and run this
script again.

└─# sudo runuser -u _gvm -- gvm-manage-certs -a -f
Generated private key in /tmp/tmp.kH78RE5WFF/cakey.pem.
Generated self signed certificate in /tmp/tmp.kH78RE5WFF/cacert.pem.
Installed private key to /var/lib/gvm/private/CA/cakey.pem.
Installed certificate to /var/lib/gvm/CA/cacert.pem.
Generated private key in /tmp/tmp.kH78RE5WFF/serverkey.pem.
Generated certificate request in /tmp/tmp.kH78RE5WFF/serverrequest.pem.
Signed certificate request in /tmp/tmp.kH78RE5WFF/serverrequest.pem with CA certificate in /var/lib/gvm/CA/cacert.pem to generate certificate in /tmp/tmp.kH78RE5WFF/servercert.pem
Installed private key to /var/lib/gvm/private/CA/serverkey.pem.
Installed certificate to /var/lib/gvm/CA/servercert.pem.
Generated private key in /tmp/tmp.kH78RE5WFF/clientkey.pem.
Generated certificate request in /tmp/tmp.kH78RE5WFF/clientrequest.pem.
Signed certificate request in /tmp/tmp.kH78RE5WFF/clientrequest.pem with CA certificate in /var/lib/gvm/CA/cacert.pem to generate certificate in /tmp/tmp.kH78RE5WFF/clientcert.pem
Installed private key to /var/lib/gvm/private/CA/clientkey.pem.
Installed certificate to /var/lib/gvm/CA/clientcert.pem.
Removing temporary directory /tmp/tmp.kH78RE5WFF.

----

 Achtung bei Kali werden die Services nach der Installation per Default NICHT gestartet im Gegensatz zu Ubuntu/Debian

 systemctl enable ospd-openvas
 systemctl enable gvmd
 systemctl enable greenbone-security-assistant
 systemctl enable redis-server

┌──(root💀mrScanner)-[~]
└─# systemctl start redis-server@openvas.service                            1 ⨯

----

└─# gvm-check-setup
gvm-check-setup 21.4.0
  Test completeness and readiness of GVM-21.4.0
Step 1: Checking OpenVAS (Scanner)...
        OK: OpenVAS Scanner is present in version 21.4.0.
        OK: Server CA Certificate is present as /var/lib/gvm/CA/servercert.pem.
Checking permissions of /var/lib/openvas/gnupg/*
        OK: _gvm owns all files in /var/lib/openvas/gnupg
        OK: redis-server is present.
        OK: scanner (db_address setting) is configured properly using the redis-server socket: /var/run/redis-openvas/redis-server.sock
        OK: redis-server is running and listening on socket: /var/run/redis-openvas/redis-server.sock.
        OK: redis-server configuration is OK and redis-server is running.
        OK: _gvm owns all files in /var/lib/openvas/plugins
        ERROR: The NVT collection is very small.
        FIX: Run the synchronization script greenbone-nvt-sync.
        sudo runuser -u _gvm -- greenbone-nvt-sync.

 ERROR: Your GVM-21.4.0 installation is not yet complete!

Please follow the instructions marked with FIX above and run this
script again.

------

Scan Konfigurationen sind auch "Feeds"


_gvm@mrScanner:/root$ gvmd --get-scanners
08b69003-5fc2-4037-a479-93b440211c73  OpenVAS  /var/run/ospd/ospd.sock  0  OpenVAS Default
6acd0832-df90-11e4-b9d5-28d24461215b  CVE    0  CVE
_gvm@mrScanner:/root$ gvmd --get-users
gvmadmin
_gvm@mrScanner:/root$ gvmd --get-users --verbose
gvmadmin 9246883f-2c90-4e46-8653-934f91a706e5
_gvm@mrScanner:/root$ gvmd --modify-scanner 08b69003-5fc2-4037-a479-93b440211c73 --value 9246883f-2c90-4e46-8653-934f91a706e5
Scanner modified.


----

runuser -u _gvm -- greenbone-feed-sync --type GVMD_DATA

...
....
21.10/port_lists/all-tcp-and-nmap-top-100-udp-730ef368-57e2-11e1-a90f-406186ea4fc5.xml
         10,268 100%    8.95kB/s    0:00:01 (xfr#60, to-chk=6/79)
21.10/report_formats/
21.10/report_formats/anonymous-xml-5057e5cc-b825-11e4-9d0e-28d24461215b.xml
         10,940 100%    9.52kB/s    0:00:01 (xfr#61, to-chk=5/79)
21.10/report_formats/csv-results-c1645568-627a-11e3-a660-406186ea4fc5.xml
         22,893 100%   19.91kB/s    0:00:01 (xfr#62, to-chk=4/79)
21.10/report_formats/itg-77bd6c4a-1f62-11e1-abf0-406186ea4fc5.xml
          4,716 100%    4.10kB/s    0:00:01 (xfr#63, to-chk=3/79)
21.10/report_formats/pdf-c402cc3e-b531-11e1-9163-406186ea4fc5.xml
         95,864 100%   65.01kB/s    0:00:01 (xfr#64, to-chk=2/79)
21.10/report_formats/txt-a3810a62-1f62-11e1-9219-406186ea4fc5.xml
         57,524 100%  348.92kB/s    0:00:00 (xfr#65, to-chk=1/79)
21.10/report_formats/xml-a994b278-1f62-11e1-96ac-406186ea4fc5.xml
          2,190 100%    6.77kB/s    0:00:00 (xfr#66, to-chk=0/79)

...
..

-----------
└─# runuser -u _gvm -- gvmd --get-users --verbose

gvmadmin 9246883f-2c90-4e46-8653-934f91a706e5


┌──(root💀mrScanner)-[~]
└─# runuser -u _gvm -- gvmd --modify-setting 78eceaec-3385-11ea-b237-28d24461215b --value 9246883f-2c90-4e46-8653-934f91a706e5

┌──(root💀mrScanner)-[~]
└─# echo $?

--------

└─# /usr/bin/gvm-feed-update
....
....
See https://community.greenbone.net for details.

By using this service you agree to our terms and conditions.

Only one sync per time, otherwise the source ip will be temporarily blocked.

receiving incremental file list
timestamp
             13 100%   12.70kB/s    0:00:00 (xfr#1, to-chk=0/1)

sent 43 bytes  received 114 bytes  104.67 bytes/sec
total size is 13  speedup is 0.08
Greenbone community feed server - http://feed.community.greenbone.net/
This service is hosted by Greenbone Networks - http://www.greenbone.net/

All transactions are logged.

If you have any questions, please use the Greenbone community portal.
See https://community.greenbone.net for details.

By using this service you agree to our terms and conditions.

Only one sync per time, otherwise the source ip will be temporarily blocked.

receiving incremental file list
./
CB-K19.xml
      4,136,577 100%  171.52MB/s    0:00:00 (xfr#1, to-chk=21/29)
CB-K21.xml
      1,990,639 100%   12.66MB/s    0:00:00 (xfr#2, to-chk=19/29)
dfn-cert-2020.xml
      3,659,131 100%   18.97MB/s    0:00:00 (xfr#3, to-chk=5/29)
dfn-cert-2021.xml
      1,770,822 100%    8.62MB/s    0:00:00 (xfr#4, to-chk=4/29)
sha1sums
          1,419 100%    7.00kB/s    0:00:00 (xfr#5, to-chk=3/29)
sha256sums
          2,019 100%    9.91kB/s    0:00:00 (xfr#6, to-chk=2/29)
sha256sums.asc
            819 100%    4.02kB/s    0:00:00 (xfr#7, to-chk=1/29)
timestamp
             13 100%    0.06kB/s    0:00:00 (xfr#8, to-chk=0/29)

sent 40,423 bytes  received 130,573 bytes  341,992.00 bytes/sec
total size is 76,496,057  speedup is 447.36
....
....

-----------

Immer wieder prüfen ob ok:


└─# gvm-check-setup
gvm-check-setup 21.4.0
  Test completeness and readiness of GVM-21.4.0
Step 1: Checking OpenVAS (Scanner)...
        OK: OpenVAS Scanner is present in version 21.4.0.
        OK: Server CA Certificate is present as /var/lib/gvm/CA/servercert.pem.
Checking permissions of /var/lib/openvas/gnupg/*
        OK: _gvm owns all files in /var/lib/openvas/gnupg
        OK: redis-server is present.
        OK: scanner (db_address setting) is configured properly using the redis-server socket: /var/run/redis-openvas/redis-server.sock
        OK: redis-server is running and listening on socket: /var/run/redis-openvas/redis-server.sock.
        OK: redis-server configuration is OK and redis-server is running.
        OK: _gvm owns all files in /var/lib/openvas/plugins
        OK: NVT collection in /var/lib/openvas/plugins contains 71010 NVTs.
Checking that the obsolete redis database has been removed
        OK: No old Redis DB
        OK: ospd-OpenVAS is present in version 21.4.0.
Step 2: Checking GVMD Manager ...
        OK: GVM Manager (gvmd) is present in version 21.4.0.
Step 3: Checking Certificates ...
        OK: GVM client certificate is valid and present as /var/lib/gvm/CA/clientcert.pem.
        OK: Your GVM certificate infrastructure passed validation.
Step 4: Checking data ...
        OK: SCAP data found in /var/lib/gvm/scap-data.
        OK: CERT data found in /var/lib/gvm/cert-data.
Step 5: Checking Postgresql DB and user ...
        OK: Postgresql version and default port are OK.
 gvmd      | _gvm     | UTF8     | en_GB.UTF-8 | en_GB.UTF-8 |
        OK: At least one user exists.
Step 6: Checking Greenbone Security Assistant (GSA) ...
Oops, secure memory pool already initialized
        OK: Greenbone Security Assistant is present in version 21.04.0~git.
Step 7: Checking if GVM services are up and running ...
        OK: ospd-openvas service is active.
        OK: gvmd service is active.
        OK: greenbone-security-assistant service is active.
Step 8: Checking few other requirements...
        OK: nmap is present in version 21.04.0~git.
        OK: ssh-keygen found, LSC credential generation for GNU/Linux targets is likely to work.
        WARNING: Could not find makensis binary, LSC credential package generation for Microsoft Windows targets will not work.
        SUGGEST: Install nsis.
        OK: xsltproc found.
        WARNING: Your password policy is empty.
        SUGGEST: Edit the /etc/gvm/pwpolicy.conf file to set a password policy.

It seems like your GVM-21.4.0 installation is OK.


Auf greenbone Assistant wird über SSL Port Forwarding zugegriffe zB: ssh root@SERVER -L3000:localhost:9392 (--http-only ok da SSH Port Forwarding )

└─# systemctl edit greenbone-security-assistant
### Editing /etc/systemd/system/greenbone-security-assistant.service.d/override.conf
### Anything between here and the comment below will become the new contents of the file

[Service]
ExecStart=
ExecStart=/usr/sbin/gsad --listen=127.0.0.1 --port=9392 --http-only

### Lines below this comment will be discarded
 ...

└─# systemctl daemon-reload greenbone-security-assistant


----------
- Wenn Scan-Konfigurationen und Port Listen erfolgreich zugeordnet wurden:


- Nach der Installation erstellt ospd-openvas Socket mit falscher Bezeichnung:
- –unix-socket /run/ospd/ospd.sock braucht jedoch –unix-socket /run/ospd/ospd-openvas.sock
systemctl edit ospd-openvas.service

### Editing /etc/systemd/system/ospd-openvas.service.d/override.conf
### Anything between here and the comment below will become the new contents of the file

[Service]

ExecStart=
ExecStart=/usr/bin/ospd-openvas --config /etc/gvm/ospd-openvas.conf --log-config /etc/gvm/ospd-logging.conf --unix-socket /run/ospd/ospd-openvas.sock --pid-file /run/ospd/ospd-openvas.pid --log-file /var/log/gvm/ospd-openvas.log --lock-file-dir /var/lib/openvas

### Lines below this comment will be discarded
...

systemctl daemon-reload
- Attachmentgröße auf ~3.8MB erhöhen
systemctl edit gvmd


### Editing /etc/systemd/system/gvmd.service.d/override.conf
### Anything between here and the comment below will become the new contents of the file

[Service]
ExecStart=
ExecStart=/usr/sbin/gvmd --max-email-attachment-size=4000000 --max-email-include-size=4000000 --max-email-message-size=4000000 --osp-vt-update=/run/ospd/ospd.sock --listen-group=_gvm

### Lines below this comment will be discarded

### /lib/systemd/system/gvmd.service
# [Unit]
# Description=Greenbone Vulnerability Manager daemon (gvmd)
# After=network.target networking.service postgresql.service ospd-openvas.service
# Wants=postgresql.service ospd-openvas.service
# Documentation=man:gvmd(8)
# ConditionKernelCommandLine=!recovery
#
# [Service]
# Type=forking
# User=_gvm
# Group=_gvm
# PIDFile=/run/gvm/gvmd.pid
# RuntimeDirectory=gvm
# RuntimeDirectoryMode=2775
# ExecStart=/usr/sbin/gvmd --osp-vt-update=/run/ospd/ospd.sock --listen-group=_gvm
# Restart=always
# TimeoutStopSec=10
#
# [Install]
# WantedBy=multi-user.target
- Wesentliche Schritte für Neuinstallation:
Daten löschen:

 apt-get --purge remove gvm gvm-tools openvas-scanner ospd-openvas
...
rm -rf /var/lib/openvas/
rm -rf /var/lib/gvm/
...

Datenbank löschen:
su postgres -s /bin/bash
postgres@pentest:~$ psql
psql (14.0 (Debian 14.0-1), server 13.4 (Debian 13.4-3))
Type "help" for help.

postgres=# \l
postgres=# drop database gvmd;
ERROR:  database "gvmd" is being accessed by other users
DETAIL:  There is 1 other session using the database.
postgres=# select pg_terminate_backend(pg_stat_activity.pid)
from pg_stat_activity
where pg_stat_activity.datname ='gvmd';
 pg_terminate_backend
----------------------
 t
(1 row)

postgres=# drop database gvmd;
DROP DATABASE
postgres=# \l
- gsad startet nicht mehr nach Upgrade (20220402) / aliases d.h. symbolische Links für greenbone… entfernen unter /etc/systemd/system/greenbone* und unter /lib/systemd/system/greeenbone* / danach systemctl daemon-reload und mit systemctl enable gsad wieder aktivieren
- OpenVAS Scanner Pfad anpassen - overrides löschen für ospd-openvas und überall /run/ospd/ospd.sock
_gvm@pentest:/run/ospd$ gvmd --get-scanners
6acd0832-df90-11e4-b9d5-28d24461215b  CVE    0  CVE
08b69003-5fc2-4037-a479-93b440211c73  OpenVAS  /run/ospd/ospd-openvas.sock  0  OpenVAS Default
_gvm@pentest:/run/ospd$ gvmd --modify-scanner=08b69003-5fc2-4037-a479-93b440211c73 --scanner-host=/run/ospd/ospd.sock
Scanner modified.
_gvm@pentest:/run/ospd$ gvmd --get-scanners
6acd0832-df90-11e4-b9d5-28d24461215b  CVE    0  CVE
08b69003-5fc2-4037-a479-93b440211c73  OpenVAS  /run/ospd/ospd.sock  0  OpenVAS Default
- PDF Reportdetails reduzieren wenn zB: /24er Netze gescannt werden den Wald vor lauter Bäumen nicht mehr sehen


- Nuken eines bestehenden postgresql Clusters und Neuinitialisierung
oot@pentest:~# pg_dropcluster --stop 15 main
root@pentest:~# pg_createcluster 15 main
Creating new PostgreSQL cluster 15/main ...
/usr/lib/postgresql/15/bin/initdb -D /var/lib/postgresql/15/main --auth-local peer --auth-host scram-sha-256 --no-instructions
The files belonging to this database system will be owned by user "postgres".
This user must also own the server process.

The database cluster will be initialized with locale "en_GB.UTF-8".
The default database encoding has accordingly been set to "UTF8".
The default text search configuration will be set to "english".

Data page checksums are disabled.

fixing permissions on existing directory /var/lib/postgresql/15/main ... ok
creating subdirectories ... ok
selecting dynamic shared memory implementation ... posix
selecting default max_connections ... 100
selecting default shared_buffers ... 128MB
selecting default time zone ... Europe/Vienna
creating configuration files ... ok
running bootstrap script ... ok
performing post-bootstrap initialization ... ok
syncing data to disk ... ok
Ver Cluster Port Status Owner    Data directory              Log file
15  main    5432 down   postgres /var/lib/postgresql/15/main /var/log/postgresql/postgresql-15-main.log
root@pentest:~# pg_ctlcluster 15 main start
- Fehler Database Version wrong:
md manage:MESSAGE:2023-08-07 10h39.27 utc:1095: check_db_versions: database version of database: 250
md manage:MESSAGE:2023-08-07 10h39.27 utc:1095: check_db_versions: database version supported by manager: 255
md   main:CRITICAL:2023-08-07 10h39.27 utc:1095: gvmd: database is wrong version

-> su _gvm -s /bin/bash -> gvmd --migrate (Geduld)


-> /var/log/gvm/gvmd.log :
...
md   main:MESSAGE:2023-08-07 10h40.09 utc:1147:    Greenbone Vulnerability Manager version 22.5.5 (DB revision 255)
md   main:   INFO:2023-08-07 10h40.09 utc:1147:    Migrating database.
md   main:   INFO:2023-08-07 10h40.09 utc:1147:    Migrating to 251
md   main:   INFO:2023-08-07 10h40.09 utc:1147:    Migrating to 252
md   main:   INFO:2023-08-07 10h40.09 utc:1147:    Migrating to 253
md   main:   INFO:2023-08-07 10h40.09 utc:1147:    Migrating to 254
md   main:   INFO:2023-08-07 10h40.12 utc:1147:    Migrating to 255
md   main:MESSAGE:2023-08-07 10h40.12 utc:1147: Migrating SCAP database
md manage:   INFO:2023-08-07 10h40.12 utc:1147: Reinitialization of the SCAP database necessary
md manage:WARNING:2023-08-07 10h40.12 utc:1147: update_scap: Full rebuild requested, resetting SCAP db
md manage:   INFO:2023-08-07 10h40.13 utc:1147: update_scap: Updating data
...
- Upgrade Cluster von 15 auf 16 - ohne Neuinstallation (gvmd kann nicht gestartet werden) / Vorsicht über SSH !
root@pentest:~# pg_lsclusters
Ver Cluster Port Status Owner    Data directory              Log file
15  main    5432 online postgres /var/lib/postgresql/15/main /var/log/postgresql/postgresql-15-main.log
16  main    5433 online postgres /var/lib/postgresql/16/main /var/log/postgresql/postgresql-16-main.log

root@pentest:~# pg_dropcluster 16 main --stop

root@pentest:~# pg_upgradecluster 15 main


WARNING:  database "template1" has a collation version mismatch
DETAIL:  The database was created using collation version 2.36, but the operating system provides version 2.37.
HINT:  Rebuild all objects in this database that use the default collation and run ALTER DATABASE template1 REFRESH COLLATION VERSION, or build PostgreSQL with the right library version.
Stopping old cluster...
Restarting old cluster with restricted connections...
Notice: extra pg_ctl/postgres options given, bypassing systemctl for start operation
Creating new PostgreSQL cluster 16/main ...
/usr/lib/postgresql/16/bin/initdb -D /var/lib/postgresql/16/main --auth-local peer --auth-host scram-sha-256 --no-instructions --encoding UTF8 --lc-collate en_GB.UTF-8 --lc-ctype en_GB.UTF-8 --locale-provider libc
The files belonging to this database system will be owned by user "postgres".
This user must also own the server process.

The database cluster will be initialized with locale "en_GB.UTF-8".
The default text search configuration will be set to "english".

Data page checksums are disabled.

fixing permissions on existing directory /var/lib/postgresql/16/main ... ok
creating subdirectories ... ok
selecting dynamic shared memory implementation ... posix
selecting default max_connections ... 100
selecting default shared_buffers ... 128MB
selecting default time zone ... Europe/Vienna
creating configuration files ... ok
running bootstrap script ... ok
performing post-bootstrap initialization ... ok
syncing data to disk ... ok

Copying old configuration files...
Copying old start.conf...
Copying old pg_ctl.conf...
Starting new cluster...
Notice: extra pg_ctl/postgres options given, bypassing systemctl for start operation
Running init phase upgrade hook scripts ...

WARNING:  database "template1" has a collation version mismatch
DETAIL:  The database was created using collation version 2.36, but the operating system provides version 2.37.
HINT:  Rebuild all objects in this database that use the default collation and run ALTER DATABASE template1 REFRESH COLLATION VERSION, or build PostgreSQL with the right library version.
Roles, databases, schemas, ACLs...
WARNING:  database "postgres" has a collation version mismatch
DETAIL:  The database was created using collation version 2.36, but the operating system provides version 2.37.
HINT:  Rebuild all objects in this database that use the default collation and run ALTER DATABASE postgres REFRESH COLLATION VERSION, or build PostgreSQL with the right library version.
WARNING:  database "template1" has a collation version mismatch
DETAIL:  The database was created using collation version 2.36, but the operating system provides version 2.37.
HINT:  Rebuild all objects in this database that use the default collation and run ALTER DATABASE template1 REFRESH COLLATION VERSION, or build PostgreSQL with the right library version.
WARNING:  database "gvmd" has a collation version mismatch
DETAIL:  The database was created using collation version 2.36, but the operating system provides version 2.37.
HINT:  Rebuild all objects in this database that use the default collation and run ALTER DATABASE gvmd REFRESH COLLATION VERSION, or build PostgreSQL with the right library version.
WARNING:  database "postgres" has a collation version mismatch
DETAIL:  The database was created using collation version 2.36, but the operating system provides version 2.37.
HINT:  Rebuild all objects in this database that use the default collation and run ALTER DATABASE postgres REFRESH COLLATION VERSION, or build PostgreSQL with the right library version.
 set_config
------------

(1 row)

 set_config
------------

(1 row)

 set_config
------------

(1 row)

 set_config
------------

(1 row)

Fixing hardcoded library paths for stored procedures...
WARNING:  database "template1" has a collation version mismatch
DETAIL:  The database was created using collation version 2.36, but the operating system provides version 2.37.
HINT:  Rebuild all objects in this database that use the default collation and run ALTER DATABASE template1 REFRESH COLLATION VERSION, or build PostgreSQL with the right library version.
Upgrading database template1...
WARNING:  database "template1" has a collation version mismatch
DETAIL:  The database was created using collation version 2.36, but the operating system provides version 2.37.
HINT:  Rebuild all objects in this database that use the default collation and run ALTER DATABASE template1 REFRESH COLLATION VERSION, or build PostgreSQL with the right library version.
Fixing hardcoded library paths for stored procedures...
WARNING:  database "gvmd" has a collation version mismatch
DETAIL:  The database was created using collation version 2.36, but the operating system provides version 2.37.
HINT:  Rebuild all objects in this database that use the default collation and run ALTER DATABASE gvmd REFRESH COLLATION VERSION, or build PostgreSQL with the right library version.
Upgrading database gvmd...
WARNING:  database "gvmd" has a collation version mismatch
DETAIL:  The database was created using collation version 2.36, but the operating system provides version 2.37.
HINT:  Rebuild all objects in this database that use the default collation and run ALTER DATABASE gvmd REFRESH COLLATION VERSION, or build PostgreSQL with the right library version.
Fixing hardcoded library paths for stored procedures...
WARNING:  database "postgres" has a collation version mismatch
DETAIL:  The database was created using collation version 2.36, but the operating system provides version 2.37.
HINT:  Rebuild all objects in this database that use the default collation and run ALTER DATABASE postgres REFRESH COLLATION VERSION, or build PostgreSQL with the right library version.
Upgrading database postgres...
WARNING:  database "postgres" has a collation version mismatch
DETAIL:  The database was created using collation version 2.36, but the operating system provides version 2.37.
HINT:  Rebuild all objects in this database that use the default collation and run ALTER DATABASE postgres REFRESH COLLATION VERSION, or build PostgreSQL with the right library version.
Stopping target cluster...
Stopping old cluster...
Disabling automatic startup of old cluster...
Starting upgraded cluster on port 5432...
Running finish phase upgrade hook scripts ...
vacuumdb: processing database "gvmd": Generating minimal optimizer statistics (1 target)
vacuumdb: processing database "postgres": Generating minimal optimizer statistics (1 target)
vacuumdb: processing database "template1": Generating minimal optimizer statistics (1 target)
vacuumdb: processing database "gvmd": Generating medium optimizer statistics (10 targets)
vacuumdb: processing database "postgres": Generating medium optimizer statistics (10 targets)
vacuumdb: processing database "template1": Generating medium optimizer statistics (10 targets)
vacuumdb: processing database "gvmd": Generating default (full) optimizer statistics
vacuumdb: processing database "postgres": Generating default (full) optimizer statistics
vacuumdb: processing database "template1": Generating default (full) optimizer statistics

Success. Please check that the upgraded cluster works. If it does,
you can remove the old cluster with
    pg_dropcluster 15 main

Ver Cluster Port Status Owner    Data directory              Log file
15  main    5433 down   postgres /var/lib/postgresql/15/main /var/log/postgresql/postgresql-15-main.log
Ver Cluster Port Status Owner    Data directory              Log file
16  main    5432 online postgres /var/lib/postgresql/16/main /var/log/postgresql/postgresql-16-main.log

root@pentest:~# pg_dropcluster 15 main

root@pentest:~# pg_lsclusters
Ver Cluster Port Status Owner    Data directory              Log file
16  main    5432 online postgres /var/lib/postgresql/16/main /var/log/postgresql/postgresql-16-main.log
backports debian
- Getestet auf Debian Buster am Beispiel des Pakets „wireguard“
Add backports to your /etc/apt/sources.list
    deb http://deb.debian.org/debian buster-backports main

root@mrGatekeeper:~# apt-get update
Get:1 http://security.debian.org buster/updates InRelease [65.4 kB]
Get:2 http://deb.debian.org/debian buster-backports InRelease [46.7 kB]
Hit:3 http://ftp.at.debian.org/debian buster InRelease
Get:4 http://ftp.at.debian.org/debian buster-updates InRelease [49.3 kB]
Get:5 http://security.debian.org buster/updates/main Sources [119 kB]
Get:6 http://security.debian.org buster/updates/main amd64 Packages [197 kB]
Get:7 http://deb.debian.org/debian buster-backports/main Sources [261 kB]
Get:8 http://deb.debian.org/debian buster-backports/main amd64 Packages [301 kB]
Get:9 http://deb.debian.org/debian buster-backports/main Translation-en [234 kB]
Fetched 1,273 kB in 1s (925 kB/s)
Reading package lists... Done
root@mrGatekeeper:~# apt-get -t buster-backports install wireguard
webcam linux check
- Getestet auf Kali linux / d.h. sollte auch für Debian/Ubuntu passen
urnilxfgbez@mrWhiteGhost:~$  sudo apt-get install v4l-utils


root@mrWhiteGhost:/home/urnilxfgbez# v4l2-ctl --list-devices
USB  Live camera: USB  Live cam (usb-0000:00:14.0-3):
        /dev/video0
        /dev/video1
        /dev/video2
        /dev/video3
        /dev/media0

HP HD Webcam: HP HD Webcam (usb-0000:00:14.0-7):
        /dev/video4
        /dev/video5
        /dev/media


urnilxfgbez@mrWhiteGhost:~$  sudo apt install ffmpeg
urnilxfgbez@mrWhiteGhost:~$  ffplay /dev/video0

urnilxfgbez@mrWhiteGhost:~$ cheese --device=/dev/video0
libreoffice Inhaltsverzeichnis mit Nummerierungen
- Beispiel von libreoffice.org: 14880059454992714.odt - Schlüssel Tools → Chapter Numbering
You need to use multiple levels of headings to achieve what you need. Use Heading 2 for your sub-chapters. And use Outline Numbering feature to establish proper multi-level numbering. Only then will you have proper ToC.

EDIT: here is the example file and steps:

    Create new Writer document.
    Tools->Outline Numbering...->Numbering tab->check that each level is assigned its respective Heading N paragraph style;Level 1-10->Number:1,2,3,...; Show sublevels: 10.
    Insert->Table of Contents and Index->Table of Contents, Index or Bibliography...
    Type tab: Type->Table of Contents; adjust Title
    Entries tab: Level 2->put cursor to the left of LS->click Tab Stop button->adjust Tab stop position (e.g., 15 mm) -> close dialog using OK
    Below the inserted ToC, add paragraphs "A title", "A sub-chapter", "Another sub-chapter", and "Another main chapter", with paragraph styles Heading 1, Heading 2, Heading 2, Heading 1.
    Right-click on ToC, and select Update Index.

You will have 2nd level indented by 20 mm, because of Tab in 2nd level set above, and Contents 2 paragraph style having its own indent. You may adjust both, or remove one of them or both. You may remove numbering in ToC's Entries.
xmpp/jabber server + web chat
- Ziel des Projekts:
- Eine autarke Kommunikationsinfrastruktur schaffen ohne Abhängigkeiten zu großen Anbietern wie zB: Microsoft oder Slack
- System könnte auch im LAN/WLAN (Mesh) betrieben werden mit einer Vielzahl an WLAN Nodes / in diesem Beispiel liegt der Webserver im Netz bei einem kleinen Anbieter und Zertifikate von Let's Encrypt werden genommen
- Ein Browser muss für die Kommunikation ausreichen - es sollen auf den Endgeräten keine Programme installiert werden müssen
Prosody XMPP Server Installation
- Getestet auf Debian Stretch (9)
- 2 Varianten - einmal ausschließlich authentifizierte Benutzer und einmal anonyme Benutzer die den „Hostnamen“ zum Chat wissen müssen
- Zertifikat für virtuellen Host „chat.pannoniait.at“ kommt von Let's Encrypt über den certbot (certbot certonly –webroot –webroot-path /var/www/ -d chat.pannoniait.at )
- Achtung Internal_plain speichert die Zertifikate im Plaintext unter /var/lib/prosody
apt-get install prosody
- root@island:/etc/prosody# grep -v ^[\-] /etc/prosody/prosody.cfg.lua
admins = { "christian.czeczil@chat.pannoniait.at" }


modules_enabled = {

	-- Generally required
		"roster"; -- Allow users to have a roster. Recommended ;)
		"saslauth"; -- Authentication for clients and servers. Recommended if you want to log in.
		"tls"; -- Add support for secure TLS on c2s/s2s connections
		"dialback"; -- s2s dialback support
		"disco"; -- Service discovery

	-- Not essential, but recommended
		"private"; -- Private XML storage (for room bookmarks, etc.)
		"vcard"; -- Allow users to set vCards


	-- HTTP modules
		"bosh"; -- Enable BOSH clients, aka "Jabber over HTTP"
		"http_files"; -- Serve static files from a directory over HTTP

		-- Other specific functionality
		"posix"; -- POSIX functionality, sends server to background, enables syslog, etc.
};

modules_disabled = {
	-- "offline"; -- Store offline messages
	-- "c2s"; -- Handle client connections
	-- "s2s"; -- Handle server-to-server connections
};

allow_registration = false;


daemonize = true;

pidfile = "/var/run/prosody/prosody.pid";

cross_domain_bosh = true
consider_bosh_secure = true

ssl = {
	key = "/etc/prosody/certs/privkey.pem";
	certificate = "/etc/prosody/certs/fullchain.pem";
	dhparam = "/etc/prosody/certs/dh2048.pem";
	options = {
        "no_ticket",
        "no_compression",
        "cipher_server_preference",
        "single_dh_use",
        "single_ecdh_use",
        "no_sslv2",
        "no_sslv3"
	};
    ciphers = "ECDHE-RSA-AES256-SHA:DHE-RSA-AES256-SHA:DHE-DSS-AES256-SHA:DHE-RSA-AES128-SHA:DHE-DSS-AES128-SHA;";
}


c2s_require_encryption = true

s2s_secure_auth = false

authentication = "internal_plain"

log = {
	-- Log files (change 'info' to 'debug' for debug logs):
	info = "/var/log/prosody/prosody.log";
	error = "/var/log/prosody/prosody.err";
	-- Syslog:
	{ levels = { "error" }; to = "syslog";  };
}


VirtualHost "chat.pannoniait.at"

Component "conference.chat.pannoniait.at" "muc"
name = "All People should be here"
restrict_room_creation = true
max_history_messages = 20


Include "conf.d/*.cfg.lua"
- Benutzer anlegen für chat.pannoniait.at Namespace:
prosodyctl adduser christian.czeczil@chat.pannoniait.at
- Benutzer Passwort ändern:
prosodyctl passwd christian.czeczil@chat.pannoniait.at
- Vhost ohne Authentifizierung für „Chats“ - /etc/prosody/conf.d/123random.pannoniait.at.cfg.lua
VirtualHost "123random.pannoniait.at"
    authentication = "anonymous"
    Component "conference.123random.pannoniait.at" "muc"
    name = "All Anonymous People should be here"
    restrict_room_creation = true
    max_history_messages = 20
Converse Client Web Chat Installation
- Version 6 - heruntergeladen von https://github.com/conversejs/converse.js/releases (converse.js-6.0.1.tgz)
Authentifizierte Benutzer
- cat /etc/apache2/sites-enabled/chat.pannoniait.at.conf
<IfModule mod_ssl.c>
	<VirtualHost *:443>
		ServerAdmin support@pannoniait.at
                ServerName chat.pannoniait.at

		DocumentRoot /var/www/chat

        <Directory /var/www/chat>
                Options -Indexes
                AllowOverride None
        </Directory>


		#LogLevel info ssl:warn

		ErrorLog ${APACHE_LOG_DIR}/chat.pannoniait.at-error.log
		CustomLog ${APACHE_LOG_DIR}/chat.pannoniait.at-access.log combined

		SSLEngine on

		SSLCertificateFile	/etc/letsencrypt/live/chat.pannoniait.at/fullchain.pem
		SSLCertificateKeyFile /etc/letsencrypt/live/chat.pannoniait.at/privkey.pem


		<FilesMatch "\.(cgi|shtml|phtml|php)$">
				SSLOptions +StdEnvVars
		</FilesMatch>

		BrowserMatch "MSIE [2-6]" \
				nokeepalive ssl-unclean-shutdown \
				downgrade-1.0 force-response-1.0
		# MSIE 7 and newer should be able to use keepalive
		BrowserMatch "MSIE [17-9]" ssl-unclean-shutdown


	</VirtualHost>
</IfModule>

# vim: syntax=apache ts=4 sw=4 sts=4 sr noet
- Das dist Verzeichnis aus dem tar.gz Download von githab 1:1 entpacken
- ls -al /var/www/chat/
total 12
drwxr-xr-x 3 root root   34 Mar 20 10:52 .
drwxr-xr-x 9 root root 4096 Mar 18 13:46 ..
drwxr-xr-x 6 root root 4096 Mar 17 19:52 dist
-rw-r--r-- 1 root root  833 Mar 20 10:52 index.html
- root@island:/var/www/chat# cat /var/www/chat/index.html
<html>
	<head>

        <link type="text/css" rel="stylesheet" media="screen" href="https://chat.pannoniait.at/dist/converse.min.css" />
	 <script src="https://chat.pannoniait.at/dist/converse.min.js"></script>

	</head>
	<body>

                       <div class="converse-container">
	                    <div id="conversejs"></div>
	              </div>


	</body>
<script>
    converse.initialize({
        bosh_service_url: 'https://chat.pannoniait.at:5281/http-bind',
        show_controlbox_by_default: true,
        allow_list_rooms: true,
	view_mode: 'embedded',
	default_domain: 'chat.pannoniait.at',
	auto_join_rooms: [ 'people@conference.chat.pannoniait.at' ,],
        auto_away: 180,
        auto_xa: 600,
        auto_reconnect: true,
        sticky_controlbox: true,
	omemo_default:true,
    });
</script>


</html>

- „Raum“ People für alle die einen Account haben:

Anonyme Benutzer ohne Authentifizierung
- cat /etc/apache2/sites-enabled/123random.pannoniait.at.conf
<IfModule mod_ssl.c>
	<VirtualHost *:443>
		ServerAdmin support@pannoniait.at
                ServerName 123random.pannoniait.at

		DocumentRoot /var/www/123random

        <Directory /var/www/123random>
                Options -Indexes
                AllowOverride None
        </Directory>

		#LogLevel info ssl:warn

		ErrorLog ${APACHE_LOG_DIR}/123random.pannoniait.at-error.log
		CustomLog ${APACHE_LOG_DIR}/123random.pannoniait.at-access.log combined

		SSLEngine on

		SSLCertificateFile	/etc/letsencrypt/live/123random.pannoniait.at/fullchain.pem
		SSLCertificateKeyFile /etc/letsencrypt/live/123random.pannoniait.at/privkey.pem


		<FilesMatch "\.(cgi|shtml|phtml|php)$">
				SSLOptions +StdEnvVars
		</FilesMatch>

		BrowserMatch "MSIE [2-6]" \
				nokeepalive ssl-unclean-shutdown \
				downgrade-1.0 force-response-1.0
		# MSIE 7 and newer should be able to use keepalive
		BrowserMatch "MSIE [17-9]" ssl-unclean-shutdown


	</VirtualHost>
</IfModule>

# vim: syntax=apache ts=4 sw=4 sts=4 sr noet
- root@island:/var/www/chat# cat /var/www/123random/index.html
<html>
	<head>

        <link type="text/css" rel="stylesheet" media="screen" href="https://123random.pannoniait.at/dist/converse.min.css" />
	 <script src="https://123random.pannoniait.at/dist/converse.min.js"></script>

	</head>
	<body>

                       <div class="converse-container">
	                    <div id="conversejs"></div>
	              </div>


	</body>
<script>
    converse.initialize({
        bosh_service_url: 'https://chat.pannoniait.at:5281/http-bind',
	view_mode: 'embedded',
	singleton: true,
	authentication: 'anonymous',
	auto_login: true,
	auto_join_rooms: [ 'anonymous@conference.123random.pannoniait.at' ,],
        jid: '123random.pannoniait.at',
        notify_all_room_messages: [ 'anonymous@conference.123random.pannoniait.at',],
    });
</script>


Jitsi-Meet
- Open Source Video Conferencing Möglichkeit zum Selber hosten oder https://meet.jit.si/ Meeting erstellen
- Vhost unter https://video.pannoniait.at/
- Installation - Achtung sehr viel Auto Magic beim Installer
 echo 'deb https://download.jitsi.org stable/' >> /etc/apt/sources.list.d/jitsi-stable.list
 wget -qO -  https://download.jitsi.org/jitsi-key.gpg.key | apt-key add -
 apt-get install  jitsi-meet
- Angelegte Konfiguration:
- root@island:~# cat /etc/apache2/sites-enabled/video.pannoniait.at.conf
<VirtualHost *:443>

  ServerName video.pannoniait.at

  SSLProtocol TLSv1.2
  SSLEngine on
  SSLProxyEngine on
  SSLCertificateFile /etc/letsencrypt/live/video.pannoniait.at/fullchain.pem
  SSLCertificateKeyFile /etc/letsencrypt/live/video.pannoniait.at/privkey.pem
  SSLCipherSuite "EECDH+ECDSA+AESGCM:EECDH+aRSA+AESGCM:EECDH+ECDSA+SHA256:EECDH+aRSA+SHA256:EECDH+ECDSA+SHA384:EECDH+ECDSA+SHA256:EECDH+aRSA+SHA384:EDH+aRSA+AESGCM:EDH+aRSA+SHA256:EDH+aRSA:EECDH:!aNULL:!eNULL:!MEDIUM:!LOW:!3DES:!MD5:!EXP:!PSK:!SRP:!DSS:!RC4:!SEED"
  SSLHonorCipherOrder on
  Header set Strict-Transport-Security "max-age=31536000"

  DocumentRoot "/usr/share/jitsi-meet"
  <Directory "/usr/share/jitsi-meet">
    Options Indexes MultiViews Includes FollowSymLinks
    AddOutputFilter Includes html
    AllowOverride All
    Order allow,deny
    Allow from all
  </Directory>

  ErrorDocument 404 /static/404.html

  Alias "/config.js" "/etc/jitsi/meet/video.pannoniait.at-config.js"
  <Location /config.js>
    Require all granted
  </Location>

  Alias "/external_api.js" "/usr/share/jitsi-meet/libs/external_api.min.js"
  <Location /external_api.js>
    Require all granted
  </Location>

  ProxyPreserveHost on
  ProxyPass /http-bind http://localhost:5280/http-bind/
  ProxyPassReverse /http-bind http://localhost:5280/http-bind/

  RewriteEngine on
  RewriteRule ^/([a-zA-Z0-9]+)$ /index.html
</VirtualHost>
- Prosody Magic - Auth von anonymous auf internal_plain geändert
- root@island:~# cat /etc/prosody/conf.d/video.pannoniait.at.cfg.lua
-- Plugins path gets uncommented during jitsi-meet-tokens package install - that's where token plugin is located
--plugin_paths = { "/usr/share/jitsi-meet/prosody-plugins/" }

VirtualHost "video.pannoniait.at"
        -- enabled = false -- Remove this line to enable this host
	--2020-03-26 cc: internal disabled
	--authentication = "anonymous"
	authentication = "internal_plain"

	--
        -- Properties below are modified by jitsi-meet-tokens package config
        -- and authentication above is switched to "token"
        --app_id="example_app_id"
        --app_secret="example_app_secret"
        -- Assign this host a certificate for TLS, otherwise it would use the one
        -- set in the global section (if any).
        -- Note that old-style SSL on port 5223 only supports one certificate, and will always
        -- use the global one.
        ssl = {
                key = "/etc/prosody/certs/video.pannoniait.at.key";
                certificate = "/etc/prosody/certs/video.pannoniait.at.crt";
        }
        -- we need bosh
        modules_enabled = {
            "bosh";
            "pubsub";
            "ping"; -- Enable mod_ping
        }

        c2s_require_encryption = false

Component "conference.video.pannoniait.at" "muc"
    storage = "null"
    --modules_enabled = { "token_verification" }
admins = { "focus@auth.video.pannoniait.at" }

Component "jitsi-videobridge.video.pannoniait.at"
    component_secret = "1239sdg232ksd"

VirtualHost "auth.video.pannoniait.at"
    ssl = {
        key = "/etc/prosody/certs/auth.video.pannoniait.at.key";
        certificate = "/etc/prosody/certs/auth.video.pannoniait.at.crt";
    }
    authentication = "internal_plain"

Component "focus.video.pannoniait.at"
    component_secret = "4jl3409sdf"
- Meeting erstellen auf https://video.pannoniait.at/
- Achtung Bug scheinbar im Firefox bzw. Code - es kommt nicht zur Authentifizierung wie zB: im Google Chrome


RPI - Raspberry PI
rpi GPIO Belegung

rpi3 Backup u. Restore / Migration
- Backup von „firewall“ über SSH
- Restore auf SD Karte die über Adapter an lokalem Notebook hängt
Backup

1. dump vom ext Dateisystem auf dem bestehenden RPI3

root@firewall:~# ssh root@192.168.1.2 "dump -0 / -f - " | gzip --best > /tmp/dump_temperature.dump.gz
debug1: client_input_channel_open: ctype auth-agent@openssh.com rchan 2 win 65536 max 16384
debug1: channel 1: new [authentication agent connection]
debug1: confirm auth-agent@openssh.com
  DUMP: Date of this level 0 dump: Mon Feb 15 10:11:18 2021
  DUMP: Dumping /dev/mmcblk0p2 (/) to standard output
  DUMP: Label: rootfs
  DUMP: Writing 10 Kilobyte records
  DUMP: mapping (Pass I) [regular files]
  DUMP: mapping (Pass II) [directories]
  DUMP: estimated 1477428 blocks.
  DUMP: Volume 1 started with block 1 at: Mon Feb 15 10:11:42 2021
  DUMP: dumping (Pass III) [directories]
  DUMP: dumping (Pass IV) [regular files]
  DUMP: Volume 1 completed at: Mon Feb 15 10:15:46 2021
  DUMP: Volume 1 1476770 blocks (1442.16MB)
  DUMP: Volume 1 took 0:04:04
  DUMP: Volume 1 transfer rate: 6052 kB/s
  DUMP: 1476770 blocks (1442.16MB)
  DUMP: finished in 244 seconds, throughput 6052 kBytes/sec
  DUMP: Date of this level 0 dump: Mon Feb 15 10:11:18 2021
  DUMP: Date this dump completed:  Mon Feb 15 10:15:46 2021
  DUMP: Average transfer rate: 6052 kB/s
  DUMP: DUMP IS DONE
debug1: channel 1: FORCE input drain
debug1: channel 1: free: authentication agent connection, nchannels 2


2. DD Dump von Boot Partition


ssh root@192.168.1.2 "dd if=/dev/mmcblk0p1 bs=1M" | gzip --best > /tmp/dump_dd_mmcblk0p1.img.gz


3. sfdisk Partition table von SD Karte abspeichern - Beide SD Karten sind 32GB von Samsung (High Endurance)

https://linuxaria.com/pills/how-to-clone-the-partition-table-on-linux-with-sfdisk

For example, assuming that our disk is /dev/sda , to save the partition table we can give the command:
sfdisk -d /dev/sda > partitions.txt
while to restore it, assuming that the destination disk is /dev/sdb and we want to clone the partition table, we can use the command
sfdisk /dev/sdb < partitions.txt

sfdisk /dev/mmcblk0 < ta ble


ssh root@192.168.1.2 "sfdisk -d /dev/mmcblk0" > /tmp/dump_sfdisk_table


---

Restore - Neue SSD über Adapter angesteckt / erkannt als /dev/sda

root@mrWhiteGhost:/home/urnilxfgbez/Desktop/rpi-temperature# sfdisk /dev/sda < dump_sfdisk_table
Checking that no-one is using this disk right now ... OK

Disk /dev/sda: 29.8 GiB, 32010928128 bytes, 62521344 sectors
Disk model: MassStorageClass
Units: sectors of 1 * 512 = 512 bytes
Sector size (logical/physical): 512 bytes / 512 bytes
I/O size (minimum/optimal): 512 bytes / 512 bytes
Disklabel type: dos
Disk identifier: 0x00000000

Old situation:

Device     Boot Start      End  Sectors  Size Id Type
/dev/sda1        8192 62521343 62513152 29.8G  c W95 FAT32 (LBA)

>>> Script header accepted.
>>> Script header accepted.
>>> Script header accepted.
>>> Script header accepted.
>>> Created a new DOS disklabel with disk identifier 0xeee62714.
/dev/sda1: Created a new partition 1 of type 'W95 FAT32 (LBA)' and of size 256 MiB.
Partition #1 contains a vfat signature.
/dev/sda2: Created a new partition 2 of type 'Linux' and of size 29.5 GiB.
/dev/sda3: Done.

New situation:
Disklabel type: dos
Disk identifier: 0xeee62714

Device     Boot  Start      End  Sectors  Size Id Type
/dev/sda1         8192   532479   524288  256M  c W95 FAT32 (LBA)
/dev/sda2       532480 62333951 61801472 29.5G 83 Linux

The partition table has been altered.
Calling ioctl() to re-read partition table.
Syncing disks.

root@mrWhiteGhost:/home/urnilxfgbez/Desktop/rpi-temperature# zcat dump_dd_mmcblk0p1.img.gz > /dev/sda1

root@mrWhiteGhost:/home/urnilxfgbez/Desktop/rpi-temperature# mkfs.ext4 -L rootfs /dev/sda2
mke2fs 1.45.6 (20-Mar-2020)
Creating filesystem with 7725184 4k blocks and 1933312 inodes
Filesystem UUID: 4f55ee7d-abac-46cd-89fb-a2bccb273fab
Superblock backups stored on blocks:
	32768, 98304, 163840, 229376, 294912, 819200, 884736, 1605632, 2654208,
	4096000

Allocating group tables: done
Writing inode tables: done
Creating journal (32768 blocks): done
Writing superblocks and filesystem accounting information: done

root@mrWhiteGhost:/home/urnilxfgbez/Desktop/rpi-temperature# mount /dev/sda2 /mnt/tmp/
root@mrWhiteGhost:/home/urnilxfgbez/Desktop/rpi-temperature# gunzip dump_temperature.dump.gz

root@mrWhiteGhost:/home/urnilxfgbez/Desktop/rpi-temperature# cd /mnt/tmp/
root@mrWhiteGhost:/mnt/tmp# restore rf /home/urnilxfgbez/Desktop/rpi-temperature/dump_temperature.dump
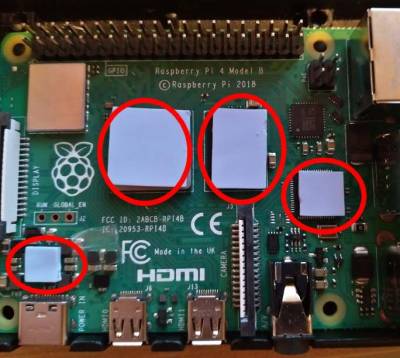
rpi4 passive Kühlung
- Achtung RPI4 wird sehr heißt z.T. >70 Grad
- Aktiv Lüfter ist sehhr laut
- Aluminiumgehäuse https://www.amazon.de/gp/product/B07ZVJDRF3/ref=ppx_yo_dt_b_asin_title_o02_s00?ie=UTF8&psc=1 zeigt erstaunliche Kühlleistung z.T. 40-50 Grad

rpi3 temperature
  102  apt-get install build-essential python-dev
  103  apt-get install build-essential python-dev
  104  cd /usr/lib/nagios/plugins
  105  wget https://raw.githubusercontent.com/Finn10111/nagios-plugins/master/check_dht/check_dht.py
  106  cd /usr/local/src
  109  apt-get install git
  110  git clone https://github.com/adafruit/Adafruit_Python_DHT.git
  111  cd Adafruit_Python_DHT
  122  apt-get install python-setuptools
  123  python setup.py install
  124  chmod o+x /usr/lib/nagios/plugins/check_dht.py
  133  /usr/lib/nagios/plugins/check_dht.py -s 22 -p 2 -w 27,65 -c 30,75
  134  apt-get install sudo
  135  visudo
  136  su nagios -s /bin/bash
  137  vim /etc/nagios/nrpe.cfg
  138  /etc/init.d/nagios-nrpe-server reload
rpi4 temperature
- Gleicher Ansatz wie bei RPI3 funktioniert nicht mehr
- Installation von adafruit-circuitpython-dht:
  194  apt-get install python3 python3-pip python3-rpi.gpio libgpiod2 -y
  195  pip3 install adafruit-circuitpython-dht
- Anpassen von /usr/lib/nagios/plugins/check_dht.py auf python3 u. adafruit_dht / Daten PIN ist GPIO 2 - siehe: https://www.elektronik-kompendium.de/sites/raspberry-pi/2002191.htm quick and dirty / Hin und wieder wirft er eine Exception beim lesen der Sensorwerte deshalb der erneute Aufruf von main mit dem try catch block
#!/usr/bin/python3
#
# This program is free software: you can redistribute it and/or modify
# it under the terms of the GNU General Public License as published by
# the Free Software Foundation, either version 3 of the License, or
# (at your option) any later version.
#
# This program is distributed in the hope that it will be useful,
# but WITHOUT ANY WARRANTY; without even the implied warranty of
# MERCHANTABILITY or FITNESS FOR A PARTICULAR PURPOSE.  See the
# GNU General Public License for more details.
#
# You should have received a copy of the GNU General Public License
# along with this program.  If not, see <http://www.gnu.org/licenses/>.
#
# Simple nagios plugin to check temperature and humidity
# with a DHT22 one wire bus sensor or similar.
# Basically it only calls the Adafruit DHT driver and reads
# out the values.
# You can get the Adafruit DHT module at GitHub:
# https://github.com/adafruit/Adafruit_Python_DHT
#
# This plugin needs to be run with sudo. For getting this working with
# nagios, nrpe or something similiar, run visudo or add a file in
# /etc/sudoers.d/ an add for example this line:
# nagios ALL=(ALL) NOPASSWD: /usr/local/lib/nagios/plugins/check_dht.py

import re
import subprocess
import time
import sys
import argparse
import adafruit_dht
import board


def main():
    try:
      parser = argparse.ArgumentParser(description='Nagios plugin to check DHT sensors using Adafruit DHT driver')
      parser.add_argument('-s', '--sensor', required=False, help='Sensor to use (supported sensors: 11, 22, 2302)', default='22')
      parser.add_argument('-p', '--pin', required=False, help='GPIO pin number (example: -p 4)', default='4')
      parser.add_argument('-w', '--warning', required=False, help='warning threshold for temperature and humidity (example: -w 25,80)', default='25,80')
      parser.add_argument('-c', '--critical', required=False, help='warning threshold for temperature and humidity (example: -c 30,85)', default='30,85')
      args = parser.parse_args()

      sensor = args.sensor
      #Predefined position of PIN
      pin = 'D2'
      warningTemp = args.warning.split(',')[0]
      warningHum = args.warning.split(',')[1]
      criticalTemp = args.critical.split(',')[0]
      criticalHum = args.critical.split(',')[1]

      dhtboard = getattr(board,pin)
      dhtDevice = adafruit_dht.DHT22(dhtboard,use_pulseio=False)

      hum, temp = dhtDevice.humidity, dhtDevice.temperature
    except RuntimeError:
      time.sleep(5)
      main()
    if not re.match("\d+\.\d+", str(temp)):
        exitCheck(3, 'could not read temperature and humidity values')
    hum = float(round(hum,1))
    temp = float(round(temp,1))
    status = 0

    msg = "Temperature: %s Humidity: %s | temp=%s;%s;%s hum=%s;%s;%s" % (temp, hum, temp, warningTemp, criticalTemp, hum, warningHum, criticalHum)
    # process thresholds
    if re.match('\d+:\d+', warningTemp):
        warningTempLow, warningTempHigh = warningTemp.split(':')
        if temp < float(warningTempLow) or temp > float(warningTempHigh):
            status = 1
    elif temp > float(warningTemp):
            status = 1
    if re.match('\d+:\d+', warningHum):
        warningHumLow, warningHumHigh = warningHum.split(':')
        if hum < float(warningHumLow) or hum > float(warningHumHigh):
            status = 1
    elif hum > float(warningHum):
            status = 1
    if re.match('\d+:\d+', criticalTemp):
        criticalTempLow, criticalTempHigh = criticalTemp.split(':')
        if temp < float(criticalTempLow) or temp > float(criticalTempHigh):
            status = 2
    elif temp > float(criticalTemp):
            status = 2
    if re.match('\d+:\d+', criticalHum):
        criticalHumLow, criticalHumHigh = criticalHum.split(':')
        if hum < float(criticalHumLow) or hum > float(criticalHumHigh):
            status = 2
    elif hum > float(criticalHum):
            status = 2

    exitCheck(status, msg)


def exitCheck(status, msg=''):
    if status == 0:
        msg = 'OK - ' + msg
    elif status == 1:
        msg = 'WARNING - ' + msg
    elif status == 2:
        msg = 'CRITICAL - ' + msg
    elif status == 3:
        msg = 'UNKNOWN - ' + msg
    print (msg)
    sys.exit(status)


if __name__ == '__main__':
    sys.exit(main())
rpi Outside temperature 433MHZ
- Ich möchte die Werte von Temperatursensoren im Außenbereich erhalten und aufzeichnen
- Ursprünglich wollte ich alles im nagios user Kontext laufen lassen Logik im User Space laufen lassen / Aufzeichnungsdatei kann über Cron Job als Root geleert werden
- RTL-433 bauen - Auszug aus Scratchpad(Raspbian buster/rpi3):
apt-get install libtool libusb-1.0.0-dev librtlsdr-dev
 git clone https://github.com/merbanan/rtl_433.git
cmake ./
make
make install
-> /usr/local/bin/rtl_433
- Daemon für rtl_433 Service /lib/systemd/system/rtl-daemon.service
[Unit]
Description=Read 433MHZ Temperature Sensors
Documentation=https://pannoniait.at
After=network.target

[Service]
Type=simple
ExecStart=/usr/local/bin/rtl_433 -F csv:/home/nagios/temp.txt

[Install]
WantedBy=multi-user.target
- Beispieldaten in /home/nagios/temp.txt
2023-04-26 08:18:15,,,LaCrosse-TX141THBv2,,210,0,1,12.300,CRC,,97,,,,,,,,,,,,,,,,,,,,,,,,,,,,,,,,,,,,,,,,,,,,,,,,,,,,,,,,,,,,,,,,,,,,,,,,,,,,,,,,,,,,,,,,,,,,,,,,,,,,,,,,,,,,,,,,,,,,,No,,,,,,,,,,,,,,,,,,,,,,,,,,,,,,,,,,,,,,,,,,,,,,,,,,,,,,,,,,,,,,,,,,,,,,,,,,,,,,,,,,,,,,,,,,,,,,,,,,,,,,,,,,,,,,,,,,,,,,,,,,,,,,,,,,,,,,,,,,,,,,,,,,,,,,,,,,,,,,,,,,,,,,,,,,,,,,,,,,,,,,,,,,,,,,,,,,,,,,,,,,,,,,,,,,,,,,,,,,,,,,,,,,,,,,,,,,,,,,,,,,,,,,,,,,,,,,,,,,,,,,,,,
2023-04-26 08:18:16,,,LaCrosse-TX141THBv2,,210,0,1,12.300,CRC,,97,,,,,,,,,,,,,,,,,,,,,,,,,,,,,,,,,,,,,,,,,,,,,,,,,,,,,,,,,,,,,,,,,,,,,,,,,,,,,,,,,,,,,,,,,,,,,,,,,,,,,,,,,,,,,,,,,,,,,No,,,,,,,,,,,,,,,,,,,,,,,,,,,,,,,,,,,,,,,,,,,,,,,,,,,,,,,,,,,,,,,,,,,,,,,,,,,,,,,,,,,,,,,,,,,,,,,,,,,,,,,,,,,,,,,,,,,,,,,,,,,,,,,,,,,,,,,,,,,,,,,,,,,,,,,,,,,,,,,,,,,,,,,,,,,,,,,,,,,,,,,,,,,,,,,,,,,,,,,,,,,,,,,,,,,,,,,,,,,,,,,,,,,,,,,,,,,,,,,,,,,,,,,,,,,,,,,,,,,,,,,,,
2023-04-26 08:18:58,,,Nexus-TH,,183,3,0,21.200,,,39,,,,,,,,,,,,,,,,,,,,,,,,,,,,,,,,,,,,,,,,,,,,,,,,,,,,,,,,,,,,,,,,,,,,,,,,,,,,,,,,,,,,,,,,,,,,,,,,,,,,,,,,,,,,,,,,,,,,,,,,,,,,,,,,,,,,,,,,,,,,,,,,,,,,,,,,,,,,,,,,,,,,,,,,,,,,,,,,,,,,,,,,,,,,,,,,,,,,,,,,,,,,,,,,,,,,,,,,,,,,,,,,,,,,,,,,,,,,,,,,,,,,,,,,,,,,,,,,,,,,,,,,,,,,,,,,,,,,,,,,,,,,,,,,,,,,,,,,,,,,,,,,,,,,,,,,,,,,,,,,,,,,,,,,,,,,,,,,,,,,,,,,,,,,,,,,,,,,,,,,,,,,,,,,,,,,,,,,,,,,,,
2023-04-26 08:19:05,,,LaCrosse-TX141THBv2,,210,0,1,12.400,CRC,,97,,,,,,,,,,,,,,,,,,,,,,,,,,,,,,,,,,,,,,,,,,,,,,,,,,,,,,,,,,,,,,,,,,,,,,,,,,,,,,,,,,,,,,,,,,,,,,,,,,,,,,,,,,,,,,,,,,,,,No,,,,,,,,,,,,,,,,,,,,,,,,,,,,,,,,,,,,,,,,,,,,,,,,,,,,,,,,,,,,,,,,,,,,,,,,,,,,,,,,,,,,,,,,,,,,,,,,,,,,,,,,,,,,,,,,,,,,,,,,,,,,,,,,,,,,,,,,,,,,,,,,,,,,,,,,,,,,,,,,,,,,,,,,,,,,,,,,,,,,,,,,,,,,,,,,,,,,,,,,,,,,,,,,,,,,,,,,,,,,,,,,,,,,,,,,,,,,,,,,,,,,,,,,,,,,,,,,,,,,,,,,,
2023-04-26 08:19:06,,,LaCrosse-TX141THBv2,,210,0,1,12.400,CRC,,97,,,,,,,,,,,,,,,,,,,,,,,,,,,,,,,,,,,,,,,,,,,,,,,,,,,,,,,,,,,,,,,,,,,,,,,,,,,,,,,,,,,,,,,,,,,,,,,,,,,,,,,,,,,,,,,,,,,,,No,,,,,,,,,,,,,,,,,,,,,,,,,,,,,,,,,,,,,,,,,,,,,,,,,,,,,,,,,,,,,,,,,,,,,,,,,,,,,,,,,,,,,,,,,,,,,,,,,,,,,,,,,,,,,,,,,,,,,,,,,,,,,,,,,,,,,,,,,,,,,,,,,,,,,,,,,,,,,,,,,,,,,,,,,,,,,,,,,,,,,,,,,,,,,,,,,,,,,,,,,,,,,,,,,,,,,,,,,,,,,,,,,,,,,,,,,,,,,,,,,,,,,,,,,,,,,,,,,,,,,,,,,
2023-04-26 08:19:55,,,LaCrosse-TX141THBv2,,210,0,1,12.400,CRC,,97,,,,,,,,,,,,,,,,,,,,,,,,,,,,,,,,,,,,,,,,,,,,,,,,,,,,,,,,,,,,,,,,,,,,,,,,,,,,,,,,,,,,,,,,,,,,,,,,,,,,,,,,,,,,,,,,,,,,,No,,,,,,,,,,,,,,,,,,,,,,,,,,,,,,,,,,,,,,,,,,,,,,,,,,,,,,,,,,,,,,,,,,,,,,,,,,,,,,,,,,,,,,,,,,,,,,,,,,,,,,,,,,,,,,,,,,,,,,,,,,,,,,,,,,,,,,,,,,,,,,,,,,,,,,,,,,,,,,,,,,,,,,,,,,,,,,,,,,,,,,,,,,,,,,,,,,,,,,,,,,,,,,,,,,,,,,,,,,,,,,,,,,,,,,,,,,,,,,,,,,,,,,,,,,,,,,,,,,,,,,,,,
2023-04-26 08:19:56,,,LaCrosse-TX141THBv2,,210,0,1,12.400,CRC,,97,,,,,,,,,,,,,,,,,,,,,,,,,,,,,,,,,,,,,,,,,,,,,,,,,,,,,,,,,,,,,,,,,,,,,,,,,,,,,,,,,,,,,,,,,,,,,,,,,,,,,,,,,,,,,,,,,,,,,No,,,,,,,,,,,,,,,,,,,,,,,,,,,,,,,,,,,,,,,,,,,,,,,,,,,,,,,,,,,,,,,,,,,,,,,,,,,,,,,,,,,,,,,,,,,,,,,,,,,,,,,,,,,,,,,,,,,,,,,,,,,,,,,,,,,,,,,,,,,,,,,,,,,,,,,,,,,,,,,,,,,,,,,,,,,,,,,,,,,,,,,,,,,,,,,,,,,,,,,,,,,,,,,,,,,,,,,,,,,,,,,,,,,,,,,,,,,,,,,,,,,,,,,,,,,,,,,,,,,,,,,,,
2023-04-26 08:19:59,,,Springfield-Soil,1,70,3,1,2.400,CHECKSUM,,,,,,,,,,,,,,,,,,,,,,,,,,,,,,,,,,,,,,,,,,,,,,,,,,,,,,,,,,,,,,,,,,,,,,,,,,,,,,,,,,,,,,,,,,,,,,,,,MANUAL,80,,,,,,,,,,,,,,,,,,,,,,,,,,,,,,,,,,,,,,,,,,,,,,,,,,,,,,,,,,,,,,,,,,,,,,,,,,,,,,,,,,,,,,,,,,,,,,,,,,,,,,,,,,,,,,,,,,,,,,,,,,,,,,,,,,,,,,,,,,,,,,,,,,,,,,,,,,,,,,,,,,,,,,,,,,,,,,,,,,,,,,,,,,,,,,,,,,,,,,,,,,,,,,,,,,,,,,,,,,,,,,,,,,,,,,,,,,,,,,,,,,,,,,,,,,,,,,,,,,,,,,,,,,,,,,,,,,,,,,,,,,,,,,
2023-04-26 08:20:17,,,Nexus-TH,,183,3,0,21.300,,,39,,,,,,,,,,,,,,,,,,,,,,,,,,,,,,,,,,,,,,,,,,,,,,,,,,,,,,,,,,,,,,,,,,,,,,,,,,,,,,,,,,,,,,,,,,,,,,,,,,,,,,,,,,,,,,,,,,,,,,,,,,,,,,,,,,,,,,,,,,,,,,,,,,,,,,,,,,,,,,,,,,,,,,,,,,,,,,,,,,,,,,,,,,,,,,,,,,,,,,,,,,,,,,,,,,,,,,,,,,,,,,,,,,,,,,,,,,,,,,,,,,,,,,,,,,,,,,,,,,,,,,,,,,,,,,,,,,,,,,,,,,,,,,,,,,,,,,,,,,,,,,,,,,,,,,,,,,,,,,,,,,,,,,,,,,,,,,,,,,,,,,,,,,,,,,,,,,,,,,,,,,,,,,,,,,,,,,,,,,,,,,
- Durchschnittstemperatur berechnen: /usr/lib/nagios/plugins/calcTemperature.sh
- ACHTUNG bei Location - hatte hier /tmp/ - systemd macht hier /tmp magic und der Wert ist über den NRPE Aufruf nicht lesbar
#!/bin/bash


TEMP_LOCATION="/home/nagios/temp.txt"


function bailout
{
	echo -e "$1" 1>&2
	echo -e "$1"
	exit 2
}


[[ -r $TEMP_LOCATION ]] || bailout "Cannot read $TEMP_LOCATION"


TEMP_AMOUNT=$(grep -P "(LaCrosse-TX141THBv2|Nexus-TH)" $TEMP_LOCATION | cut -d"," -f 9 | grep -P -o "[\-]{0,1}[0-9]+\.[0-9]{0,3}" |  wc -l)

if [[ $TEMP_AMOUNT > 1 ]] ; then

	AVERAGE_TEMP=$(grep -P "(LaCrosse-TX141THBv2|Nexus-TH)" $TEMP_LOCATION | cut -d"," -f 9 | grep -P -o "[\-]{0,1}[0-9]+\.[0-9]{0,3}" |  awk '{sum += $1} END {print sum}')

	READ_TEMP=$(echo "scale=2; $AVERAGE_TEMP / $TEMP_AMOUNT " | bc )

	echo "OK - Temperature is: $READ_TEMP | 'temp'=$READ_TEMP"

	echo > $TEMP_LOCATION
	exit 0

else
	bailout "Could not find Temperatures"

fi
- Nagios NRPE Server Konfiguration bzw. Command Deklaration:
command[check_outside_temp]=sudo /usr/lib/nagios/plugins/calcTemperature.sh
- NRPE Check über Monitoring Server /usr/lib/nagios/plugins/check_nrpe -H HOST -c check_outside_temp
OK - Temperature is: 14.58 | 'temp'=14.58
- Visuelle Integration ins Monitoring:

rpi pentest
- Image von Kali VPN Remote Tunnel / GVM Installation usw
- Für 8GB RPI4 wurde das 64Bit image verwendet : https://www.offensive-security.com/kali-linux-arm-images/
- Aufgrund von nicht vorhersehbarem Stromverlust / wenn ihn jemand austeckt wurde ein Read Only Root gewählt mit folgendem Skript: http://wiki.psuter.ch/doku.php?id=solve_raspbian_sd_card_corruption_issues_with_read-only_mounted_root_partition (achtung konvertieren dos2unix / label für root Partition rootfs)
rpi kiosk
- Anforderungen In diesem speziellen fall soll eine „Website“ aufgerufen werden die durch das Programm „Untis“ auf einem CIFS Share abgelegt wird / Die Website kann sich jedoch im Verlauf des Tages mehrmals ändern / Basissystem basiert auf Raspbian Default Image mit Desktop
- fstab Eintrag / CIFS Mount
//NAS_IP/SHARE_NAME /mnt/storage/external cifs credentials=/etc/samba/screen-reader,ro,auto,x-systemd.automount,x-systemd.requires=network-online.target 0 0
- screen-reader
username=USERNAME_SHARE
password=PASSWORD_SHARE
- Wird system gestartet führt er für pi Benutzer /etc/xdg/lxsession/LXDE-pi/autostart aus:
@unclutter --idle 2


@xset s off
@xset -dpms
@xset s noblank

@x11vnc -passwd PASSWD_RW_VNC -viewpasswd PASSWD_RO_VNC -forever -bg -display :0.0

@/usr/local/sbin/checkChanges.sh
- Hauptlogik liegt in /usr/local/sbin/checkChanges.sh
- Im wesentlichen checkt er in regelmäßigen Abständen ob sich Dateien unter /mnt/storage/external innerhalb der letzten Minute geändert haben / Wenn ja wartet er noch 5 Sekunden killt den vorhandenen chromium und ruft erneut chromium-browser –disable-application-cache –kiosk –app /mnt/storage/external/subst_001.htm auf
#!/bin/bash

MINUTES_PAST="1"
PATH_ROOT="/mnt/storage/external"
TMP_BLOCK="/tmp/check_changes_block"
FILES_FOUND="0"

export DISPLAY=":0.0"

function restartChromium
{
	pkill chromium
       chromium-browser --disable-application-cache --kiosk --app /mnt/storage/external/subst_001.htm &

}

[[ -f $TMP_BLOCK ]] && exit 2

export DISPLAY

touch $TMP_BLOCK

sleep 10s

chromium-browser --disable-application-cache --kiosk --app /mnt/storage/external/subst_001.htm &

while $(sleep 45s)
do

      FILES_FOUND=$(find $PATH_ROOT -type f -mmin -$MINUTES_PAST | wc -l)

    if [ $FILES_FOUND != "0" ]
    then

	    sleep 5s
            echo "restartin chromium .. changes detected"
	    restartChromium

    fi


done


rm $TMP_BLOCK
btrfs
- bei Pannonia IT produktiv im Einsatz seit Debian Jessie mit backports Kernel (4.6)
Anlegen
- Durchgeführt auf Debian stretch 4.9er Kernel
apt-get install btrfs-tools
mkfs.btrfs -L storage /dev/vdb

fstab:
/dev/vdb /mnt/storage  btrfs  defaults 	0	2

mount /dev/vdb
btrfs quota enable /mnt/storage/
cd /mnt/storage
btrfs subvolume create shared
Pflege
- Getestet auf Debian jessie mit 4.9er Kernel u. buster mit 4.19 / 5.2er Kernel
- BTRFS Metadaten prüfen / Checksummen überprüfen
btrfs scrub start -B DEVICE
- btrfsQuota.sh - von offizieller Seite - https://btrfs.wiki.kernel.org/index.php/Main_Page
#!/bin/bash

[[ ! -d $1 ]] && { echo Please pass mountpoint as first argument >&2 ;
exit 1 ; }

while read x i x g x x l x p
do
	    volName[i]=$p
    done < <(btrfs subvolume list $1)

    while read g r e f
    do
	        [[ -z $name ]] && echo -e "subvol\tqgroup\ttotal\tunshared\tmaximum"
		    group=${g##*/}
		        [[ ! -z ${volName[group]} ]] && name=${volName[group]} || name='(unknown)'
			    echo $name $g $r $e $f
		    done < <(btrfs qgroup show --human-readable $1 | tail -n+3) | column -t
- QGroups löschen die nicht mehr benötigt werden /Cgroups clear-qgroups cron
SHELL=/bin/bash
PATH=/usr/local/sbin:/usr/local/bin:/usr/sbin:/usr/bin:/sbin:/bin

00 20	1 * *	root	for e in $(btrfsQuota.sh /mnt/storage | grep unknown | awk '{ print $2 }') ; do btrfs qgroup destroy $e /mnt/storage ; done
- Snapshots erstellen createSnapshot.sh
#!/bin/bash


btrfs subvolume snapshot -r $1 $1/.snapshots/@GMT_`date +%Y.%m.%d-%H.%M.%S`

exit $?
- Snapshots löschen clearLastSnapshot.sh
#!/bin/bash


function usage
{
	  echo "Usage Keep this Nr of Snapshots: $0 LocalMountPoint LocalSubvolumeName DesiredSnapshotCount"
	    echo "Usage Show Nr of Snapshots: $0 LocalMountPoint LocalSubvolumeName"
	      echo "Usage: e.g. $0 /mnt/storage daten 3"
	        exit 1
	}


	LOCAL_MOUNT_POINT=$1
	LOCAL_SUBVOLUME=$2
	DESIRED_SNAPSHOTS=$3

	[[ $# != 3 && $# != 2 ]] && usage


	[[ ! -d $LOCAL_MOUNT_POINT ]] && echo "Couldn't validate local btrfs subvolume mountpoint: $LOCAL_MOUNT_POINT" && exit 2


	CURRENT_NR_SNAPSHOTS=$(btrfs subvolume list $LOCAL_MOUNT_POINT/$LOCAL_SUBVOLUME/.snapshots -r -o --sort=+gen  | wc -l )


	[[  "$CURRENT_NR_SNAPSHOTS" == 0 ]] &&  echo "Couldn't aquire number of snapshots from $LOCAL_MOUNT_POINT/$LOCAL_SUBVOLUME/.snapshots" && exit 2


	[[ $# == 2 ]] && echo -e "Mount Point: $LOCAL_MOUNT_POINT\nSubvolume: $LOCAL_SUBVOLUME\nCurrent Snapshots: $CURRENT_NR_SNAPSHOTS" && exit 0


	REGEX_NUMBER='^[0-9]+$'

	[[ ! $DESIRED_SNAPSHOTS =~ $REGEX_NUMBER ]] && echo "That's not a valid number: $NR_SNAPSHOTS" && exit 2


	[[  $(($CURRENT_NR_SNAPSHOTS-$DESIRED_SNAPSHOTS)) -le 0 ]] && echo -e "Deletion not needed\nMount Point: $LOCAL_MOUNT_POINT\nSubvolume: $LOCAL_SUBVOLUME\nCurrent Snapshots: $CURRENT_NR_SNAPSHOTS\nDesired: $DESIRED_SNAPSHOTS" && exit 0

	NR_SNAPSHOTS_REMOVE=$(($CURRENT_NR_SNAPSHOTS-$DESIRED_SNAPSHOTS))

	CURRENT_SNAPSHOTS=$(btrfs subvolume list $LOCAL_MOUNT_POINT/$LOCAL_SUBVOLUME/.snapshots -r -o --sort=+gen | head -n $NR_SNAPSHOTS_REMOVE | cut -d' ' -f 9 )


	for snap in $CURRENT_SNAPSHOTS
	do
		btrfs subvolume delete --commit-after $LOCAL_MOUNT_POINT/$snap

	done

	btrfs filesystem  sync $LOCAL_MOUNT_POINT
Deduplizierung
- Getestet auf Debian buster mit 4.19 Kernel
- Kann bei größeren Datenmengen sehr lange dauern / cannot allocate memory bug
jdupes -B -r PFAD_BTRFS_VOLUME
- Getestet auf Debian buster mit 5.2 backports Kernel
- Der Speicher ist ihm beim Test (3GB RAM /4GB SWAP/ >600k Dateien) ausgegangen und der oom killer beendete den Prozess
duperemove -r -d --hashfile=PFAD/btrfs_hashes.hashes PFAD_BTRFS_VOLUME
Wazuh
Installation Wazuh Server
- Getestet mit Ubuntu 22.04 und https://documentation.wazuh.com/current/quickstart.html
- Achtung zum Testen bei der Installation KEINEN proxy verwenden - Die Skripts checken ob die Services laufen zB:
"CONNECT 127.0.0.1:9200 HTTP/1.1" 403 3405
- Dieser Zugriff schlägt jedoch auf dem Proxy auf da es nicht möglich war Ausnahmen für den Proxy zu definieren
- Achtung Per Default kann sich jeder beliebige Agent reinhängen
- Vulnerability Detection ist per Default ausgeschaltet:
- https://documentation.wazuh.com/current/user-manual/capabilities/vulnerability-detection/configuring-scans.html bzw. /var/ossec/etc/ossec.conf
...
   <enabled>yes</enabled>
...
- Alerting via E-Mail ist per Default deaktiviert / Werte entsprechend anpassen /var/ossec/etc/ossec.conf :
..
    <email_notification>yes</email_notification>
..
- Authentifizierung des Wazuh Managers gegenüber Agent: https://documentation.wazuh.com/current/user-manual/agent-enrollment/security-options/manager-identity-verification.html / Zertifikat von trusted CA signieren lassen und auf gehts mit signiertem Zertifikat - Überprüfung zB:
- openssl s_client –connect IP_MANAGER:1515
- Entfernen eines Agents über cli: https://documentation.wazuh.com/current/user-manual/agents/remove-agents/remove.html
****************************************
* Wazuh v4.3.10 Agent manager.         *
* The following options are available: *
****************************************
   (A)dd an agent (A).
   (E)xtract key for an agent (E).
   (L)ist already added agents (L).
   (R)emove an agent (R).
   (Q)uit.
Choose your action: A,E,L,R or Q: R

Available agents:

   ID: 006, Name: monitoring, IP: any
Provide the ID of the agent to be removed (or '\q' to quit): 006
Confirm deleting it?(y/n): y
Agent '006' removed.
- Zertifikat des Dashboards austauschen: https://documentation.wazuh.com/current/user-manual/wazuh-dashboard/configuring-third-party-certs/ssl.html
/etc/wazuh-dashboard/certs
Enrollment Agents ohne CA Überprüfung
- ACHTUNG - es wird Keine Validierung der „Identität“ des wazuhs-manager durchgeführt - nicht empfehlenswert
root@monitoring:~# https_proxy="http://IP_PROXY:8080" wget  https://packages.wazuh.com/4.x/apt/pool/main/w/wazuh-agent/wazuh-agent_4.3.10-1_amd64.deb -O ./wazuh-agent-4.3.10.deb && WAZUH_MANAGER='IP_WAZUH' dpkg -i ./wazuh-agent-4.3.10.deb
--2023-03-09 08:55:32--  https://packages.wazuh.com/4.x/apt/pool/main/w/wazuh-agent/wazuh-agent_4.3.10-1_amd64.deb
Connecting to IP_PROXY:8080... connected.
Proxy request sent, awaiting response... 200 OK
Length: 8863656 (8.5M) [binary/octet-stream]
Saving to: ‘./wazuh-agent-4.3.10.deb’

./wazuh-agent-4.3.1 100%[===================>]   8.45M  10.8MB/s    in 0.8s

2023-03-09 08:55:33 (10.8 MB/s) - ‘./wazuh-agent-4.3.10.deb’ saved [8863656/8863656]

Selecting previously unselected package wazuh-agent.
(Reading database ... 86428 files and directories currently installed.)
Preparing to unpack ./wazuh-agent-4.3.10.deb ...
Unpacking wazuh-agent (4.3.10-1) ...
Setting up wazuh-agent (4.3.10-1) ...
Processing triggers for systemd (245.4-4ubuntu3.20) ...
root@monitoring:~# systemctl status wazuh-agent
● wazuh-agent.service - Wazuh agent
     Loaded: loaded (/usr/lib/systemd/system/wazuh-agent.service; disabled; ven>
     Active: inactive (dead)
root@monitoring:~# systemctl enable wazuh-agent
Synchronizing state of wazuh-agent.service with SysV service script with /lib/systemd/systemd-sysv-install.
Executing: /lib/systemd/systemd-sysv-install enable wazuh-agent
Created symlink /etc/systemd/system/multi-user.target.wants/wazuh-agent.service → /usr/lib/systemd/system/wazuh-agent.service.
root@monitoring:~# systemctl start wazuh-agent
root@monitoring:~# systemctl status wazuh-agent
- tcpdump bzw. Wireshark des Enrollments über tcp/1515

Enrollment Agents mit CA Überprüfung
root@monitoring:~# https_proxy="http://IP_PROXY:8080" wget  https://packages.wazuh.com/4.x/apt/pool/main/w/wazuh-agent/wazuh-agent_4.3.10-1_amd64.deb -O wazuh-agent-4.3.10.deb && WAZUH_MANAGER='IP_MANAGER' WAZUH_REGISTRATION_CA='/usr/share/ca-certificates/CUSTOM_CA/ca.crt' dpkg -i ./wazuh-agent-4.3.10.deb
--2023-03-09 10:20:00--  https://packages.wazuh.com/4.x/apt/pool/main/w/wazuh-agent/wazuh-agent_4.3.10-1_amd64.deb
Connecting to IP_PROXY:8080... connected.
Proxy request sent, awaiting response... 200 OK
Length: 8863656 (8.5M) [binary/octet-stream]
Saving to: ‘wazuh-agent-4.3.10.deb’

wazuh-agent-4.3.10.deb            100%[=============================================================>]   8.45M  7.65MB/s    in 1.1s

2023-03-09 10:20:02 (7.65 MB/s) - ‘wazuh-agent-4.3.10.deb’ saved [8863656/8863656]

Selecting previously unselected package wazuh-agent.
(Reading database ... 86428 files and directories currently installed.)
Preparing to unpack ./wazuh-agent-4.3.10.deb ...
Unpacking wazuh-agent (4.3.10-1) ...
Setting up wazuh-agent (4.3.10-1) ...
Processing triggers for systemd (245.4-4ubuntu3.20) ...
root@monitoring:~# systemctl enable wazuh-agent
Synchronizing state of wazuh-agent.service with SysV service script with /lib/systemd/systemd-sysv-install.
Executing: /lib/systemd/systemd-sysv-install enable wazuh-agent
root@monitoring:~# systemctl start wazuh-agent
- Siehe bei vorhandenen Agents /var/ossec/etc/ossec.conf
    <enrollment>
      <enabled>yes</enabled>
      <server_ca_path>PATH_CA</server_ca_path>
    </enrollment>
- Debugging - überprüft er auch das Zertifikat:
root@monitoring:/var/ossec/logs# tail ossec.log
2023/03/09 10:30:44 wazuh-agentd: INFO: Requesting a key from server: IP_MANAGER
2023/03/09 10:30:44 wazuh-agentd: INFO: Verifying manager's certificate
2023/03/09 10:30:44 wazuh-agentd: INFO: Manager has been verified successfully
Troubleshooting
- CVE Überprüfung stoppt einfach
- Ubuntu CVE Infos können nicht mehr herunter geladen werden - https://github.com/wazuh/wazuh/issues/20573
- Notifications per E-Mail stoppen einfach
- Agent Flooding - https://github.com/wazuh/wazuh/issues/206 - siehe ossec.conf , Buffer Size , Queue erhöhen
- wazuh-dashboard „not ready yet“ nach dist-upgrade - thx https://www.reddit.com/r/Wazuh/comments/17nlhed/wazuh_dashboard_server_is_not_ready_yet_resolved/
systemctl stop wazuh-dashboard
curl -k -X DELETE -u admin:PASSWORD https://127.0.0.1:9200/.kibana_1
systemctl start wazuh-dashboard
Mrtg - Netzwerk Interface Statistiken
- Anforderungen - Auf schnelle und einfache Weise Netzwerk Interface Auslastungsstatistiken zu erhalten / es läuft ohnehin bereits ein Webserver auf der Firewall / Zugriffe für SNMP ausschließlich über localhost
- Getestet auf: Ubuntu 18.04
- Der Default Cron Job mrtg läuft alle 5 Minuten nach der Installation
root@firewall:~# apt-get install mrtg snmpd
Reading package lists... Done
Building dependency tree
Reading state information... Done
The following additional packages will be installed:
  libnet-snmp-perl libsnmp-session-perl
Suggested packages:
  libcrypt-des-perl libdigest-hmac-perl libio-socket-inet6-perl mrtg-contrib
  snmptrapd
Recommended packages:
  libio-socket-inet6-perl libsocket6-perl
The following NEW packages will be installed:
  libnet-snmp-perl libsnmp-session-perl mrtg snmpd
0 upgraded, 4 newly installed, 0 to remove and 0 not upgraded.
Need to get 605 kB of archives.
After this operation, 2,089 kB of additional disk space will be used.
Do you want to continue? [Y/n] y
Get:1 http://de.archive.ubuntu.com/ubuntu bionic/universe amd64 libnet-snmp-perl all 6.0.1-3 [90.3 kB]
Get:2 http://de.archive.ubuntu.com/ubuntu bionic-updates/main amd64 snmpd amd64 5.7.3+dfsg-1.8ubuntu3.6 [57.1 kB]
Get:3 http://de.archive.ubuntu.com/ubuntu bionic/universe amd64 libsnmp-session-perl all 1.14~git20130523.186a005-2 [141 kB]
Get:4 http://de.archive.ubuntu.com/ubuntu bionic/universe amd64 mrtg amd64 2.17.4-4.1ubuntu1 [316 kB]
Fetched 605 kB in 0s (1,231 kB/s)
Preconfiguring packages ...
Selecting previously unselected package libnet-snmp-perl.
(Reading database ... 251063 files and directories currently installed.)
Preparing to unpack .../libnet-snmp-perl_6.0.1-3_all.deb ...
Unpacking libnet-snmp-perl (6.0.1-3) ...
Selecting previously unselected package snmpd.
Preparing to unpack .../snmpd_5.7.3+dfsg-1.8ubuntu3.6_amd64.deb ...
Unpacking snmpd (5.7.3+dfsg-1.8ubuntu3.6) ...
Selecting previously unselected package libsnmp-session-perl.
Preparing to unpack .../libsnmp-session-perl_1.14~git20130523.186a005-2_all.deb ...
Unpacking libsnmp-session-perl (1.14~git20130523.186a005-2) ...
Selecting previously unselected package mrtg.
Preparing to unpack .../mrtg_2.17.4-4.1ubuntu1_amd64.deb ...
Unpacking mrtg (2.17.4-4.1ubuntu1) ...
Setting up snmpd (5.7.3+dfsg-1.8ubuntu3.6) ...
adduser: Warning: The home directory `/var/lib/snmp' does not belong to the user you are currently creating.
Created symlink /etc/systemd/system/multi-user.target.wants/snmpd.service → /lib/systemd/system/snmpd.service.
Setting up libnet-snmp-perl (6.0.1-3) ...
Setting up libsnmp-session-perl (1.14~git20130523.186a005-2) ...
Setting up mrtg (2.17.4-4.1ubuntu1) ...
Processing triggers for systemd (237-3ubuntu10.46) ...
Processing triggers for man-db (2.8.3-2ubuntu0.1) ...


---------------------------------


 vim /etc/snmp/snmpd.conf +49
rocommunity public  localhost


systemctl restart snmpd


----------------------------------


oot@firewall:~# cfgmaker public@localhost > /etc/mrtg.cfg
--base: Get Device Info on public@localhost:
--base: Vendor Id: Unknown Vendor - 1.3.6.1.4.1.8072.3.2.10
--base: Populating confcache
--base: Get Interface Info
--base: Walking ifIndex
--snpd:   public@localhost: -> 1 -> ifIndex = 1
--snpd:   public@localhost: -> 2 -> ifIndex = 2
--snpd:   public@localhost: -> 3 -> ifIndex = 3
--snpd:   public@localhost: -> 4 -> ifIndex = 4
--snpd:   public@localhost: -> 7 -> ifIndex = 7
--snpd:   public@localhost: -> 8 -> ifIndex = 8
--base: Walking ifType
--snpd:   public@localhost: -> 1 -> ifType = 24
--snpd:   public@localhost: -> 2 -> ifType = 6
--snpd:   public@localhost: -> 3 -> ifType = 6
--snpd:   public@localhost: -> 4 -> ifType = 6
--snpd:   public@localhost: -> 7 -> ifType = 1
--snpd:   public@localhost: -> 8 -> ifType = 1
--base: Walking ifAdminStatus
--snpd:   public@localhost: -> 1 -> ifAdminStatus = 1
--snpd:   public@localhost: -> 2 -> ifAdminStatus = 1
--snpd:   public@localhost: -> 3 -> ifAdminStatus = 1
--snpd:   public@localhost: -> 4 -> ifAdminStatus = 2
--snpd:   public@localhost: -> 7 -> ifAdminStatus = 1
--snpd:   public@localhost: -> 8 -> ifAdminStatus = 1
--base: Walking ifOperStatus
--snpd:   public@localhost: -> 1 -> ifOperStatus = 1
--snpd:   public@localhost: -> 2 -> ifOperStatus = 1
--snpd:   public@localhost: -> 3 -> ifOperStatus = 1
--snpd:   public@localhost: -> 4 -> ifOperStatus = 2
--snpd:   public@localhost: -> 7 -> ifOperStatus = 1
--snpd:   public@localhost: -> 8 -> ifOperStatus = 1
--base: Walking ifMtu
--snpd:   public@localhost: -> 1 -> ifMtu = 65536
--snpd:   public@localhost: -> 2 -> ifMtu = 1500
--snpd:   public@localhost: -> 3 -> ifMtu = 1500
--snpd:   public@localhost: -> 4 -> ifMtu = 1500
--snpd:   public@localhost: -> 7 -> ifMtu = 1500
--snpd:   public@localhost: -> 8 -> ifMtu = 1500
--base: Walking ifSpeed
--snpd:   public@localhost: -> 1 -> ifSpeed = 10000000
--snpd:   public@localhost: -> 2 -> ifSpeed = 4294967295
--snpd:   public@localhost: -> 3 -> ifSpeed = 4294967295
--snpd:   public@localhost: -> 4 -> ifSpeed = 4294967295
--snpd:   public@localhost: -> 7 -> ifSpeed = 0
--snpd:   public@localhost: -> 8 -> ifSpeed = 0

-------

Für Indexfile beim Aufruf der Ressource:

indexmaker /etc/mrtg.cfg > /var/www/htdocs/stats-network/index.html

-------
- Beispielscreenshot:

Apache2 - external Auth Helper mit Skript
- Getestet auf Raspbian Buster
- exit Code 0 → Authentifizierung erfolgreich
- exit Code != 0 → Authentifizierung fehlerhaft
- Apache2 Vhost Konfiguration Auszug:
<VirtualHost *:80>
         ....
         ....
	DocumentRoot /var/www/administration

        <Directory /var/www/administration/>
        AuthType Basic
        AuthName "Bitte Passwort eingeben"
        AuthBasicProvider external
	AuthExternal pwauth
	require valid-user
	</Directory>


       AddExternalAuth pwauth /usr/local/bin/check_kids_auth.php
       SetExternalAuthMethod pwauth pipe
          .....
          .....
</VirtualHost>
- check_kids_auth.php
#!/usr/bin/php

<?php

require_once("/var/www/config.php");


#Pipe Username\n and Password\n to php
$auth_data = file("php://stdin");


if(count($auth_data) != 2)
{
	exit(1);
}


$USERNAME=trim($auth_data[0]);
$PASSWORD=trim($auth_data[1]);

#We assume it's system initalization
if(!is_readable(LOCATION_PASSWD_FILE))
{
	exit(0);
}

$passwd_hash=file_get_contents(LOCATION_PASSWD_FILE);


if($USERNAME==USERNAME_LOGIN && password_verify($PASSWORD,$passwd_hash))
 {
      exit(0);
 }
 exit(1);


?>
Nvidia Optimus / Nvidia Karte aktivieren (Kali Linux)
2017-03-23 #1
TiGER511
TiGER511 is offline Junior Member

Join Date
    2017-Mar
Posts
    22

Cool [TUTORIAL] Installing official NVIDIA driver in Optimus laptop

    After spending 4 days in a row,i was finally able to install and run Official NVIDIA driver on my HP Envy 15 laptop.Here is my specs:

    CPU: Intel core i7-4510U CPU
    GPU #1: Intel HD Graphics 4400
    GPU #2: NVIDIA GeForce GTX 850M

    My system:
    Code:

    root@linux:~# uname -a
    Linux linux 4.9.0-kali3-amd64 #1 SMP Debian 4.9.13-1kali3 (2017-03-13) x86_64 GNU/Linux

    Code:

    root@linux:~# cat /etc/*release*
    DISTRIB_ID=Kali
    DISTRIB_RELEASE=kali-rolling
    DISTRIB_CODENAME=kali-rolling
    DISTRIB_DESCRIPTION="Kali GNU/Linux Rolling"
    PRETTY_NAME="Kali GNU/Linux Rolling"
    NAME="Kali GNU/Linux"
    ID=kali
    VERSION="2016.2"
    VERSION_ID="2016.2"
    ID_LIKE=debian
    ANSI_COLOR="1;31"
    HOME_URL="http://www.kali.org/"
    SUPPORT_URL="http://forums.kali.org/"
    BUG_REPORT_URL="http://bugs.kali.org/"

    Before we begin,couple of notes:

    ***USE AT YOUR OWN RISK***
    *This tutorial is for official NVIDIA Driver not Bumblebee
    *Tutorial found on official Kali website is BROKEN! It never works for optimus/hybrid Graphics enabled laptop

    1. Verify you have hybrid graphics

    Code:

    lspci | grep -E "VGA|3D"

    00:02.0 VGA compatible controller: Intel Corporation Haswell-ULT Integrated Graphics Controller (rev 0b)
    0a:00.0 3D controller: NVIDIA Corporation GM107M [GeForce GTX 850M] (rev a2)

    2.Disable nouveau
    Code:

    echo -e "blacklist nouveau\noptions nouveau modeset=0\nalias nouveau off" > /etc/modprobe.d/blacklist-nouveau.conf

    update-initramfs -u && reboot

    3.system will reboot and nouveau should be disabled.verify if nouveau is disabled:
    Code:

    lsmod |grep -i nouveau

    If shows nothing,means nouveau successfully disabled.

    4.Install nvidia driver from kali repo:

    Code:

    apt-get install  nvidia-driver nvidia-xconfig

    You can also download latest .run file from nvidia website.execute and procceed with installation.whether its from kali repo or nvidia website,procedure is same.

    5.Now we have to find bus id of our nvidia card:
    Code:

    nvidia-xconfig --query-gpu-info | grep 'BusID : ' | cut -d ' ' -f6

    it should show something like this:
    Code:

    PCI:10:0:0

    This is our Bus ID.
    6.Now we generate /etc/X11/xorg.conf file with this bus ID according to nvidia guide http://us.download.nvidia.com/XFree8...E/randr14.html:
    Code:

    Section "ServerLayout"
        Identifier "layout"
        Screen 0 "nvidia"
        Inactive "intel"
    EndSection

    Section "Device"
        Identifier "nvidia"
        Driver "nvidia"
        BusID "PCI:10:0:0"
    EndSection

    Section "Screen"
        Identifier "nvidia"
        Device "nvidia"
        Option "AllowEmptyInitialConfiguration"
    EndSection

    Section "Device"
        Identifier "intel"
        Driver "modesetting"
    EndSection

    Section "Screen"
        Identifier "intel"
        Device "intel"
    EndSection

    Replace the bold string with your Bus ID and save it to /etc/X11/xorg.conf

    7.Now we have to create some scripts according to our display manager https://wiki.archlinux.org/index.php...splay_Managers.Since im using default Kali linux which is GDM,i created two files:
    /usr/share/gdm/greeter/autostart/optimus.desktop
    /etc/xdg/autostart/optimus.desktop
    with the following content:
    Code:

    [Desktop Entry]
    Type=Application
    Name=Optimus
    Exec=sh -c "xrandr --setprovideroutputsource modesetting NVIDIA-0; xrandr --auto"
    NoDisplay=true
    X-GNOME-Autostart-Phase=DisplayServer

    8. Now reboot and you should be using Nvidia Driver.Verify if everything is ok:
    Code:

    root@kali:~# glxinfo | grep -i "direct rendering"

    direct rendering: Yes

    Optional: you can now install your cuda toolkits:
    Code:

    apt-get install ocl-icd-libopencl1 nvidia-cuda-toolkit

    FIXING SCREEN TEARING ISSUE:
    After you successfully boot up with Nvidia Driver, you most probably experiencing screen tearing issue eg: playing videos in VLC,youtube video on Chrome/Firefox etc.Luckily,we can fix this by enabling PRIME Sync.

    1.Verify if PRIME is disabled
    Code:

    xrandr --verbose|grep PRIME

    it should output something like this:
    PRIME Synchronization: 0
    PRIME Synchronization: 1

    First one is our connected display.So PRIME sync is disabled.
    2. Edit /etc/default/grub and append nvidia-drm.modeset=1 in GRUB_CMDLINE_LINUX_DEFAULT after quiet.Like the following:
    Code:

    ....
    GRUB_CMDLINE_LINUX_DEFAULT="quiet nvidia-drm.modeset=1"
    ...

    3.Save the changes.Update grub
    Code:

    update-grub

    4.Reboot your system.
    5.Verify if PRIME is enabled:
    Code:

    xrandr --verbose|grep PRIME

    Now it should output:
    PRIME Synchronization: 1
    PRIME Synchronization: 1

    If it still shows 0 for you,then there is probably something wrong with your system config/kernel.Since this is still an experimental feature from Nvidia,you are out of luck.

    ***IF YOU STUCK IN BOOT SCREEN***
    Revert what we have done so far:
    Press CTRL+ALT+F2 or CTRL+ALT+F3 ,login with your password.
    Code:

    apt-get remove --purge nvidia*
    rm -rf /etc/X11/xorg.conf

    Remove those display manager files we created earlier (for GDM):
    Code:

    rm -rf /usr/share/gdm/greeter/autostart/optimus.desktop
    rm -rf /etc/xdg/autostart/optimus.desktop

    Now reboot.you should be able get back to your old system.

    Last edited by TiGER511; 2017-04-04 at 17:59. Reason: Screen tearing fix added.
- Damit hashcat funktioniert !!
- Mit clinfo erscheint danach auch die CUDA Karte!
apt-get install nvidia-cuda-doc nvidia-opencl-icd
usrmerge Probleme (Kali Linux)
- Zum Teil liegen noch files in /lib sowie /usr/lib
- auf Quelle der Lösung verweisen / stackoverflow ?
for f in `find /bin -mindepth 1 ! -type l`; do sudo mv $f /usr/bin/$(basename ${f}); sudo ln -s /usr/bin/$(basename ${f}) $f;done
for f in `find /sbin -mindepth 1 ! -type l`; do sudo mv $f /usr/sbin/$(basename ${f}); sudo ln -s /usr/sbin/$(basename ${f}) $f;done
for f in `find /lib/udev/rules.d -mindepth 1 ! -type l`; do sudo mv $f /usr/lib/udev/rules.d/$(basename ${f}); sudo ln -s /usr/lib/udev/rules.d/$(basename ${f}) $f;done
for f in `find /lib/systemd/system -mindepth 1 ! -type l`; do sudo mv $f /usr/lib/systemd/system/$(basename ${f}); sudo ln -s /usr/lib/systemd/system/$(basename ${f}) $f;done
for f in `find /lib/x86_64-linux-gnu -mindepth 1 ! -type l`; do sudo mv $f /usr/lib/x86_64-linux-gnu/$(basename ${f}); sudo ln -s /usr/lib/x86_64-linux-gnu/$(basename ${f}) $f;done
 for f in `find /lib/x86_64-linux-gnu -mindepth 1 ! -type l`; do  mv $f /usr/lib/x86_64-linux-gnu/$(basename ${f});  ln -s /usr/lib/x86_64-linux-gnu/$(basename ${f}) $f;done
Sound reparieren (Kali Linux)
- Nach letztem Update werden keine Sound Devices gefunden (pipewire-pulse stört)
enable pulseaudio for the current user

urnilxfgbez@mrChief:~$ systemctl --user status pulseaudio
● pulseaudio.service - Sound Service
     Loaded: loaded (/usr/lib/systemd/user/pulseaudio.service; enabled; vendor >
    Drop-In: /usr/lib/systemd/user/pulseaudio.service.d
             └─kali_pulseaudio.conf
     Active: active (running) since Thu 2022-01-13 17:35:11 CET; 32s ago
TriggeredBy: ● pulseaudio.socket
   Main PID: 1357 (pulseaudio)
      Tasks: 4 (limit: 19044)
     Memory: 27.0M
        CPU: 166ms
     CGroup: /user.slice/user-1000.slice/user@1000.service/session.slice/pulsea>
             └─1357 /usr/bin/pulseaudio --daemonize=no --log-target=journal

Jan 13 17:35:11 mrChief systemd[1336]: Starting Sound Service...
Jan 13 17:35:11 mrChief systemd[1336]: Started Sound Service.
urnilxfgbez@mrChief:~$ apt-get remove pipewire-pulse
Google Chrome Repository (Debian,Ubuntu)
Content: ### THIS FILE IS AUTOMATICALLY CONFIGURED ###
# You may comment out this entry, but any other modifications may be lost.
deb [arch=amd64] http://dl.google.com/linux/chrome/deb/ stable main
"Default" Programm auswählen zB: java JRE
- update-alternatives –display java
- update-alternatives –config java
root@mrChief:/home/urnilxfgbez# update-alternatives --display java
java - manual mode
  link best version is /usr/lib/jvm/java-11-openjdk-amd64/bin/java
  link currently points to /usr/lib/jvm/jdk-8-oracle-x64/jre/bin/java
  link java is /usr/bin/java
  slave java.1.gz is /usr/share/man/man1/java.1.gz
/usr/lib/jvm/java-10-openjdk-amd64/bin/java - priority 1101
  slave java.1.gz: /usr/lib/jvm/java-10-openjdk-amd64/man/man1/java.1.gz
/usr/lib/jvm/java-11-openjdk-amd64/bin/java - priority 1111
  slave java.1.gz: /usr/lib/jvm/java-11-openjdk-amd64/man/man1/java.1.gz
/usr/lib/jvm/java-8-openjdk-amd64/jre/bin/java - priority 1081
  slave java.1.gz: /usr/lib/jvm/java-8-openjdk-amd64/jre/man/man1/java.1.gz
/usr/lib/jvm/java-9-openjdk-amd64/bin/java - priority 1091
  slave java.1.gz: /usr/lib/jvm/java-9-openjdk-amd64/man/man1/java.1.gz
/usr/lib/jvm/jdk-8-oracle-x64/jre/bin/java - priority 318
  slave java.1.gz: /usr/lib/jvm/jdk-8-oracle-x64/man/man1/java.1.gz

root@mrChief:/home/urnilxfgbez# /usr/lib/jvm/jdk-8-oracle-x64/jre/bin/java -version
java version "1.8.0_51"
Java(TM) SE Runtime Environment (build 1.8.0_51-b16)
Java HotSpot(TM) 64-Bit Server VM (build 25.51-b03, mixed mode)

root@mrChief:/home/urnilxfgbez# java -version
java version "1.8.0_51"
Java(TM) SE Runtime Environment (build 1.8.0_51-b16)
Java HotSpot(TM) 64-Bit Server VM (build 25.51-b03, mixed mode)


root@mrChief:/home/urnilxfgbez# update-alternatives --config java
There are 5 choices for the alternative java (providing /usr/bin/java).

  Selection    Path                                            Priority   Status
------------------------------------------------------------
  0            /usr/lib/jvm/java-11-openjdk-amd64/bin/java      1111      auto mode
  1            /usr/lib/jvm/java-10-openjdk-amd64/bin/java      1101      manual mode
  2            /usr/lib/jvm/java-11-openjdk-amd64/bin/java      1111      manual mode
  3            /usr/lib/jvm/java-8-openjdk-amd64/jre/bin/java   1081      manual mode
  4            /usr/lib/jvm/java-9-openjdk-amd64/bin/java       1091      manual mode
* 5            /usr/lib/jvm/jdk-8-oracle-x64/jre/bin/java       318       manual mode

Press <enter> to keep the current choice[*], or type selection number: 0
update-alternatives: using /usr/lib/jvm/java-11-openjdk-amd64/bin/java to provide /usr/bin/java (java) in auto mode


root@mrChief:/home/urnilxfgbez# java -version
openjdk version "11.0.3" 2019-04-16
OpenJDK Runtime Environment (build 11.0.3+1-Debian-1)
OpenJDK 64-Bit Server VM (build 11.0.3+1-Debian-1, mixed mode, sharing


-> gleiche mit javaws für web start
XFCE4
- Sollte Desktop nicht „nachgezeichnet“ werden und keine Icons u.a. rm -rf ~/.cache/sessions/*
CA Zertifikat hinzufügen (Debian,Ubuntu)
- Getestet auf Debian stretch
- CA Zertifikat im PEM Format
- Bei dpkg-reconfigure ca-certificates → ASK → Zertifikat auswählen und OK - bei der Ausgabe sollte erscheinen , dass er eines hinzugefügt hat
- Getestet werden kann zB: mit wget auf entsprechende Seite wo ein Zertifikat existiert das von CA unterschrieben wurde
root@mrAdblock:/tmp# mkdir /usr/share/ca-certificates/extra
root@mrAdblock:/tmp# vim /usr/share/ca-certificates/extra/pannoniait.crt
root@mrAdblock:/tmp# dpkg-reconfigure ca-certificates
xfreerdp-helper-freerdp2
- Quick and dirty
- Hostname entweder direkt über cli oder zenity
- Username und Passwort immer über zenity
- rdpc.sh
#!/bin/bash


infoCodes=$(cat << EOF
/* section 0-15: protocol-independent codes */
XF_EXIT_SUCCESS = 0,
XF_EXIT_DISCONNECT = 1,
XF_EXIT_LOGOFF = 2,
XF_EXIT_IDLE_TIMEOUT = 3,
XF_EXIT_LOGON_TIMEOUT = 4,
XF_EXIT_CONN_REPLACED = 5,
XF_EXIT_OUT_OF_MEMORY = 6,
XF_EXIT_CONN_DENIED = 7,
XF_EXIT_CONN_DENIED_FIPS = 8,
XF_EXIT_USER_PRIVILEGES = 9,
XF_EXIT_FRESH_CREDENTIALS_REQUIRED = 10,
XF_EXIT_DISCONNECT_BY_USER = 11,
/* section 16-31: license error set */
XF_EXIT_LICENSE_INTERNAL = 16,
XF_EXIT_LICENSE_NO_LICENSE_SERVER = 17,
XF_EXIT_LICENSE_NO_LICENSE = 18,
XF_EXIT_LICENSE_BAD_CLIENT_MSG = 19,
XF_EXIT_LICENSE_HWID_DOESNT_MATCH = 20,
XF_EXIT_LICENSE_BAD_CLIENT = 21,
XF_EXIT_LICENSE_CANT_FINISH_PROTOCOL = 22,
XF_EXIT_LICENSE_CLIENT_ENDED_PROTOCOL = 23,
XF_EXIT_LICENSE_BAD_CLIENT_ENCRYPTION = 24,
XF_EXIT_LICENSE_CANT_UPGRADE = 25,
XF_EXIT_LICENSE_NO_REMOTE_CONNECTIONS = 26,
/* section 32-127: RDP protocol error set */
XF_EXIT_RDP = 32,
/* section 128-254: xfreerdp specific exit codes */
XF_EXIT_PARSE_ARGUMENTS = 128,
XF_EXIT_MEMORY = 129,
XF_EXIT_PROTOCOL = 130,
XF_EXIT_CONN_FAILED = 131,
XF_EXIT_AUTH_FAILURE = 132,
XF_EXIT_UNKNOWN = 255,
EOF)


[[ -n "$1" ]] && HOSTNAME="$1"

[[ -z "$1" ]] && HOSTNAME=$(zenity --entry --title="Hostname:" --text="Hostname:")

USERNAME=$(zenity --entry --title="Username ($HOSTNAME):" --text="Username ($HOSTNAME):")
PASSWORD=$(zenity  --text="Password ($HOSTNAME):" --password --title="Password ($HOSTNAME):")


xfreerdp /u:$USERNAME /p:"$PASSWORD"  /v:$HOSTNAME /drive:tmp,/tmp /dynamic-resolution /h:600 /w:1280 /encryption-methods:128,FIPS /network:auto


returnFree="$?"


[[ $returnFree != "0" ]] && zenity --error --text="Error Code: $returnFree\n$infoCodes"
integrity-check-boot service
- Quick and dirty um folgenden Fall abzudecken: Das Notebook wird ohne Kenntnis des Besitzers entwendet initramfs verändert um das Boot Passwort aufzuzeichenn und abermals das Notebook zu entwenden
- Beim Herunterfahren werden die Hashes aller Dateien in /boot erstellt, die beim Hochfahren überprüft werden
- Die Verifikationsdateien befinden sich auf dem verschlüsselten Teil des Systems
- Skript: /usr/local/bin/integ.sh
#!/bin/bash

function usage {

echo "Usage: $0 [c|v]"
echo "c...create hashes"
echo "v...veriy hashes"

exit 0

}


HASH_DIRECTORY="/boot"
HASH_VERIFICATION_FILE="/usr/local/bin/hashes.sha256"
HASH_COUNT_VERIFICATION_FILE="/usr/local/bin/hashes.sha256.count"


function verifyDirectoryHashes {

echo "verify"


[[ ! -f $HASH_VERIFICATION_FILE ]] && echo "Hashes: $HASH_VERIFICATION_FILE not found" && exit 2

[[ ! -f $HASH_COUNT_VERIFICATION_FILE ]] && echo "Hashes Count: $HASH_COUNT_VERIFICATION_FILE not found" && exit 2

date1=$(date -u +"%s")

sha256sum --strict --quiet  -c $HASH_VERIFICATION_FILE

retCode=$?

date2=$(date -u +"%s")
diff=$(($date2-$date1))
amount=$(find $HASH_DIRECTORY -type f |  wc -l  | cut -d " " -f 1)

amountStored=$(cat $HASH_COUNT_VERIFICATION_FILE )

echo "$(($diff / 60)) minutes and $(($diff % 60)) seconds elapsed."
echo "Hashes verified: $amountStored"
echo "Files actually found: $amount"

echo "done"

[[ $retCode != "0" ]] && echo "Stored files in: $HASH_DIRECTORY do NOT LOOK OK" && zenity --error --text "Stored files in $HASH_DIRECTORY do NOT LOOK OK - ATTENTION"

[[ $retCode == "0" ]] && echo "Stored files in: $HASH_DIRECTORY look OK" && zenity --info --text "Stored files in: $HASH_DIRECTORY look OK"

[[ $amount != $amountStored ]] && echo "File Count in: $HASH_DIRECTORY is NOT OK Current Count: $amount , Count previously saved: $amountStored " && zenity --error --text "File Count in: $HASH_DIRECTORY is NOT OK Current Count: $amount , Count previously saved: $amountStored - ATTENTION"

exit $retCode

}

function createDirectoryHashes {
echo "create hashes"


echo -n > $HASH_VERIFICATION_FILE


date1=$(date -u +"%s")

find $HASH_DIRECTORY  -type f  -exec sha256sum {} >> $HASH_VERIFICATION_FILE \;

date2=$(date -u +"%s")
diff=$(($date2-$date1))

amount=$(wc -l $HASH_VERIFICATION_FILE | cut -d " " -f 1)
echo "$(($diff / 60)) minutes and $(($diff % 60)) seconds elapsed."
echo "Hashes created: $amount"

echo $amount > $HASH_COUNT_VERIFICATION_FILE

echo "done"
exit 0
}


ACTION="$1"


[[  $ACTION != "c" && $ACTION != "v" ]] && echo "Either verify or create" && usage


[[ $ACTION == "c" ]] && createDirectoryHashes

[[ $ACTION == "v" ]] && verifyDirectoryHashes
- Systemd Startup:
root@mrChief:/home/urnilxfgbez# cat /lib/systemd/system/integ-boot.service
[Unit]
Description=integrity boot service

[Service]
Type=oneshot
ExecStart=/usr/local/bin/integ.sh v
ExecStop=/usr/local/bin/integ.sh c
RemainAfterExit=yes

[Install]
WantedBy=multi-user.target

root@mrChief:/home/urnilxfgbez# systemctl enable integ-boot
- Graphical Startup:

openwrt/lede
802.11s Mesh Wifi
- Ziel: Performante WLAN Brücke über 2GHZ und 5GHZ
- Hardware: TP-Link AC1750 C7 2.0
- Firmware: OpenWrt 18.06-SNAPSHOT, r7724-6c3ca1d , Eigenbau
root@router1:~# opkg list-installed
ath10k-firmware-qca4019 - 2018-05-12-952afa49-1
ath10k-firmware-qca6174 - 2018-05-12-952afa49-1
ath10k-firmware-qca9887 - 2018-05-12-952afa49-1
ath10k-firmware-qca9888 - 2018-05-12-952afa49-1
ath10k-firmware-qca988x - 2018-05-12-952afa49-1
ath10k-firmware-qca9984 - 2018-05-12-952afa49-1
ath10k-firmware-qca99x0 - 2018-05-12-952afa49-1
base-files - 194.2-r7724-6c3ca1d
busybox - 1.28.4-3
dnsmasq-full - 2.80-1.4
dropbear - 2017.75-7.1
ethtool - 4.19-1
firewall - 2018-08-13-1c4d5bcd-1
fstools - 2018-12-28-af93f4b8-3
fwtool - 1
hostapd-common - 2018-05-21-62566bc2-5
htop - 2.2.0-1
ip-tiny - 4.16.0-8
ip6tables - 1.6.2-1
iperf - 2.0.12-2
iptables - 1.6.2-1
iw - 4.14-1
iwinfo - 2018-07-31-65b8333f-1
jshn - 2018-07-25-c83a84af-2
jsonfilter - 2018-02-04-c7e938d6-1
kernel - 4.9.164-1-3f5d65b8ac169a2b710fb39d45f1492e
kmod-ath - 4.9.164+2017-11-01-10
kmod-ath10k - 4.9.164+2017-11-01-10
kmod-ath9k - 4.9.164+2017-11-01-10
kmod-ath9k-common - 4.9.164+2017-11-01-10
kmod-cfg80211 - 4.9.164+2017-11-01-10
kmod-gpio-button-hotplug - 4.9.164-2
kmod-hwmon-core - 4.9.164-1
kmod-ip6tables - 4.9.164-1
kmod-ipt-conntrack - 4.9.164-1
kmod-ipt-core - 4.9.164-1
kmod-ipt-ipset - 4.9.164-1
kmod-ipt-nat - 4.9.164-1
kmod-ipt-nat6 - 4.9.164-1
kmod-mac80211 - 4.9.164+2017-11-01-10
kmod-mii - 4.9.164-1
kmod-nf-conntrack - 4.9.164-1
kmod-nf-conntrack-netlink - 4.9.164-1
kmod-nf-conntrack6 - 4.9.164-1
kmod-nf-ipt - 4.9.164-1
kmod-nf-ipt6 - 4.9.164-1
kmod-nf-nat - 4.9.164-1
kmod-nf-nat6 - 4.9.164-1
kmod-nf-reject - 4.9.164-1
kmod-nf-reject6 - 4.9.164-1
kmod-nfnetlink - 4.9.164-1
kmod-nls-base - 4.9.164-1
kmod-tun - 4.9.164-1
kmod-usb-core - 4.9.164-1
kmod-usb-ehci - 4.9.164-1
kmod-usb-ledtrig-usbport - 4.9.164-1
kmod-usb-net - 4.9.164-1
kmod-usb-net-cdc-ether - 4.9.164-1
kmod-usb-ohci - 4.9.164-1
kmod-usb2 - 4.9.164-1
libblobmsg-json - 2018-07-25-c83a84af-2
libc - 1.1.19-1
libgcc - 7.3.0-1
libgmp - 6.1.2-1
libip4tc - 1.6.2-1
libip6tc - 1.6.2-1
libiwinfo - 2018-07-31-65b8333f-1
libiwinfo-lua - 2018-07-31-65b8333f-1
libjson-c - 0.12.1-2
libjson-script - 2018-07-25-c83a84af-2
liblua - 5.1.5-1
liblucihttp - 2018-05-18-cb119ded-1
liblucihttp-lua - 2018-05-18-cb119ded-1
liblzo - 2.10-1
libmnl - 1.0.4-1
libncurses - 6.1-1
libnetfilter-conntrack - 2017-07-25-e8704326-1
libnettle - 3.4-1
libnfnetlink - 1.0.1-1
libnl-tiny - 0.1-5
libopenssl - 1.0.2q-1
libpthread - 1.1.19-1
libubox - 2018-07-25-c83a84af-2
libubus - 2018-10-06-221ce7e7-1
libubus-lua - 2018-10-06-221ce7e7-1
libuci - 2018-08-11-4c8b4d6e-1
libuclient - 2018-11-24-3ba74ebc-1
libxtables - 1.6.2-1
logd - 2018-02-14-128bc35f-2
lua - 5.1.5-1
luci - git-19.079.57770-b99e77d-1
luci-app-firewall - git-19.079.57770-b99e77d-1
luci-base - git-19.079.57770-b99e77d-1
luci-lib-ip - git-19.079.57770-b99e77d-1
luci-lib-jsonc - git-19.079.57770-b99e77d-1
luci-lib-nixio - git-19.079.57770-b99e77d-1
luci-mod-admin-full - git-19.079.57770-b99e77d-1
luci-proto-ipv6 - git-19.079.57770-b99e77d-1
luci-proto-ppp - git-19.079.57770-b99e77d-1
luci-theme-bootstrap - git-19.079.57770-b99e77d-1
mtd - 23
netifd - 2019-01-31-a2aba5c7-2.1
odhcp6c - 2018-07-14-67ae6a71-15
openvpn-openssl - 2.4.5-4.2
openwrt-keyring - 2018-05-18-103a32e9-1
opkg - 2019-01-18-7708a01a-1
procd - 2018-03-28-dfb68f85-1
rpcd - 2018-11-28-3aa81d0d-1
rpcd-mod-rrdns - 20170710
swconfig - 11
terminfo - 6.1-1
uboot-envtools - 2018.03-1
ubox - 2018-02-14-128bc35f-2
ubus - 2018-10-06-221ce7e7-1
ubusd - 2018-10-06-221ce7e7-1
uci - 2018-08-11-4c8b4d6e-1
uclibcxx - 0.2.4-3
uclient-fetch - 2018-11-24-3ba74ebc-1
uhttpd - 2018-11-28-cdfc902a-2
usign - 2015-07-04-ef641914-1
wireless-regdb - 2017-10-20-4343d359
wpad-mesh-openssl - 2018-05-21-62566bc2-5
- /etc/config/wireless
root@router1:~#  cat /etc/config/wireless

config wifi-device 'radio0'
	option type 'mac80211'
        option country '00'
	option channel '1'
	option hwmode '11g'
	option path 'platform/qca955x_wmac'
	option htmode 'HT40+'
	option disabled '0'

config wifi-device 'radio1'
        option country '00'
	option type 'mac80211'
	option channel '36'
	option hwmode '11a'
	option path 'pci0000:01/0000:01:00.0'
	option htmode 'VHT80'
	option disabled '0'

config wifi-iface 'mesh5'
	option device 'radio1'
	option network 'lan'
	option mode 'mesh'
	option mesh_id 'foo5'
	option encryption 'psk2/aes'
	option key 'PSK_MESH_KEY_HERE'


config wifi-iface 'mesh2'
        option device 'radio0'
        option network 'lan'
        option mode 'mesh'
        option mesh_id 'foo2'
        option encryption 'psk2/aes'
        option key 'PSK_MESH_KEY_HERE'


config wifi-iface 'clients'
       option device 'radio0'
       option network 'lan'
       option mode 'ap'
       option encryption 'psk2'
       option key 'PSK_ADDITIONAL_WLAN_HERE'
       option ssid 'SSID_ADDITIONAL_WLAN_HERE'
- /etc/config/network
root@router1:~# cat /etc/config/network

config interface 'loopback'
	option ifname 'lo'
	option proto 'static'
	option ipaddr '127.0.0.1'
	option netmask '255.0.0.0'

config interface 'lan'
	option type 'bridge'
	option ifname 'eth1.1 eth0.2'
	option proto 'static'
	option ipaddr '192.168.1.1'
	option netmask '255.255.255.0'
        option stp '1'


config switch
	option name 'switch0'
	option reset '1'
	option enable_vlan '1'

config switch_vlan
	option device 'switch0'
	option vlan '1'
	option ports '2 3 4 5 0t'

config switch_vlan
	option device 'switch0'
	option vlan '2'
	option ports '1 6t'
- Performance Iperf Notebook1 (192.168.1.10) ↔ router1 ↔MESH 2/5GHZ↔router2↔ Notebook2 (192.168.1.5)
- ~230Mbit sind möglich
iperf -c 192.168.1.5 -t 7200 -i 300
------------------------------------------------------------
Client connecting to 192.168.1.5, TCP port 5001
TCP window size: 85.0 KByte (default)
------------------------------------------------------------
[  3] local 192.168.1.10 port 44742 connected with 192.168.1.5 port 5001
[ ID] Interval       Transfer     Bandwidth
[  3]  0.0-300.0 sec  8.39 GBytes   240 Mbits/sec
[  3] 300.0-600.0 sec  8.83 GBytes   253 Mbits/sec
[  3] 600.0-900.0 sec  8.92 GBytes   255 Mbits/sec
[  3] 900.0-1200.0 sec  8.23 GBytes   236 Mbits/sec
[  3] 1200.0-1500.0 sec  8.08 GBytes   231 Mbits/sec
[  3] 1500.0-1800.0 sec  7.96 GBytes   228 Mbits/sec
[  3] 1800.0-2100.0 sec  8.06 GBytes   231 Mbits/sec
[  3] 2100.0-2400.0 sec  8.17 GBytes   234 Mbits/sec
[  3] 2400.0-2700.0 sec  8.76 GBytes   251 Mbits/sec
[  3] 2700.0-3000.0 sec  8.83 GBytes   253 Mbits/sec
[  3] 3000.0-3300.0 sec  8.84 GBytes   253 Mbits/sec
[  3] 3300.0-3600.0 sec  8.78 GBytes   251 Mbits/sec
[  3] 3600.0-3900.0 sec  8.07 GBytes   231 Mbits/sec
- Empfangsqualität
root@router2:~# iw wlan0 station dump
Station c4:6e:1f:73:4e:dc (on wlan0)
	inactive time:	10 ms
	rx bytes:	198828976381
	rx packets:	127736272
	tx bytes:	5907694319
	tx packets:	53180353
	tx retries:	0
	tx failed:	62
	rx drop misc:	174
	signal:  	-56 [-64, -59, -60] dBm
	signal avg:	-56 [-64, -58, -60] dBm
	Toffset:	18446744073242107607 us
	tx bitrate:	6.0 MBit/s
	rx bitrate:	975.0 MBit/s VHT-MCS 7 80MHz short GI VHT-NSS 3
	rx duration:	2583998012 us
	mesh llid:	0
	mesh plid:	0
	mesh plink:	ESTAB
	mesh local PS mode:	ACTIVE
	mesh peer PS mode:	ACTIVE
	mesh non-peer PS mode:	ACTIVE
	authorized:	yes
	authenticated:	yes
	associated:	yes
	preamble:	long
	WMM/WME:	yes
	MFP:		yes
	TDLS peer:	no
	DTIM period:	2
	beacon interval:100
	connected time:	6145 seconds


root@router1:~# iw wlan0 station dump
Station d4:6e:0e:36:1f:18 (on wlan0)
	inactive time:	0 ms
	rx bytes:	5875172367
	rx packets:	52915454
	tx bytes:	197338102690
	tx packets:	126668449
	tx retries:	0
	tx failed:	52
	rx drop misc:	57340
	signal:  	-61 [-67, -62, -73] dBm
	signal avg:	-60 [-66, -61, -72] dBm
	Toffset:	467444260 us
	tx bitrate:	6.0 MBit/s
	rx bitrate:	585.0 MBit/s VHT-MCS 4 80MHz short GI VHT-NSS 3
	rx duration:	699504416 us
	mesh llid:	0
	mesh plid:	0
	mesh plink:	ESTAB
	mesh local PS mode:	ACTIVE
	mesh peer PS mode:	ACTIVE
	mesh non-peer PS mode:	ACTIVE
	authorized:	yes
	authenticated:	yes
	associated:	yes
	preamble:	long
	WMM/WME:	yes
	MFP:		yes
	TDLS peer:	no
	DTIM period:	2
	beacon interval:100
	connected time:	6101 seconds
Upgrades von älteren Versionen
- TP-Link 841n v8.2 Barrier Breaker r35421 Upgrade auf OpenWrt 18.06-SNAPSHOT, r7724-6c3ca1d funktioniert
- TP-Link 841n 9.1 CHAOS CALMER (15.05, r46767) Upgrade auf OpenWrt 18.06-SNAPSHOT,r7724-6c3ca1d funktioniert
- TP-Link C7 v2 EU OpenWrt 18.06-SNAPSHOT, r7724-6c3ca1d Upgrade auf OpenWrt 21.02-SNAPSHOT, r16126-fc0fd54738 funktioniert
- zB: V8 des WLAN Routers:
root@mrMicrobox-1:/tmp# sysupgrade -v openwrt-ar71xx-tiny-tl-wr841-v8-squashfs-s
ysupgrade.bin
Saving config files...
etc/sysctl.conf
etc/shells
etc/shadow
etc/rc.local
etc/profile
etc/passwd
etc/inittab
etc/hosts
etc/group
etc/dropbear/dropbear_rsa_host_key
etc/dropbear/dropbear_dss_host_key
etc/dropbear/authorized_keys
etc/dnsmasq.conf
etc/config/wireless
etc/config/ubootenv
etc/config/system
etc/config/openvpn
etc/config/network
etc/config/dropbear
etc/config/dhcp
Sending TERM to remaining processes ... dnsmasq openvpn openvpn ntpd syslogd klogd hotplug2 procd ubusd netifd
Sending KILL to remaining processes ...
Switching to ramdisk...
Performing system upgrade...
Unlocking firmware ...

Writing from <stdin> to firmware ...
Appending jffs2 data from /tmp/sysupgrade.tgz to firmware...TRX header not found
Error fixing up TRX header

Upgrade completed
Rebooting system...


root@mrMicrobox-1:~# cat /proc/version
Linux version 4.9.164 (dev@develop-openwrt) (gcc version 7.3.0 (OpenWrt GCC 7.3.0 r7724-6c3ca1d) ) #0 Mon Mar 25 09:51:50 2019
Welche Branches gibt es ?
- openwrt-23.05 currently stable
- openwrt-22.03 old stable
3 hours ago 	main 	shortlog | log | tree
3 hours ago 	master 	shortlog | log | tree
22 hours ago 	openwrt-23.05 	shortlog | log | tree
10 days ago 	openwrt-22.03 	shortlog | log | tree
3 months ago 	openwrt-21.02 	shortlog | log | tree
4 months ago 	openwrt-19.07 	shortlog | log | tree
3 years ago 	openwrt-18.06 	shortlog | log | tree
4 years ago 	lede-17.01 	shortlog | log | tree
feeds aktualsieren
- Im Root der Build Umgebung
- ./scripts/feeds update -a / ./scripts/feeds install -a
git / sources hinzufügen branch auswählen
- danach befindet man sich im branch master
- Um zu wechseln cd ins openwrt und git checkout branch zB: git checkout openwrt-18.06
git / pakete aktualisieren
- Pakete aktualisieren in der vorhandenen Build Umgebung
- git pull
"anomeome, post:6, topic:9646"]
#!/bin/sh
#
#CDBU=$(date +"%F_%H%M%S")
#BAK="../abu/$CDBU"
#cp .config "$BAK"
# or set aside the config diff after it is generated, whatever
#make clean (dir/dist)
# i tend to the following rather than the previous, YMMV
# rm -rf bin build_dir tmp
#git pull
#./scripts/feeds update -a
#./scripts/feeds install -a
#./scripts/diffconfig.sh > configdiff
#cp configdiff .config
#make defconfig;make oldconfig
VLANs
- Getestet auf TP-Link EAP225 (https://www.amazon.de/-/en/gp/product/B01LLAK1UG) und OpenWrt 21.02-SNAPSHOT, r16399-c67509efd7
- Ich möchte quasi ein WLAN am AccessPort untagged und ein WLAN am virtuellen Port tagged im VLAN 27 / WLAN werden entweder in interface lan oder multi gehängt
..
config device
	option name 'br-lan'
	option type 'bridge'
	list ports 'eth0'

config device
        option name 'br-multi'
        option type 'bridge'
        list ports 'eth0.27'

config interface 'multi'
        option device 'br-multi'
        option proto 'none'

config interface 'lan'
	option device 'br-lan'
	option proto 'dhcp'
..
Bugland
- sysntpd holt sich nicht die Zeit / wenn alle Anschlüsse gebridged sind auf br-lan / kleiner Schubs wenns interface hochkommt
root@AP:/etc/hotplug.d/iface# cat 99-ifup-lan
#!/bin/sh
[ "$ACTION" = "ifup" -a "$INTERFACE" = "lan" ] && {
    logger "iface lan hack up detected restarting sysntpd ..."
    /etc/init.d/sysntpd restart
}
exit 0
Debian 11 to Debian 12 Upgrade
- Erfahrungen bei Workstation (HP 430 G2 beinahe seamless / vollverschlüsselt mit cryptsetup)
- Alle Einträge von /etc/apt/sources.list → bullseye mit → bookworm ersetzen
- apt-get update → Repo Infos aktualisieren
- apt-get upgrade → Bereits vorhandene Pakete aktualisieren
- apt-get dist-upgrade → Ebenso neue Pakete installieren und Kernel aktualisieren
- Den Anweisungen folgen hinsichtlich der Änderungen der Konfigurationsdateien (zB: bei syslog-ng.conf usw) und reboot :)
Debian 10 to Debian 11 Upgrade
- Pfad des ipset binaries ist anders ( ln -s /usr/sbin/ipset /sbin/ipset ) nicht mehr /sbin/ipset sondern /usr/sbin/ipset Grundsätzlicher Change on the horizont siehe https://www.debian.org/releases/stable/amd64/release-notes/ch-information.en.html
- Debian 10 wird zu oldstable → apt-get update –allow-releaseinfo-change
root@firewall:~# apt-get update
Get:1 http://security.debian.org buster/updates InRelease [65.4 kB]
Get:2 http://ftp.at.debian.org/debian buster InRelease [122 kB]
Get:3 http://ftp.at.debian.org/debian buster-updates InRelease [51.9 kB]
Reading package lists... Done
E: Repository 'http://security.debian.org buster/updates InRelease' changed its 'Suite' value from 'stable' to 'oldstable'
N: This must be accepted explicitly before updates for this repository can be applied. See apt-secure(8) manpage for details.
N: Repository 'http://ftp.at.debian.org/debian buster InRelease' changed its 'Version' value from '10.8' to '10.11'
E: Repository 'http://ftp.at.debian.org/debian buster InRelease' changed its 'Suite' value from 'stable' to 'oldstable'
N: This must be accepted explicitly before updates for this repository can be applied. See apt-secure(8) manpage for details.
E: Repository 'http://ftp.at.debian.org/debian buster-updates InRelease' changed its 'Suite' value from 'stable-updates' to 'oldstable-updates'
N: This must be accepted explicitly before updates for this repository can be applied. See apt-secure(8) manpage for details.
root@firewall:~# apt-get update --allow-releaseinfo-change
- Achtung Änderungen vom security Repo Syntax auf :
deb http://ftp.de.debian.org/debian bullseye main non-free contrib
deb http://deb.debian.org/debian bullseye-backports main non-free contrib
deb http://security.debian.org/debian-security bullseye-security main non-free contrib
deb http://ftp.de.debian.org/debian bullseye-updates main non-free contrib
- Achtung Einsatz von c-icap :
Sollte c-icap verwendet werden mit squidclamav (7.1) / libarchive13 installieren !
Seeehr schwierig c-icap vernünftig zu debuggen da es zu keiner Ausgabe kommt
- Achtung bei Squid mit Cache :
Bestimmte Verzeichnisse darf squid wegen appamor nicht lesen / siehe /etc/apparmor/ Squid und mit local ggf. anpassen

UFSSwapDir::openLog: Failed to open swap
- Achtung beim Einsatz von bonding :
- scheint schon gefixed zu sein / Tag des Upgrades 2022-02-16 / diese Config funktioniert unverändert von buster auf bullseye
auto bond0
#prepare bond interfaces
iface eth0 inet manual
iface eth1 inet manual

iface bond0 inet manual
      slaves eth0 eth1
      bond_mode 802.3ad
- Achtung Icinga Installation → läuft nach Upgrade unverändert obwohl nicht mehr in den Repos vorhanden / php5 muss manuell deinstalliert werden php7.4 ist aktuell für Distribution / Migration zu nagios4 beinahe analog zu Ubuntu Upgrades
Debian 8 to Debian 9 Upgrade
Nagios3 - Icinga
- pnp4nagios Error ERROR STDOUT: ERROR: invalid option 'lower=0'
--- /usr/share/pnp4nagios/html/templates.dist/default.php.old	2018-04-03 14:32:42.698461380 +0200
+++ /usr/share/pnp4nagios/html/templates.dist/default.php	2018-04-03 14:33:40.851404388 +0200
@@ -47,7 +47,7 @@
 		$crit_min = $VAL['CRIT_MIN'];
 	}
 	if ( $VAL['MIN'] != "" && is_numeric($VAL['MIN']) ) {
-		$lower = " --lower=" . $VAL['MIN'];
+		$lower = " --lower-limit=" . $VAL['MIN'];
 		$minimum = $VAL['MIN'];
 	}
 	if ( $VAL['MAX'] != "" && is_numeric($VAL['MAX']) ) {
@@ -56,7 +56,7 @@
 	if ($VAL['UNIT'] == "%%") {
 		$vlabel = "%";
 		$upper = " --upper=101 ";
-		$lower = " --lower=0 ";
+		$lower = " --lower-limit=0 ";
 	}
 	else {
$vlabel = $VAL['UNIT'];
Ubuntu 14.04 to Ubuntu 16.04 Upgrade
OpenVPN Bug systemd ?
- Sollte OpenVPN über service openvpn start nicht starten oder über pgrep die OpenVPN Prozesse nicht sichtbar sein / Fehler im syslog dass er openvpn service nicht starten kann
https://bugs.debian.org/cgi-bin/bugreport.cgi?bug=819919

einfach aus der Datei

 /lib/systemd/system/openvpn@.service

den Eintrag

LimitNPROC=1

auskommentieren und systemd neu laden ggf. neustart zum check ob openvpn hoch kommt
Nagios3 - Icinga
- pnp4nagios wurde entfernt
- Achtung php5 wurde entfernt - libapache2-mod-php - installiert php7.0 - überprüfen ob nach Upgrade PHP aktiv
- nagios3 wurde entfernt
- Alternative ohne große Syntax Änderungen „icinga“ nicht „icinga2“
apt-get install icinga
- Bestehende Konfigurationen aus /etc/nagios3/conf.d nach /etc/icinga/objects
- pnp4nagios manuell installieren & kompilieren
  wget "https://sourceforge.net/projects/pnp4nagios/files/PNP-0.6/pnp4nagios-0.6.26.tar.gz/download"
  mv download pnp4nagios-0.6.26.tar.gz
  gunzip pnp4nagios-0.6.26.tar.gz
  mkdir pnp4nagios-manual-install
  tar -xvf pnp4nagios-0.6.26.tar -C pnp4nagios-manual-install/
  ./configure --with-nagios-user=nagios --with-nagios-group=nagios --with-httpd-conf=/etc/apache2/conf-enabled
  make all
  make install
  make install-webconf
  make install-config
  make install-init
  update-rc.d npcd defaults
  service npcd start
  service npcd status
  vim /etc/apache2/conf-enabled/pnp4nagios.conf -> auf **/etc/icinga/htpasswd.users** Pfad anpassen
  apt-get install php-xml php-gd rrdtool
  Anpassen von /usr/local/pnp4nagios/etc/config_local.php
  Anpassen von /etc/icinga/icinga.cfg - performance data
  Anpassen der Templates unter /etc/icinga/objects/ - die action URLS damit zu php4nagios ein Link gebaut wird
  Testen von pnp4nagios unter zB: http://localhost/pnp4nagios -> dann kann die install Datei gelöscht werden wenn alles grün
  Neustart von icinga / Apache2
- Grundsätzlich:
7 - Modify config_local.php for Naemon

vi /usr/local/pnp4nagios/etc/config_local.php

edit row: $conf[‘nagios_base’] = “/nagios/cgi-bin”;

replace with: $conf[‘nagios_base’] = “/icinga/cgi-bin”;
8 - Enable Naemon performance data

vi /etc/icinga/icinga.cfg

edit row: process_performance_data=0”

replace with: process_performance_data=1”

Add the following entries at the bottom of /etc/icinga/icinga.cfg to
setup performance data settings

#
# service performance data
#
service_perfdata_file=/usr/local/pnp4nagios/var/service-perfdata
service_perfdata_file_template=DATATYPE::SERVICEPERFDATA\tTIMET::$TIMET$\tHOSTNAME::$HOSTNAME$\tSERVICEDESC::$SERVICEDESC$\tSERVICEPERFDATA::$SERVICEPERFDATA$\tSERVICECHECKCOMMAND::$SERVICECHECKCOMMAND$\tHOSTSTATE::$HOSTSTATE$\tHOSTSTATETYPE::$HOSTSTATETYPE$\tSERVICESTATE::$SERVICESTATE$\tSERVICESTATETYPE::$SERVICESTATETYPE$
service_perfdata_file_mode=a
service_perfdata_file_processing_interval=15
service_perfdata_file_processing_command=process-service-perfdata-file

#
#
#
host_perfdata_file=/usr/local/pnp4nagios/var/host-perfdata
host_perfdata_file_template=DATATYPE::HOSTPERFDATA\tTIMET::$TIMET$\tHOSTNAME::$HOSTNAME$\tHOSTPERFDATA::$HOSTPERFDATA$\tHOSTCHECKCOMMAND::$HOSTCHECKCOMMAND$\tHOSTSTATE::$HOSTSTATE$\tHOSTSTATETYPE::$HOSTSTATETYPE$
host_perfdata_file_mode=a
host_perfdata_file_processing_interval=15
host_perfdata_file_processing_command=process-host-perfdata-file

9 - Add process performance commands

vi /etc/naemon/conf.d/commands.cfg

Add the following entries at the bottom of /etc/naemon/conf.d/commands.cfg

define command{
       command_name    process-service-perfdata-file
       command_line    /bin/mv
/usr/local/pnp4nagios/var/service-perfdata
/usr/local/pnp4nagios/var/spool/service-perfdata.$TIMET$
}

define command{
       command_name    process-host-perfdata-file
       command_line    /bin/mv /usr/local/pnp4nagios/var/host-perfdata
/usr/local/pnp4nagios/var/spool/host-perfdata.$TIMET$
}

10 - Add host performance template

vi /etc/naemon/conf.d/templates/hosts.cfg

Add the following entries at the bottom of
/etc/naemon/conf.d/templates/hosts.cfg

define host {
   name host-pnp
   process_perf_data 1
   action_url /pnp4nagios/index.php/graph?host=$HOSTNAME$&srv=_HOST_'
class='tips' rel='/pnp4nagios/index.php/popup?host=$HOSTNAME$&srv=_HOST_
   register 0
}

11 - Add service performance template

vi /etc/naemon/conf.d/templates/services.cfg

Add the following entries at the bottom of
/etc/naemon/conf.d/templates/services.cfg

define service {
   name service-pnp
   process_perf_data 1
   action_url
/pnp4nagios/index.php/graph?host=$HOSTNAME$&srv=$SERVICEDESC$'
class='tips'
rel='/pnp4nagios/index.php/popup?host=$HOSTNAME$&srv=$SERVICEDESC$
   register 0
}
Ubuntu 32Bit to 64bit Kernel - CrossGrading
Produktivsystem 32bit verbleibt - Kernel 64bit
- Getestet auf 32Bit Kernel Ubuntu 18.04.1
- Hintergrund: Aus historischen Gründen läuft ein 32Bit Kernel / Produziert mittlerweile jedoch undefinierbare Kernel Panics (auf manchen Hyper-V 2012r2 Systemen) / Wir möchten , dass zumindest ein 64Bit Kernel läuft obwohl der Rest 32Bit bleibt (Binaries / Libraries usw..)
- Vollständiges CrossGrading von 32Bit auf 64Bit NICHT empfehlenswert / Getestet diverse Male in Virtualisierung führt zu nicht definierbarem Systemzustand
  dpkg --add-architecture amd64
  apt-get update
  apt-get install apt-get install linux-image-generic:amd64
  apt-get install linux-image-generic:amd64
  reboot
Bootstrapping neues System
- Komplett neues System bootstrappen / Pakete die auf alten System installiert sind installieren und /etc mit Konfigurationen übernehmen
- Neues System wird mit grml live iso gebootet / Partionierung usw. vorbereitet
1. debootstrap neues System 64bit

debootstrap --variant=minbase --arch=amd64 bionic /mnt/ http://de.archive.ubuntu.com/ubuntu

2. Alle Paketnamen exportieren auf 32Bit Produktivsystem
dpkg --get-selections | grep -v deinstall | cut -d":" -f1 | awk '{print $1}' > all_packagaes


3. Pakete mit Fehlern aus der Liste löschen / und Pakete reindrücken

Falls bei Produktivsystem keine Recommends
root@firewall:/etc/apt/apt.conf.d# cat 30NoRecommends

APT::Install-Recommends "0";
APT::Install-Suggests "0";

ins 64Bit System chroot übernehmen

packages=$(cat /root/all_packages.txt | paste -sd" ");  apt-get install $packages

4. /etc/ und ggf. Skripte übertragen / Module ggf. neu bauen (squidlcamav)

wichtig aus dem chroot heraus und ohne numeric-ids / passwd und groups File der Neuinstallation muss bleiben

zB:  rsync -av --delete  -e "ssh -p10022" --exclude "/passwd*" --exclude "/group*" --compress root@10.0.27.36:/etc/ /mnt/etc/
Ubuntu 16.04 to Ubuntu 18.04 Upgrade
- Issues mit Icinga
- Achtung nrpe Client hat die DH Größe geändert daher kommt es zu SSL Fehlern ggf. mit -2 legacy aktivieren oder nrpe Client vor Upgrade backuppen
- Probleme mit pnp4nagios nach Upgrade
sed -i 's:if(sizeof(\$pages:if(is_array(\$pages) \&\& sizeof(\$pages:' /usr/local/pnp4nagios/share/application/models/data.php
Ubuntu 14.04 to Ubuntu 18.04 Upgrade
Bring back ntp daemon / will kein systemd NTP
- Offenbar ab 16.04 - ein „FEATURE“
systemctl disable systemd-timesyncd.service
systemctl enable ntp.service
service ntp start
ntpq -> peers
Major Upgrades
- Mit dem do-release-upgrade tool von Ubuntu !!
- Manuelles Upgrade wie bei Debian mit ändern der sources hatte Chaos im ubuntu System verursacht
ipsec eap-radius backend geht nimma
- Achtung apt-get install libcharon-extra-plugins muss installiert sein
- Status vom alten Paket nämlich: strongswan-plugin-eap-radius deinstall
Systemd Resolver deaktivieren
- dnsmasq läuft auf meinem System
https://askubuntu.com/questions/907246/how-to-disable-systemd-resolved-in-ubuntu

Caution! Be aware that disabling systemd-resolvd might break name resolution in VPN for some users. See this bug on launchpad (Thanks, Vincent).

Disable the systemd-resolved service and stop it:

sudo systemctl disable systemd-resolved.service
sudo service systemd-resolved stop

Put the following line in the [main] section of your /etc/NetworkManager/NetworkManager.conf:

dns=default

Delete the symlink /etc/resolv.conf

rm /etc/resolv.conf

Restart network-manager

sudo service network-manager restart
syslog-ng
- Zeile 58 entfernen mit „Some 'catch-all' logfiles. - vim /etc/syslog-ng/syslog-ng.conf +58
php
- PHP5 ist obsolete
- apt-get install libapache2-mod-php → installiert PHP7.2
netstat is gone
- apt-get install net-tools
Netzwerkinterfaces
- ggf. hat sich die Netzwerkinterface Bezeichnung geändert (https://askubuntu.com/questions/704361/why-is-my-network-interface-named-enp0s25-instead-of-eth0)
- /etc/default/grub
...

GRUB_CMDLINE_LINUX="net.ifnames=0"
...
rc.local gone
root@arbitrator:~# systemctl status rc-local
● rc-local.service - /etc/rc.local Compatibility
   Loaded: loaded (/lib/systemd/system/rc-local.service;
enabled-runtime; vendor preset: enabled)
  Drop-In: /lib/systemd/system/rc-local.service.d
           └─debian.conf
   Active: failed (Result: exit-code) since Mon 2018-06-11 16:53:47
CEST; 1min 53s ago
     Docs: man:systemd-rc-local-generator(8)
  Process: 1182 ExecStart=/etc/rc.local start (code=exited, status=203/EXEC)

Jun 11 16:53:46 arbitrator systemd[1]: Starting /etc/rc.local
Compatibility...
Jun 11 16:53:47 arbitrator systemd[1182]: rc-local.service: Failed to
execute command: Exec format error
Jun 11 16:53:47 arbitrator systemd[1182]: rc-local.service: Failed at
step EXEC spawning /etc/rc.local: Exec format error
Jun 11 16:53:47 arbitrator systemd[1]: rc-local.service: Control process
exited, code=exited status=203
Jun 11 16:53:47 arbitrator systemd[1]: rc-local.service: Failed with
result 'exit-code'.
Jun 11 16:53:47 arbitrator systemd[1]: Failed to start /etc/rc.local
Compatibility.
- /etc/rc.local still works in Ubuntu 18.04, when
    1) it exists
    2) is executable
    3) Starts with a valid shell e.g. #!/bin/bash
Ubuntu 18.04 to Ubuntu 20.04 Upgrade
nagios4
- Für Nagios4 sind die Pakete in Ubuntu 20.04 enthalten (nagios4)
- Achtung Konfigurationen von Icinga können zum Großteil übernommen werden / beim Upgradeprozess darauf achten , dass nicht alle Konfigurationsdateien von Icinga gelöscht werden , da dieses Paket nicht mehr enthalten ist
- Scratchpad der Punkte die mir aufgefallen sind beim dist-upgrade und Umstieg auf nagios4:
Upgrade Ubuntu 18.04 -> 20.04 mit Icinga Installation


do-release-upgrade

Instruktionen folgen im Grunde "y" auf alle Fragen..


....
or available database at line 7: libgdbm5:amd64
                                               dpkg: warning: package not in status nor available database at line 8: libhogweed4:amd64
                                                                                                                                       dpkg: warning: package not in status nor available database at line 9: libisc-export169:amd64
                                                                       dpkg: warning: package not in status nor available database at line 10: libisccc160:amd64
   dpkg: warning: package not in status nor available database at line 15: python-asn1crypto:all
                                                                                                dpkg: warning: found unknown packages; this might mean the available database
                is outdated, and needs to be updated through a frontend method;
                                                                               please see the FAQ <https://wiki.debian.org/Teams/Dpkg/FAQ>
                                                                                                                                          (Reading database .(Reading database ... 83943 files and directories currently installed.)
Purging configuration files for php7.2-opcache (7.2.24-0ubuntu0.18.04.10) ...
Purging configuration files for php7.2-json (7.2.24-0ubuntu0.18.04.10) ...
Purging configuration files for php5-json (1.3.2-2build1) ...
dpkg: warning: while removing php5-json, directory '/etc/php5/mods-available' not empty so not removed
Purging configuration files for php7.2-readline (7.2.24-0ubuntu0.18.04.10) ...

System upgrade is complete.

Restart required

To complete the upgrade, a system restart is required.
If you select 'y' the system will be restarted.

Continue [yN] y

...

-> über openvpn VPN Verbindung - hat geklappt - reboot :)


-> Remote VPN kommt wieder zurück - hat geklappt - ssh wieder da :)


-----

Icinga wurd entfernt - dafür gibt es wieder Nagios
root@monitoring:/etc/icinga# apt-cache search nagios4
nagios4 - host/service/network monitoring and management system
nagios4-cgi - cgi files for nagios4
nagios4-common - support files for nagios4
nagios4-core - host/service/network monitoring and management system core files
nagios4-dbg - debugging symbols and debug stuff for nagios4


-----
root@monitoring:/etc/icinga# apt-get install nagios4
Reading package lists... Done
Building dependency tree
Reading state information... Done
The following packages were automatically installed and are no longer required:
  libjs-jquery-ui python-attr python-automat python-constantly
  python-hyperlink python-idna python-pyasn1 python-pyasn1-modules
  python-service-identity
Use 'apt autoremove' to remove them.
The following additional packages will be installed:
  nagios4-cgi nagios4-common nagios4-core
Recommended packages:
  nagios-images
The following NEW packages will be installed:
  nagios4 nagios4-cgi nagios4-common nagios4-core
0 upgraded, 4 newly installed, 0 to remove and 0 not upgraded.
Need to get 1,595 kB of archives.
After this operation, 8,857 kB of additional disk space will be used.
Do you want to continue? [Y/n] y
Get:1 http://at.archive.ubuntu.com/ubuntu focal/universe amd64 nagios4-common all 4.3.4-3 [55.9 kB]
Get:2 http://at.archive.ubuntu.com/ubuntu focal/universe amd64 nagios4-cgi amd64 4.3.4-3 [1,290 kB]
Get:3 http://at.archive.ubuntu.com/ubuntu focal/universe amd64 nagios4-core amd64 4.3.4-3 [246 kB]
Get:4 http://at.archive.ubuntu.com/ubuntu focal/universe amd64 nagios4 amd64 4.3.4-3 [3,404 B]
Fetched 1,595 kB in 1s (1,391 kB/s)
Selecting previously unselected package nagios4-common.
(Reading database ... 83943 files and directories currently installed.)
Preparing to unpack .../nagios4-common_4.3.4-3_all.deb ...
Unpacking nagios4-common (4.3.4-3) ...
Selecting previously unselected package nagios4-cgi.
Preparing to unpack .../nagios4-cgi_4.3.4-3_amd64.deb ...
Unpacking nagios4-cgi (4.3.4-3) ...
Selecting previously unselected package nagios4-core.
Preparing to unpack .../nagios4-core_4.3.4-3_amd64.deb ...
Unpacking nagios4-core (4.3.4-3) ...
Selecting previously unselected package nagios4.
Preparing to unpack .../nagios4_4.3.4-3_amd64.deb ...
Unpacking nagios4 (4.3.4-3) ...
Setting up nagios4-common (4.3.4-3) ...
Setting up nagios4-core (4.3.4-3) ...
Setting up nagios4-cgi (4.3.4-3) ...

Creating config file /etc/nagios4/apache2.conf with new version
enabling Apache2 config...
apache2_invoke cgi: already enabled
apache2_invoke: Enable configuration nagios4-cgi
apache2_reload: Your configuration is broken. Not reloading Apache 2
apache2_reload: AH00526: Syntax error on line 37 of /etc/apache2/conf-enabled/nagios4-cgi.conf:
apache2_reload: Invalid command 'AuthDigestDomain', perhaps misspelled or defined by a module not included in the server configuration
Setting up nagios4 (4.3.4-3) ...
Processing triggers for man-db (2.9.1-1) ...
Processing triggers for systemd (245.4-4ubuntu3.15) ...

-----

Ok digest Modul für apache2 ist offenbar nicht aktiviert

root@monitoring:/etc/apache2/mods-available# ls -al aut^C
root@monitoring:/etc/apache2/mods-available# a2enmod auth_digest
Considering dependency authn_core for auth_digest:
Module authn_core already enabled
Enabling module auth_digest.
To activate the new configuration, you need to run:
  systemctl restart apache2
root@monitoring:/etc/apache2/mods-available# systemctl restart apache2
Job for apache2.service failed because the control process exited with error code.
See "systemctl status apache2.service" and "journalctl -xe" for details.

---

Ok nächstes Modul für Auth fehlt

Jan 13 10:20:44 monitoring systemd[1]: Starting The Apache HTTP Server...
Jan 13 10:20:44 monitoring apachectl[3131]: AH00526: Syntax error on line 40 of /etc/apache2/conf-enabled/nagios4-cgi.conf:
Jan 13 10:20:44 monitoring apachectl[3131]: Invalid command 'AuthGroupFile', perhaps misspelled or defined by a module not included in the server configura>
Jan 13 10:20:45 monitoring apachectl[3120]: Action 'start' failed.
Jan 13 10:20:45 monitoring apachectl[3120]: The Apache error log may have more information.
Jan 13 10:20:45 monitoring systemd[1]: apache2.service: Control process exited, code=exited, status=1/FAILURE
Jan 13 10:20:45 monitoring systemd[1]: apache2.service: Failed with result 'exit-code'.
Jan 13 10:20:45 monitoring systemd[1]: Failed to start The Apache HTTP Server.

------

root@monitoring:/etc/apache2/mods-available# ls -al /etc/apache2/mods-available/a^C
root@monitoring:/etc/apache2/mods-available# a2enmod authz_groupfile.load
Considering dependency authz_core for authz_groupfile:
Module authz_core already enabled
Enabling module authz_groupfile.
To activate the new configuration, you need to run:
  systemctl restart apache2
root@monitoring:/etc/apache2/mods-available# systemctl restart apache2
root@monitoring:/etc/apache2/mods-available# systemctl status apache2
● apache2.service - The Apache HTTP Server
     Loaded: loaded (/lib/systemd/system/apache2.service; enabled; vendor preset: enabled)
     Active: active (running) since Thu 2022-01-13 10:22:02 CET; 4s ago
       Docs: https://httpd.apache.org/docs/2.4/
    Process: 3170 ExecStart=/usr/sbin/apachectl start (code=exited, status=0/SUCCESS)
   Main PID: 3182 (apache2)
      Tasks: 6 (limit: 1100)
     Memory: 11.4M
     CGroup: /system.slice/apache2.service
             ├─3182 /usr/sbin/apache2 -k start
             ├─3183 /usr/sbin/apache2 -k start
             ├─3184 /usr/sbin/apache2 -k start
             ├─3185 /usr/sbin/apache2 -k start
             ├─3186 /usr/sbin/apache2 -k start
             └─3187 /usr/sbin/apache2 -k start

Jan 13 10:22:02 monitoring systemd[1]: Starting The Apache HTTP Server...
Jan 13 10:22:02 monitoring systemd[1]: Started The Apache HTTP Server.


----

Ok user gibts auch keinen zum Zugriff per HTTP - Realm laut Config file Nagios4 - siehe /etc/apache2/conf-enabled/nagios4-cgi.conf / Achtung per Default
wird ausschließlich per IP Acl (granted) authentifiziert - muss manuell aktiviert werden siehe Kommentare in der Konfigurationsdatei

root@monitoring:/etc/apache2/conf-enabled# htdigest  /etc/nagios4/htdigest.users Nagios4 admin
Adding user admin in realm Nagios4
New password:
Re-type new password:

---

Versuch die Objekte der Icinga Installation in die Nagios4 Installatio zu verschieben:

vorher die Default Objekte wegschieben
root@monitoring:/etc/nagios4/objects# cp -r /etc/icinga/objects/ ./


----
root@monitoring:/etc/nagios4/objects# service nagios4 restart
Job for nagios4.service failed because the control process exited with error code.
See "systemctl status nagios4.service" and "journalctl -xe" for details.

----
Ok hardcoded sind die Basispfade für die Konfiguration

/etc/nagios4/nagios.cfg
....
# Debian uses by default a configuration directory where nagios4-common,
# other packages and the local admin can dump or link configuration
# files into.
cfg_dir=/etc/nagios4/conf.d
cfg_dir=/etc/nagios4/objects


# OBJECT CONFIGURATION FILE(S)
# These are the object configuration files in which you define hosts,
# host groups, contacts, contact groups, services, etc.
# You can split your object definitions across several config files
# if you wish (as shown below), or keep them all in a single config file.

#2022-01-13 cc: No default hierarchy
# You can specify individual object config files as shown below:
#cfg_file=/etc/nagios4/objects/commands.cfg
#cfg_file=/etc/nagios4/objects/contacts.cfg
#cfg_file=/etc/nagios4/objects/timeperiods.cfg
#cfg_file=/etc/nagios4/objects/templates.cfg

# Definitions for monitoring the local (Linux) host
#cfg_file=/etc/nagios4/objects/localhost.cfg

# Definitions for monitoring a Windows machine
#cfg_file=/etc/nagios4/objects/windows.cfg

...


YES - Config ist grundsätzlich kompatibel

----

Auf  zu pnp4nagios

Auth ebenfalls auf digest umstellen analog zu nagios4-cgi.conf

root@monitoring:/etc/apache2/conf-enabled# vim pnp4nagios.conf

-------

Deprecated functions / PHP Kompatiblitätsprobleme

Danke an https://exchange.nagios.org/directory/Addons/Graphing-and-Trending/PNP4Nagios/details

----

performance data passt noch nicht

/etc/nagios4/nagios.conf

process_performance_data = 1

in meiner Installation:
service_perfdata_file=/usr/local/pnp4nagios/var/service-perfdata
service_perfdata_file_template=DATATYPE::SERVICEPERFDATA\tTIMET::$TIMET$\tHOSTNAME::$HOSTNAME$\tSERVICEDESC::$SERVICEDESC$\tSERVICEPERFDATA::$SERVICEPERFDATA$\tSERVICECHECKCOMMAND::$SERVICECHECKCOMMAND$\tHOSTSTATE::$HOSTSTATE$\tHOSTSTATETYPE::$HOSTSTATETYPE$\tSERVICESTATE::$SERVICESTATE$\tSERVICESTATETYPE::$SERVICESTATETYPE$
service_perfdata_file_mode=a
service_perfdata_file_processing_interval=15
service_perfdata_file_processing_command=process-service-perfdata-file

host_perfdata_file=/usr/local/pnp4nagios/var/host-perfdata
host_perfdata_file_template=DATATYPE::HOSTPERFDATA\tTIMET::$TIMET$\tHOSTNAME::$HOSTNAME$\tHOSTPERFDATA::$HOSTPERFDATA$\tHOSTCHECKCOMMAND::$HOSTCHECKCOMMAND$\tHOSTSTATE::$HOSTSTATE$\tHOSTSTATETYPE::$HOSTSTATETYPE$
host_perfdata_file_mode=a
host_perfdata_file_processing_interval=15
host_perfdata_file_processing_command=process-host-perfdata-file
- Achtung bei Windows nsclient++ 2048 Bit DH keyfile erstellen und Konfiguration anpassen (-2 für legacy Protokoll bei Nagios Installation und Konfigurationsanpassungen bei nsclient++ für 2048 bit dh keyfile)
lvm
- Warning dass alter Header benutzt wird während des Upgrades mit do-release-upgrade
 vgs
 vgck --updatemetadata volumeGroupName
clamav
- Einige Options existieren nicht mehr, die entfernt werden müssen
Error Clamd:
Apr 03 09:02:49 firewall systemd[1]: Starting Clam AntiVirus userspace daemon...
Apr 03 09:02:49 firewall systemd[1]: Started Clam AntiVirus userspace daemon.
Apr 03 09:02:49 firewall clamd[764]: WARNING: Ignoring deprecated option DetectBrokenExecutables at /etc/clamav/clamd.conf:40
Apr 03 09:02:49 firewall clamd[764]: WARNING: Ignoring deprecated option ScanOnAccess at /etc/clamav/clamd.conf:60
Apr 03 09:02:49 firewall clamd[764]: ERROR: Parse error at /etc/clamav/clamd.conf:71: Unknown option StatsEnabled
Apr 03 09:02:49 firewall clamd[764]: ERROR: Can't open/parse the config file /etc/clamav/clamd.conf
Apr 03 09:02:49 firewall systemd[1]: clamav-daemon.service: Main process exited, code=exited, status=1/FAILURE
Apr 03 09:02:49 firewall systemd[1]: clamav-daemon.service: Failed with result 'exit-code'.

-> Remove StatsXXX Options

-> Remove Deprecated Options:
Apr 03 09:35:28 firewall systemd[1]: Started Clam AntiVirus userspace daemon.
Apr 03 09:35:28 firewall clamd[50896]: WARNING: Ignoring deprecated option DetectBrokenExecutables at /etc/clamav/clamd.conf:40
Apr 03 09:35:28 firewall clamd[50896]: WARNING: Ignoring deprecated option ScanOnAccess at /etc/clamav/clamd.conf:60
NetworkManager
- Getestet auf Debian 12 Bookworm
- Ich möchte alle dns queries loggen - mit dnsmasq (man NetworkManager.conf)
- /etc/NetworkManager/NetworkManager.conf
[main]
...
dns=dnsmasq
...
- Nach einem restart vom NetworkManger startet er eine eigene dnsmasq Instanz als nobody e.g.
/usr/sbin/dnsmasq --no-resolv --keep-in-foreground --no-hosts --bind-interfaces --pid-file=/run/NetworkManager/dnsmasq.pid --listen-address=127.0.0.1 --cache-size=400 --clear-on-reload --conf-file=/dev/null --proxy-dnssec --enable-dbus=org.freedesktop.NetworkManager.dnsmasq --conf-dir=/etc/NetworkManager/dnsmasq.d
- Fürs logging erstellen wir /etc/NetworkManager/dnsmasq.d/queries.conf
log-queries=extra
log-async
- Auf meiner Maschine erhalte ich nun alle queries unter zB: tail -f /var/log/syslog | grep dnsmasq
Feb 26 11:41:43 mrWhiteGhost dnsmasq[7898]: 1788 127.0.0.1/40860 query[A] doku.pannoniait.at from 127.0.0.1
Feb 26 11:41:43 mrWhiteGhost dnsmasq[7898]: 1788 127.0.0.1/40860 cached doku.pannoniait.at is 188.40.28.234


Feb 26 11:42:10 mrWhiteGhost dnsmasq[7898]: 1789 127.0.0.1/53721 query[A] safebrowsing.googleapis.com from 127.0.0.1
Feb 26 11:42:10 mrWhiteGhost dnsmasq[7898]: 1789 127.0.0.1/53721 forwarded safebrowsing.googleapis.com to 192.168.179.2
Feb 26 11:42:10 mrWhiteGhost dnsmasq[7898]: 1789 127.0.0.1/53721 reply safebrowsing.googleapis.com is 142.250.184.202
openssh
- Notification mail nach Login via SSH
root@firewall:~# cat /etc/ssh/sshrc
ip=$(echo $SSH_CONNECTION | cut -d " " -f 1)
date=$(date)
echo "User $USER just logged in at $date from $ip" | mail  -s "SSH Login Firewall" MAIL_ADRESSE_RECIPIENT
- Ausführen von bestimmten Skript nach Login über SSH
...
Match User username123
 ForceCommand /usr/local/bin/script.sh
...
XRDP Remote Desktop Server mit Kerberos im AD - terminalserver
- Wir wollen in einer Active Directory Umgebung einen Open Source Remote Desktop Server bei dem sich alle Mitglieder der Domäne mit ihren gewohnten Zugangsdaten einloggen können
- Es soll den Usern die Möglichkeit geboten werden mit ihren Windows Maschinen per nativem Remote Desktop Client (mstsc.exe) auf eine Linux XFCE Umgebung zuzugreifen um den Einstieg in die Open Source Welt zu erleichtern bzw. leicht zu ermöglichen
- Den eingeloggten Usern sollen automatisch die richtigen Proxy Einstellungen für die Infrastruktur zugewiesen werden & es soll ihnen nicht möglich sein den Server herunterzufahren / neu zu starten oder zu suspendieren
Domäne: firma.intern
Zielserver: terminalserver.firma.intern / Debian stretch + xfce4 Oberfläche + xrdp
Anforderungen Zielserver
- Achtung
- Bei der Debian Installation wurde die grafische Oberfläche gleich über den Installer ausgewählt - xfce
- Erforderliche Pakete
apt-get install krb5-user krb5-config msktutil xrdp sssd-ad sssd-ad-common sssd-common sssd-krb5 sssd-krb5-common
- Anforderungen innerhalb Infrastruktur
- Forward und Reverse Lookup wurden konfiguriert auf AD Server bzw. DNS Server zB: terminalserver.firma.intern → 192.168.0.11 u. 192.168.0.11 → terminalserver.firma.intern
- Forward und Reverse Lookup funktionieren auch auf Zielserver entsprechend d.h. richtige DNS Server wurden eingetragen /etc/resolv.conf
- Zeit wird synchronisiert mit zB: AD Server - Zeit darf nicht um mehr als 5 Minuten vom AD Server abweichen , mit openntpd oder ntp
Zielserver dem AD hinzufügen mit msktutil
- Kerberos Konfiguration
root@terminalserver:/# cat /etc/krb5.conf
[libdefaults]
	default_realm = FIRMA.INTERN

# The following krb5.conf variables are only for MIT Kerberos.
	kdc_timesync = 1
	ccache_type = 4
	forwardable = true
	proxiable = true

# The following encryption type specification will be used by MIT Kerberos
# if uncommented.  In general, the defaults in the MIT Kerberos code are
# correct and overriding these specifications only serves to disable new
# encryption types as they are added, creating interoperability problems.
#
# The only time when you might need to uncomment these lines and change
# the enctypes is if you have local software that will break on ticket
# caches containing ticket encryption types it doesn't know about (such as
# old versions of Sun Java).

#	default_tgs_enctypes = des3-hmac-sha1
#	default_tkt_enctypes = des3-hmac-sha1
#	permitted_enctypes = des3-hmac-sha1

# The following libdefaults parameters are only for Heimdal Kerberos.
	fcc-mit-ticketflags = true

[realms]
        FIRMA.INTERN = {
		kdc = dc.firma.intern
                admin_server = dc.firma.intern
		default_domain = firma.intern
	}

[domain_realm]
	.firma.intern = FIRMA.INTERN
         firma.intern = FIRMA.INTERN
- Kerberos Ticket holen
root@terminalserver:/# kinit Administrator
Password for Administrator@FIRMA.INTERN:
root@terminalserver:/# klist
Ticket cache: FILE:/tmp/krb5cc_0
Default principal: Administrator@FIRMA.INTERN

Valid starting       Expires              Service principal
06/18/2019 09:46:16  06/18/2019 19:46:16  krbtgt/FIRMA.INTERN@FIRMA.INTERN
	renew until 06/19/2019 09:46:11
- Kerberos Keytab für Terminalserver erstellen
root@terminalserver:/# msktutil -c -b "CN=COMPUTERS" -s AUTH/terminalserver.firma.intern -h terminalserver.firma.intern -k /etc/krb5.keytab --computer-name terminal --upn AUTH/terminalserver.firma.intern --server dc.firma.intern --verbose
- Keytab Location für SSSD
root@terminalserver:/# ls -al /etc/krb5.keytab
-rw------- 1 root root 2156 Jun 12 11:50 /etc/krb5.keytab
- Account Secret automatisch aktualisieren
root@terminalserver:/etc/sssd# cat /etc/cron.d/msktutil
00 00     * * * root   /usr/sbin/msktutil --auto-update -k /etc/krb5.keytab --computer-name terminal | logger -t "msktutil"
User Mapping konfigurieren mit SSSD-AD
- Folgende SSSD Pakete sind installiert:
- herausfinden ob alle benötigt werden
root@terminalserver:/etc/sssd#  dpkg --get-selections | grep -i sssd
sssd						install
sssd-ad						install
sssd-ad-common					install
sssd-common					install
sssd-dbus					install
sssd-ipa					install
sssd-krb5					install
sssd-krb5-common				install
sssd-ldap					install
sssd-proxy					install
sssd-tools					install
- Nach der Installation kann er den Daemon nicht starten da er nicht konfiguriert wurde/ist
root@terminalserver:/etc/sssd# cat sssd.conf
# Configuration for the System Security Services Daemon (SSSD)
[sssd]

# Syntax of the config file; always 2
config_file_version = 2

# Services that are started when sssd starts
services = nss, pam

# List of domains in the order they will be queried
domains = firma.intern

# Configuration for the AD domain
[domain/firma.intern]

# Use the Active Directory Provider
id_provider = ad

# Use Active Directory for access control
access_provider = ad

# Turn off sudo support in sssd - we're doing it directly in /etc/sudoers.d/
# and leaving this enabled results in spurious emails being sent to root
sudo_provider = none

# UNIX and Windows use different mechanisms to identify groups and users.
# UNIX uses integers for both; the challenge is to generate these consistently
# across all machines from the objectSID.
#
# Active Directory provides an objectSID for every user and group object in
# the directory. This objectSID can be broken up into components that represent
# the Active Directory domain identity and the relative identifier (RID) of the
# user or group object.
#
# The SSSD ID-mapping algorithm takes a range of available UIDs and divides it into
# equally-sized component sections - called "slices"-. Each slice represents
# the space available to an Active Directory domain.
#
# The default configuration results in configuring 10,000 slices, each capable
# of holding up to 200,000 IDs, starting from 10,001 and going up to
# 2,000,100,000. This should be sufficient for most deployments.
ldap_id_mapping = true

# Define some defaults for accounts that are not already on this box.
# We appear to need these settings as well as the PAM configuration.
fallback_homedir = /home/%u
default_shell = /bin/bash
skel_dir = /etc/skel


ad_gpo_map_interactive = +xrdp-sesman
- Check ob Daemon läuft:
root@terminalserver:/etc/sssd# systemctl restart sssd
root@terminalserver:/etc/sssd# systemctl status sssd
● sssd.service - System Security Services Daemon
   Loaded: loaded (/lib/systemd/system/sssd.service; enabled; vendor preset: enabled)
   Active: active (running) since Tue 2019-06-18 09:51:05 CEST; 11s ago
 Main PID: 4022 (sssd)
    Tasks: 4 (limit: 9830)
   CGroup: /system.slice/sssd.service
           ├─4022 /usr/sbin/sssd -i -f
           ├─4023 /usr/lib/x86_64-linux-gnu/sssd/sssd_be --domain firma.intern --uid 0 --gid 0 --debug-to-files
           ├─4024 /usr/lib/x86_64-linux-gnu/sssd/sssd_nss --uid 0 --gid 0 --debug-to-files
           └─4025 /usr/lib/x86_64-linux-gnu/sssd/sssd_pam --uid 0 --gid 0 --debug-to-files

Jun 18 09:51:05 terminalserver systemd[1]: Starting System Security Services Daemon...
Jun 18 09:51:05 terminalserver sssd[4022]: Starting up
Jun 18 09:51:05 terminalserver sssd[be[4023]: Starting up
Jun 18 09:51:05 terminalserver sssd[4024]: Starting up
Jun 18 09:51:05 terminalserver sssd[4025]: Starting up
Jun 18 09:51:05 terminalserver systemd[1]: Started System Security Services Daemon
- Automatisch Home Verzeichnisse erstellen lassen beim 1. Login
root@terminalserver:/# cat /usr/share/pam-configs/active-directory-homes
Name: Guestline AD user home management
Default: yes
Priority: 127

Session-Type: Additional
Session-Interactive-Only: yes
Session:
        required pam_mkhomedir.so skel=/etc/skel/ umask=0077

root@terminalserver:/#  /usr/sbin/pam-auth-update --package
Remote Desktop Server mit xrdp
- Konfiguration für RDP Server
root@terminalserver:/# grep -v ^[\;] /etc/xrdp/xrdp.ini
[Globals]
ini_version=1

fork=true
port=3389
tcp_nodelay=true
tcp_keepalive=true
#tcp_send_buffer_bytes=32768
#tcp_recv_buffer_bytes=32768

security_layer=tls

crypt_level=high

certificate=/etc/xrdp/terminalserver.firma.intern.crt
key_file=/etc/xrdp/terminalserver.firma.intern.key


disableSSLv3=true
tls_ciphers=HIGH

autorun=

allow_channels=true
allow_multimon=true
bitmap_cache=true
bitmap_compression=true
bulk_compression=true
#hidelogwindow=true
max_bpp=32
new_cursors=true
use_fastpath=both
#require_credentials=true
#pamerrortxt=change your password according to policy at http://url

blue=009cb5
grey=dedede
#black=000000
#dark_grey=808080
#blue=08246b
#dark_blue=08246b
#white=ffffff
#red=ff0000
#green=00ff00
#background=626c72


ls_title=terminalserver.firma.intern

ls_top_window_bg_color=009cb5

ls_width=350
ls_height=430

ls_bg_color=dedede

#ls_background_image=

ls_logo_filename=
ls_logo_x_pos=55
ls_logo_y_pos=50

ls_label_x_pos=30
ls_label_width=60

ls_input_x_pos=110
ls_input_width=210

ls_input_y_pos=220

ls_btn_ok_x_pos=142
ls_btn_ok_y_pos=370
ls_btn_ok_width=85
ls_btn_ok_height=30

ls_btn_cancel_x_pos=237
ls_btn_cancel_y_pos=370
ls_btn_cancel_width=85
ls_btn_cancel_height=30

[Logging]
LogFile=xrdp.log
LogLevel=DEBUG
EnableSyslog=true
SyslogLevel=DEBUG

[Channels]
rdpdr=true
rdpsnd=true
drdynvc=true
cliprdr=true
rail=true
xrdpvr=true
tcutils=true

#port=/var/run/xrdp/sockdir/xrdp_display_10

#chansrvport=/var/run/xrdp/sockdir/xrdp_chansrv_socket_7210


[Xorg]
name=Linux
lib=libxup.so
username=ask
password=ask
ip=127.0.0.1
port=-1
code=20


#channel.rdpdr=true
#channel.rdpsnd=true
#channel.drdynvc=true
#channel.cliprdr=true
#channel.rail=true
#channel.xrdpvr=true
root@terminalserver:/# grep -v ^[\;] /etc/xrdp/sesman.ini
[Globals]
ListenAddress=127.0.0.1
ListenPort=3350
EnableUserWindowManager=true
UserWindowManager=startwm.sh
DefaultWindowManager=startwm.sh

[Security]
AllowRootLogin=false
MaxLoginRetry=4
TerminalServerUsers=tsusers
TerminalServerAdmins=tsadmins
AlwaysGroupCheck=false

[Sessions]
X11DisplayOffset=10

MaxSessions=50

KillDisconnected=false

IdleTimeLimit=0

DisconnectedTimeLimit=0

Policy=Default

[Logging]
LogFile=xrdp-sesman.log
LogLevel=DEBUG
EnableSyslog=1
SyslogLevel=DEBUG

[Xorg]
param=Xorg
param=-config
param=xrdp/xorg.conf
param=-noreset
param=-nolisten
param=tcp

[Xvnc]
param=Xvnc
param=-bs
param=-nolisten
param=tcp
param=-localhost
param=-dpi
param=96

[Chansrv]
FuseMountName=thinclient_drives

[SessionVariables]
PULSE_SCRIPT=/etc/xrdp/pulse/default.pa
- Xorg Server Anpassungen
root@terminalserver:/# cat /etc/X11/Xwrapper.config
# Xwrapper.config (Debian X Window System server wrapper configuration file)
#
# This file was generated by the post-installation script of the
# xserver-xorg-legacy package using values from the debconf database.
#
# See the Xwrapper.config(5) manual page for more information.
#
# This file is automatically updated on upgrades of the xserver-xorg-legacy
# package *only* if it has not been modified since the last upgrade of that
# package.
#
# If you have edited this file but would like it to be automatically updated
# again, run the following command as root:
#   dpkg-reconfigure xserver-xorg-legacy
#allowed_users=console
allowed_users=anybody
- Achtung Berechtigungen für Zertifikat und Keyfile
root@terminalserver:/# ls -al /etc/xrdp/terminalserver.firma.intern*
-rwxr--r-- 1 root root 2602 Jun 12 17:01 /etc/xrdp/terminalserver.firma.intern.crt
-rwxr----- 1 root xrdp 3272 Jun 12 17:01 /etc/xrdp/terminalserver.firma.intern.key
Gesonderte System Anpassungen
Proxy Einstellungen zuteilen
- Variante 1 - der aktuelle User selbst / ohne Firefox Einstellungen zu editieren
- Ermitteln ob Systemproxy gesetzt wurde:
christian.czeczil@terminalserver:~$ gsettings get org.gnome.system.proxy mode
'none'
- Systemproxy über cli setzen:
christian.czeczil@terminalserver:~$ gsettings set org.gnome.system.proxy mode 'manual'
christian.czeczil@terminalserver:~$ gsettings set org.gnome.system.proxy.http host 'firewall.firma.intern'
christian.czeczil@terminalserver:~$ gsettings set org.gnome.system.proxy.http port 8080
- Variante 2 - Für jeden neuen User werden die Einstellungen gesetzt:
root@terminalserver:~#  apt-get install dconf-cli

root@terminalserver:~#  mkdir -p /etc/dconf/db/site.d
root@terminalserver:~#  mkdir /etc/dconf/profile

root@terminalserver:/# cat /etc/dconf/db/site.d/00_proxy
[system/proxy]
mode='manual'
[system/proxy/http]
host='firewall.firma.intern'
port=8080
enabled=true

root@terminalserver:/# cat /etc/dconf/profile/user
user-db:user
system-db:site


root@terminalserver:~#  dconf update

root@terminalserver:~# dconf dump /

[system/proxy/http]
host='firewall.firma.intern'
port=8080
enabled=true

[system/proxy]
mode='manual'
Home-Verzeichnis vom Windows Server mounten
- Installation pam Modul und keyutils
apt-get install libpam-mount keytuils
- /etc/security/pam_mount.conf.xml
- In diesem Beispiel befinden sich die Home Verzeichnisse der User auf FILESERVER und es existiert jeweils ein verstecktes Share mit username$
  <!-- Example using CIFS -->
    <volume
        fstype="cifs"
        server="FILESERVER"
        path="%(USER)$"
        mountpoint="~/Documents"
        options="sec=krb5,seal,vers=3.0,cruid=%(USERUID)"
       />
- /etc/pam.d/common-session
root@terminalserver:/etc/pam.d# cat common-session
#
# /etc/pam.d/common-session - session-related modules common to all services
#
# This file is included from other service-specific PAM config files,
# and should contain a list of modules that define tasks to be performed
# at the start and end of sessions of *any* kind (both interactive and
# non-interactive).
#
# As of pam 1.0.1-6, this file is managed by pam-auth-update by default.
# To take advantage of this, it is recommended that you configure any
# local modules either before or after the default block, and use
# pam-auth-update to manage selection of other modules.  See
# pam-auth-update(8) for details.

# here are the per-package modules (the "Primary" block)
session	[default=1]			pam_permit.so
# here's the fallback if no module succeeds
session	requisite			pam_deny.so
# prime the stack with a positive return value if there isn't one already;
# this avoids us returning an error just because nothing sets a success code
# since the modules above will each just jump around
session	required			pam_permit.so
# and here are more per-package modules (the "Additional" block)
session	required	pam_unix.so
session	optional			pam_sss.so
session	required pam_mkhomedir.so skel=/etc/skel/ umask=0077
session	optional	pam_mount.so
session	optional	pam_systemd.so
# end of pam-auth-update config
Hibernate/Reboot/Shutdown deaktivieren für User
- Buttons werden in GUI ausgegraut
root@terminalserver:/# cat /etc/polkit-1/localauthority/50-local.d/disable-shutdown.pkla
[Disable shutdown/whatever]
Identity=unix-user:*
Action=org.freedesktop.consolekit.system.stop;org.freedesktop.consolekit.system.restart;org.freedesktop.upower.suspend;org.freedesktop.upower.hibernate
ResultAny=no
ResultInactive=no
ResultActive=no
root@terminalserver:/# cat /etc/polkit-1/localauthority/50-local.d/restrict-login-powermgmt.pkla
[Disable lightdm PowerMgmt]
Identity=unix-user:*
Action=org.freedesktop.login1.reboot;org.freedesktop.login1.reboot-multiple-sessions;org.freedesktop.login1.power-off;org.freedesktop.login1.power-off-multiple-sessions;org.freedesktop.login1.suspend;org.freedesktop.login1.suspend-multiple-sessions;org.freedesktop.login1.hibernate;org.freedesktop.login1.hibernate-multiple-sessions
ResultAny=no
ResultInactive=no
ResultActive=no
Bug - Schwarzer Screen
- Unter bestimmten Voraussetzungen ( user war bereits eingeloggt und loggt sich nach einiger Zeit wieder ein) bleibt der „Bildschirm“ schwarz
- Maximale BPP ändern
- /etc/xrdp/xrdp.ini → max_bpp=16
- Power Management anpassen ?


- XRDP Server aus den backports für stretch installiert
- Wenn Mate eingesetzt wird - für betroffene User:
Im jeweiligen User Kontext:
echo mate-session > ~/.xsession
SSO - Apache mit Kerberos + Poor Mans Ticket System
- Es sollte ein Ticketsystem geschaffen werden, das so einfach wie möglich Tickets erstellen lässt , um sie Zentral zuzustellen / Die User sollen sich nicht extra einloggen müssen - daher SSO
Serverkomponenten
- System wird ins AD reingesetzt wie bei SSO mit dem Dokuwiki
- Wäre mit Bootstrap schöner , in diesem Fall ein HTML Formular, das Online mittels Generator generiert wurde um Fehlerbeschreibungen einzugeben und dies über support.php zu verschicken
Enduser Ticket erstellen
- die „EDV-Hilfe“ Links werden über GPO am Desktop ausgerollt und über SSO authentifiziert sich der User vollkomment transparent - Aufgrund des User Namens wird die E-Mail Adresse generiert an die das Ticket in Kopie geschickt werden / Das Ticket wird an die jeweilige Support E-Mail Adresse geschickt und kann dort weiter verarbeitet werden - als Absender sieht der Support E-Mail Verantwortliche die Infos des Users und kann direkt dem User ein Mail schreiben


SSO - Apache mit Kerberos + Dokuwiki
- Wir wollen in einer Active Directory Umgebung SSO für Dokuwiki
- Bestimmten Gruppen soll es ermöglicht werden Einträge zu ändern bzw. Superuser zu sein und andere Gruppen sollen nur Leserechte bekommen
- Bei den Clients muss Integrierte Windows Authentifizierung bei den Einstellungen der „Internetoptionen“ aktiviert sein (Default Einstellung)
- Falls SSO nicht funktioniert wird ein Fallback durchgeführt auf Basic Authentifizierung in der der User zu Username und Passwort aufgefordert wird - Achtung hier auf SSL/TLS setzen für den Webserver
- Domäne: firma.intern
- Zielserver: webserver.firma.intern / Debian stretch minimal
Anforderungen Zielserver
- Erforderliche Pakete
apt-get install krb5-user krb5-config libapache2-mod-auth-kerb msktutil
- Anforderungen innerhalb Infrastruktur
- Forward und Reverse Lookup wurden konfiguriert auf AD Server bzw. DNS Server zB: webserver.firma.intern → 192.168.0.20 u. 192.168.0.20 → webserver.firma.intern
- Forward und Reverse Lookup funktionieren auch auf Zielserver entsprechend d.h. richtige DNS Server wurden eingetragen /etc/resolv.conf
- Zeit wird synchronisiert mit zB: AD Server - Zeit darf nicht um mehr als 5 Minuten vom AD Server abweichen , mit openntpd oder ntp
Zielserver dem AD hinzufügen /Kerberos
- Zuerst Kerberos konfigurieren & Ticket holen mit Administrator User (kinit Administrator@FIRMA.INTERN) oder User der die Rechte besitzt ein Gerät hinzuzufügen ()
- Im Anschluss mit msktutil den Server dem Active Directory hinzufügen - er erscheint am AD Server als Computer Objekt unter der OU „COMPUTERS“
- Kerberos Konfiguration
cat /etc/krb5.conf
[logging]
  default = FILE:/var/log/krb5.log


[libdefaults]
	default_realm = FIRMA.INTERN

# The following krb5.conf variables are only for MIT Kerberos.
	krb4_config = /etc/krb.conf
	krb4_realms = /etc/krb.realms
	kdc_timesync = 1
	ccache_type = 4
	forwardable = true
	proxiable = true


[realms]

         FIRMA.INTERN = {
		kdc = adserver.firma.intern
                admin_server = adserver.firma.intern
		default_domain = firma.intern
         }


[domain_realm]
 .firma.intern = FIRMA.INTERN
 firma.intern = FIRMA.INTERN
root@webserver:~# kinit Administrator@FIRMA.INTERN
Password for Administrator@FIRMA.INTERN:
root@webserver:~# klist
Ticket cache: FILE:/tmp/krb5cc_0
Default principal: Administrator@FIRMA.INTERN

Valid starting     Expires            Service principal
03/04/19 10:54:48  03/04/19 20:54:48  krbtgt/FIRMA.INTERN@FIRMA.INTERN
	renew until 04/04/19 10:54:43
root@webserver:~# msktutil  -c -b "CN=COMPUTERS" -s HTTP/webserver.FIRMA.INTERN -h webserver.FIRMA.INTERN -k /etc/apache2/HTTP.keytab --computer-name web-http --upn HTTP/webserver.FIRMA.INTERN --server adserver.FIRMA.INTERN --verbose
 -- init_password: Wiping the computer password structure
 -- generate_new_password: Generating a new, random password for the computer account
 -- generate_new_password:  Characters read from /dev/urandom = 85
 -- create_fake_krb5_conf: Created a fake krb5.conf file: /tmp/.msktkrb5.conf-AZ8Cv8
 -- reload: Reloading Kerberos Context
 -- finalize_exec: SAM Account Name is: web-http$
 -- try_machine_keytab_princ: Trying to authenticate for web-http$ from local keytab...
 -- try_machine_keytab_princ: Error: krb5_get_init_creds_keytab failed (Client not found in Kerberos database)
 -- try_machine_keytab_princ: Authentication with keytab failed
 -- try_machine_keytab_princ: Trying to authenticate for WEB-HTTP$ from local keytab...
 -- try_machine_keytab_princ: Error: krb5_get_init_creds_keytab failed (Client not found in Kerberos database)
 -- try_machine_keytab_princ: Authentication with keytab failed
 -- try_machine_keytab_princ: Trying to authenticate for host/webserver.FIRMA.INTERN from local keytab...
 -- try_machine_keytab_princ: Error: krb5_get_init_creds_keytab failed (Client not found in Kerberos database)
 -- try_machine_keytab_princ: Authentication with keytab failed
 -- try_machine_password: Trying to authenticate for web-http$ with password.
 -- create_default_machine_password: Default machine password for web-http$ is web-http
 -- try_machine_password: Error: krb5_get_init_creds_keytab failed (Client not found in Kerberos database)
 -- try_machine_password: Authentication with password failed
 -- try_user_creds: Checking if default ticket cache has tickets...
 -- finalize_exec: Authenticated using method 5
 -- LDAPConnection: Connecting to LDAP server: adserver.FIRMA.INTERN
SASL/GSSAPI authentication started
SASL username: Administrator@FIRMA.INTERN
SASL SSF: 56
SASL data security layer installed.
 -- ldap_get_base_dn: Determining default LDAP base: dc=FIRMA,dc=INTERN
 -- ldap_check_account: Checking that a computer account for web-http$ exists
 -- ldap_create_account: Computer account not found, create the account
No computer account for web-http found, creating a new one.
 -- ldap_check_account_strings: Inspecting (and updating) computer account attributes
 -- ldap_check_account_strings: Found userPrincipalName =
 -- ldap_check_account_strings: userPrincipalName should be HTTP/webserver.FIRMA.INTERN@FIRMA.INTERN
 -- ldap_set_userAccountControl_flag: Setting userAccountControl bit at 0x200000 to 0x0
 -- ldap_set_userAccountControl_flag: userAccountControl not changed 0x1000
 -- ldap_get_kvno: KVNO is 1
 -- ldap_add_principal: Checking that adding principal HTTP/webserver.FIRMA.INTERN to web-http$ won't cause a conflict
 -- ldap_add_principal: Adding principal HTTP/webserver.FIRMA.INTERN to LDAP entry
 -- ldap_add_principal: Checking that adding principal host/webserver.FIRMA.INTERN to web-http$ won't cause a conflict
 -- ldap_add_principal: Adding principal host/webserver.FIRMA.INTERN to LDAP entry
 -- execute: Updating all entries for webserver.FIRMA.INTERN in the keytab WRFILE:/etc/apache2/HTTP.keytab
 -- update_keytab: Updating all entries for web-http$
 -- add_principal_keytab: Adding principal to keytab: web-http$
 -- add_principal_keytab:     Using salt of FIRMA.INTERNhostweb-http.FIRMA.INTERN
 -- add_principal_keytab:   Adding entry of enctype 0x17
 -- add_principal_keytab:     Using salt of FIRMA.INTERNhostweb-http.FIRMA.INTERN
 -- add_principal_keytab:   Adding entry of enctype 0x11
 -- add_principal_keytab:     Using salt of FIRMA.INTERNhostweb-http.FIRMA.INTERN
 -- add_principal_keytab:   Adding entry of enctype 0x12
 -- add_principal_keytab: Adding principal to keytab: WEB-HTTP$
 -- add_principal_keytab: Removing entries with kvno < 0
 -- add_principal_keytab:     Using salt of FIRMA.INTERNhostweb-http.FIRMA.INTERN
 -- add_principal_keytab:   Adding entry of enctype 0x17
 -- add_principal_keytab:     Using salt of FIRMA.INTERNhostweb-http.FIRMA.INTERN
 -- add_principal_keytab:   Adding entry of enctype 0x11
 -- add_principal_keytab:     Using salt of FIRMA.INTERNhostweb-http.FIRMA.INTERN
 -- add_principal_keytab:   Adding entry of enctype 0x12
 -- add_principal_keytab: Adding principal to keytab: HTTP/webserver.FIRMA.INTERN
 -- add_principal_keytab: Removing entries with kvno < 0
 -- add_principal_keytab:     Using salt of FIRMA.INTERNhostweb-http.FIRMA.INTERN
 -- add_principal_keytab:   Adding entry of enctype 0x17
 -- add_principal_keytab:     Using salt of FIRMA.INTERNhostweb-http.FIRMA.INTERN
 -- add_principal_keytab:   Adding entry of enctype 0x11
 -- add_principal_keytab:     Using salt of FIRMA.INTERNhostweb-http.FIRMA.INTERN
 -- add_principal_keytab:   Adding entry of enctype 0x12
 -- add_principal_keytab: Adding principal to keytab: host/web-http
 -- add_principal_keytab: Removing entries with kvno < 0
 -- add_principal_keytab:     Using salt of FIRMA.INTERNhostweb-http.FIRMA.INTERN
 -- add_principal_keytab:   Adding entry of enctype 0x17
 -- add_principal_keytab:     Using salt of FIRMA.INTERNhostweb-http.FIRMA.INTERN
 -- add_principal_keytab:   Adding entry of enctype 0x11
 -- add_principal_keytab:     Using salt of FIRMA.INTERNhostweb-http.FIRMA.INTERN
 -- add_principal_keytab:   Adding entry of enctype 0x12
 -- update_keytab: Entries for SPN HTTP/webserver.FIRMA.INTERN have already been added. Skipping ...
 -- add_principal_keytab: Adding principal to keytab: host/webserver.FIRMA.INTERN
 -- add_principal_keytab: Removing entries with kvno < 0
 -- add_principal_keytab:     Using salt of FIRMA.INTERNhostweb-http.FIRMA.INTERN
 -- add_principal_keytab:   Adding entry of enctype 0x17
 -- add_principal_keytab:     Using salt of FIRMA.INTERNhostweb-http.FIRMA.INTERN
 -- add_principal_keytab:   Adding entry of enctype 0x11
 -- add_principal_keytab:     Using salt of FIRMA.INTERNhostweb-http.FIRMA.INTERN
 -- add_principal_keytab:   Adding entry of enctype 0x12
 -- ~KRB5Context: Destroying Kerberos Context
- Cron job hinzufügen damit Keytab aktualisiert wird ( per Default müssen alle „Computer“ alle 30 Tage das „Passwort“ wechseln in Windows AD)
root@webserver:/etc/cron.d# cat msktutil
00 00     * * * root   /usr/sbin/msktutil --auto-update -k /etc/apache2/keytab/HTTP.keytab --computer-name web-http | logger -t "msktutil"
Apache2 Keytab konfigurieren - Directory ACLs
- Keytab wurde unter /etc/apache2/keytab kopiert
root@webserver:/etc/apache2/keytab# ls -al
total 12
dr-x------  2 www-data root 4096 Apr  3 10:56 .
drwxr-xr-x 10 root     root 4096 Apr  3 11:06 ..
-r--------  1 www-data root 1192 Apr  3 10:54 HTTP.keytab
- Apache2 Beispielkonfiguration für Vhost
...
         <Directory /var/www/howto.firma.intern>
        AllowOverride all
        Order allow,deny
        allow from all

        AuthType Kerberos
        AuthName "Firmenlogin zB: vorname.nachname"
        KrbAuthRealm FIRMA.INTERN
        Krb5Keytab /etc/apache2/keytab/HTTP.keytab
        KrbMethodK5Passwd On
        Require valid-user
 	</Directory>


...
Dokukwiki konfigurieren
- authad Plugin wird verwendet
- Benutzer für Dokuwiki muss erstellt werden damit die Gruppenzugehörigkeit überprüft werden kann - es reicht ein User mit Standardrechten d.h. Domänen User
- Superuser wird wer Mitglied zB: der Gruppe „Dokuadmins“ und „admin“ ist
- Dokuwiki Installation liegt unter /var/www/howto.firma.intern/ entspricht dem DocumentRoot für den virtuellen Vhost und dieser ist innerhalb der Firma unter https://howto.firma.intern erreichbar
root@webserver:/var/www/howto.firma.intern/conf# cat local.php
<?php
/*
 * Dokuwiki's Main Configuration File - Local Settings
 * Auto-generated by config plugin
 * Run for user: christian.czeczil
 * Date: Wed, 03 Apr 2019 12:52:41 +0200
 */

$conf['authtype'] = 'authad';
$conf['superuser'] = '@admin,@Dokuadmins';
$conf['disableactions'] = 'register';
$conf['plugin']['authad']['account_suffix'] = '@firma.intern';
$conf['plugin']['authad']['base_dn'] = 'DC=firma,DC=intern';
$conf['plugin']['authad']['domain_controllers'] = 'adserver.firma.intern';
- local.protected.php → damit die Einstellungen nicht editiert werden können
root@webserver:/var/www/howto.firma.intern/conf# cat local.protected.php
<?php
$conf['plugin']['authad']['sso'] = 1;

$conf['plugin']['authad']['admin_username'] = 'DOKUWIKI_USER';
$conf['plugin']['authad']['admin_password'] = 'DOKUWIKI_PASSWORT';
//
//
?>
- Alle User dürfen das Dokuwiki grundsätzlich lesen
root@webserver:/var/www/howto.firma.intern/conf# cat acl.auth.php
# acl.auth.php
# <?php exit()?>
# Don't modify the lines above
#
# Access Control Lists
#
# Auto-generated by install script
# Date: Wed, 03 Apr 2019 10:01:09 +0000
*	@ALL	1
*	@user	1
unattended-upgrades
- Bei Debian jessie/stretch reicht für die Installation von security Upgrades:
apt-get install unattended-upgrades
- Achtung wird per cronjob aufgerufen auch manuell möglich über unattended-upgrade oder mit -d für debug
- Bei Linux Mint Sarah 18 und Linux Mint 19 funktioniert die Erkennung der Distribution nicht automatisch für die Updates
- Auf einer Workstation mit google chrome repository zB: bei Linux Mint Sarah 18
- /etc/apt/apt.conf.d/50unattended-upgrades:
Unattended-Upgrade::Allowed-Origins {
        "${distro_id}:${distro_codename}-security";
        "${distro_id}:${distro_codename}-updates";
//      "${distro_id}:${distro_codename}-proposed";
//      "${distro_id}:${distro_codename}-backports";
        "Google LLC:stable";
        "Ubuntu:xenial-security";
        "Ubuntu:xenial-updates";
        "Ubuntu:xenial-partner";
};
SQUID logging - mit goaccess fancy logs
- Durchgeführt auf Debian stretch
- Logging mit https://goaccess.io/
- Möchte längerfristig die Logs - Logs pro Monat und die Aktuellen
- Aufgrund der DSGVO werden nur so wenig persistente Logs wie sinnvoll gespeichert zB: 7 Tage
- Repository von goaccess da goaccess in den offiziellen debian repos keine persistente Datenbank unterstützt
CRON - konfigurieren
- Die Logs werden täglich rotiert
- Jeder Monat bekommt in Summe ein eigenes File im format YYYYMM.html
- Aktuelle Statistiken befinden sich im index.html File werden im /var/www/stats abgelegt Webserver entsprechend konfigurieren
- /etc/cron.d/goaccess
SHELL=/bin/bash
PATH=/usr/local/sbin:/usr/local/bin:/usr/sbin:/usr/bin:/sbin:/bin:/usr/games:/usr/local/games

45 8	1 * *	root	cp /var/www/stats/fancy/index.html /var/www/stats/$(date +\%Y\%m --date "now -1 days").html && rm /var/lib/goaccess/*.tcb

45 7	* * * root  ( [[ $(date +\%d) == "02" ]] && zcat /var/log/squid/combined.log.1.gz | goaccess - --keep-db-files --config-file /etc/goaccess/goaccess.conf > /var/www/stats/index.html ) || ( zcat /var/log/squid/combined.log.1.gz | goaccess - --keep-db-files --load-from-disk --config-file /etc/goaccess/goaccess.conf > /var/www/stats/index.html )
LOGROTATE - konfigurieren
- /etc/logrotate.d/squid
/var/log/squid/*.log
{
        rotate 7
        daily
        missingok
        notifempty
        compress
        sharedscripts
        postrotate
                invoke-rc.d syslog-ng reload > /dev/null
        endscript
SYSLOG-NG- konfigurieren
- /etc/syslog-ng/syslog-ng.conf
...
filter f_squid_combined { program("squid") and facility("local7"); };
destination d_squid_combined { file("/var/log/squid/combined.log" template("${MESSAGE}\n")); };
log { source(s_src); filter(f_squid_combined); destination(d_squid_combined); flags(final);};
....
SQUID - konfigurieren
- /etc/squid/squid.conf
...
access_log syslog:local7.info  combined
..
GOACCESS - konfigurieren
- /etc/apt/sources.list.d/goaccess.list
deb http://deb.goaccess.io/ stretch main
- Key hinzufügen zu trusted repo keys
wget -O - https://deb.goaccess.io/gnugpg.key | sudo apt-key add -
- Repos aktualisieren und goaccess mit Persistenz Support installieren
apt-get install goaccess-tcb
- Beispielkonfiguration: /etc/goaccess/goaccess.conf
time-format %H:%M:%S


date-format %d/%b/%Y

log-format %h %^[%d:%t %^] "%r" %s %b "%R" "%u"

log-format COMBINED

config-dialog false

hl-header true


html-prefs {"theme":"bright","perPage":10,"layout":"vertical","showTables":true,"visitors":{"plot":{"chartType":"bar"}}}


json-pretty-print false

no-color false

no-column-names false

no-csv-summary false

no-progress false

no-tab-scroll false

with-mouse true

agent-list false

with-output-resolver false


http-method yes

http-protocol yes


no-query-string false

no-term-resolver false

444-as-404 false

4xx-to-unique-count false

accumulated-time true

all-static-files false


double-decode false


ignore-crawlers false

crawlers-only false


ignore-panel KEYPHRASES
ignore-panel GEO_LOCATION

real-os true

static-file .css
static-file .js
static-file .jpg
static-file .png
static-file .gif
static-file .ico
static-file .jpeg
static-file .pdf
static-file .csv
static-file .mpeg
static-file .mpg
static-file .swf
static-file .woff
static-file .woff2
static-file .xls
static-file .xlsx
static-file .doc
static-file .docx
static-file .ppt
static-file .pptx
static-file .txt
static-file .zip
static-file .ogg
static-file .mp3
static-file .mp4
static-file .exe
static-file .iso
static-file .gz
static-file .rar
static-file .svg
static-file .bmp
static-file .tar
static-file .tgz
static-file .tiff
static-file .tif
static-file .ttf
static-file .flv

db-path /var/lib/goaccess
- Persistente Location für Datenbank /var/lib/goaccess
mkdir /var/lib/goaccess
SQUID Caching Proxy für Windows Updates
- Getestet mit Ubuntu 18.04 / Debian Buster - Clients Windows 10 LTSB 2016
- „Cacheserver“ läuft als stand alone Proxy Server - Firewall hat ihn für die Windows Updates als „parent“
- Sehr viel trial and error - nachsehen ob TCP/MEM Hit's in den Logs vorliegen und der cache auch wächst
Caching Proxy
- Cacheproxy Konfiguration auf Debian Buster - /etc/squid/squid.conf
acl allowedNetworks src 1.2.3.0/24
acl windowsupdate dstdomain  "/etc/squid/cache_domains/windowsupdate.acl"
acl CONNECT method CONNECT
acl wuCONNECT dstdomain www.update.microsoft.com
acl wuCONNECT dstdomain sls.microsoft.com
acl slowdown_domains dstdom_regex "/etc/squid/slowdown_domains"


http_access allow CONNECT wuCONNECT allowedNetworks
http_access allow windowsupdate allowedNetworks
http_access deny all


http_port 8080


access_log /var/log/squid/access.log combined


#Cache Windows Updates
refresh_pattern -i windowsupdate.com/.*\.(cab|exe|ms[i|u|f|p]|[ap]sf|wm[v|a]|dat|zip|psf) 43200 80% 129600 reload-into-ims
refresh_pattern -i microsoft.com/.*\.(cab|exe|ms[i|u|f|p]|[ap]sf|wm[v|a]|dat|zip|psf) 43200 80% 129600 reload-into-ims
refresh_pattern -i windows.com/.*\.(cab|exe|ms[i|u|f|p]|[ap]sf|wm[v|a]|dat|zip|psf) 43200 80% 129600 reload-into-ims
refresh_pattern -i microsoft.com.akadns.net/.*\.(cab|exe|ms[i|u|f|p]|[ap]sf|wm[v|a]|dat|zip|psf) 43200 80% 129600 reload-into-ims
refresh_pattern -i deploy.akamaitechnologies.com/.*\.(cab|exe|ms[i|u|f|p]|[ap]sf|wm[v|a]|dat|zip|psf) 43200 80% 129600 reload-into-ims


cache_mem 512 MB
minimum_object_size 0
maximum_object_size 32768 MB
maximum_object_size_in_memory 16384 KB
range_offset_limit 32768 MB windowsupdate
quick_abort_min -1 KB


#		cache_dir aufs Directory-Name Mbytes L1 L2 [options]
cache_dir aufs /var/lib/squid 100000 16 256


#Throttle Speed to maximum of 2000Kbyte for specific domains
delay_pools 1
delay_class 1 1
delay_access 1 allow slowdown_domains
delay_parameters 1 2000000/2000000
- Achtung Traffic Shaping (für CONNECT Zugriffe) funktioniert seit squid4 nicht mehr - https://squid-users.squid-cache.narkive.com/a9Ro3fM3/delay-pools-in-squid4-not-working-with-https there's a bug for that *
- Achtung Traffic Shaping (für CONNECT Zugriffe) scheint seit squid 5.7 wieder zu funktionieren - getestet mit Debian Bookworm
- /etc/squid/cache_domains/windowsupdate.acl
windowsupdate.microsoft.com
.update.microsoft.com
redir.metaservices.microsoft.com
images.metaservices.microsoft.com
c.microsoft.com
wustat.windows.com
crl.microsoft.com
sls.microsoft.com
productactivation.one.microsoft.com
ntservicepack.microsoft.com
.mp.microsoft.com
.windowsupdate.com
.download.windowsupdate.com
- /etc/squid/slowdown_domains
#2015-06-08: Limit Windows Updates
\.windowsupdate\.com
\.download\.windowsupdate\.com
au\.download\.windowsupdate\.com
#2018-10-16 cc: Limit Windows Update delivery network
\.delivery\.mp\.microsoft\.com
Firewall Proxy
- Getestet auf Ubuntu 18.04
- Für alle Windows Update spezifischen Domains wird der Caching Proxy genommen / Server sollen weiterhin direkt von Microsoft die Updates ziehen sollte es Probleme mit dem Caching Proxy geben
- /etc/squid/squid.conf
acl blocked_server src "/etc/squid/blocked/blocked_server"
acl windowsupdate dstdomain "/etc/squid/cache_domains/windowsupdate.acl"

cache_peer IP_CACHE_PROXY parent    8080       0  connect-timeout=5 connect-fail-limit=5 no-query no-digest no-netdb-exchange proxy-only
prefer_direct on

never_direct allow windowsupdate !blocked_server
always_direct deny windowsupdate !blocked_server
always_direct allow all
- /etc/squid/cache_domains/windowsupdate.acl
windowsupdate.microsoft.com
.update.microsoft.com
redir.metaservices.microsoft.com
images.metaservices.microsoft.com
c.microsoft.com
wustat.windows.com
crl.microsoft.com
sls.microsoft.com
productactivation.one.microsoft.com
ntservicepack.microsoft.com
.mp.microsoft.com
.windowsupdate.com
.download.windowsupdate.com
- /etc/squid/blocked_server
#Server IP's / they should directly download the updates
SQUID bauen/konfigurieren - mit SSL intercept support
- Durchgeführt auf RPI3 mit Debian stretch (Raspian) / zum Teil mit Kali Linux
SQUID bauen
- Build Umgebung wird benötigt
- e.g. auf einem Kali Linux (leider keine history vom rpi3)
- SQUID 3.1.x
apt-get update
apt-get install openssl
apt-get install devscripts build-essential libssl-dev
apt-get source squid3
apt-get build-dep squid3
cd squid3-3.1.14
vi debian/rules
->rules änderungen
debuild -us -uc
- SQUID 3.5
Achtung:
NOTE: Squid-3.5 requries --with-openssl instead of --enable-ssl  und --enable-ctrdl


Now with debian stretch i see libssl1.0-dev and libssl1.1 in the tree.
I can still use libssl1.0-dev to build squid with ssl support?
Even when debian stretch installs openssl 1.1.0?

On stretch Squid-3 builds with libssl1.0-dev and Squid-4 builds with
libssl-dev.
- SQUID 4.6 (Debian Buster)
- tests durchführen , gebaut wird es erfolgreich
apt-get source squid
apt-get build-dep squid

gnutls rausnehmen
debian/rules -> --with-openssl , --enable-ctrdl , --enable-ssl
- SQUID 4.13 (Debian Bullseye)
- Kein manuelles Bauen mehr erforderlich

CA erstellen und directory intialisieren
- CA Directory initialisieren , Achtung richtige Verzeichnisse wählen
- zB:
  155  2017-09-23 08:57:55 openssl req -new -newkey rsa:2048 -sha256 -days 3650 -nodes -x509 -extensions v3_ca -keyout myCA.pem -out myCA.pem
  156  2017-09-23 08:57:55 openssl x509 -in myCA.pem -text -noout
  163  2017-09-23 08:57:55 /usr/lib/squid/ssl_crtd -c -s certs/
- SQUID 4.13 Bullseye - Initialisierung
/usr/lib/squid/security_file_certgen -c -s /var/lib/squid/certs/ -M 32
SQUID konfigurieren
- SQUID 3.5:
- zB:
acl lan src 10.0.23.0/24
acl ssl_targets ssl::server_name_regex -i google.at google.com www.google.at www.google.com pannoniait.at
#http_access allow  lan ssl_targets
http_access allow lan
http_access deny all
#http_port 3128 intercept ssl-bump
https_port 3129 intercept ssl-bump generate-host-certificates=on dynamic_cert_mem_cache_size=4MB cert=/etc/squid/ssl/myCA.pem

sslcrtd_program /usr/lib/squid/ssl_crtd -s /etc/squid/ssl/certs -M 4MB

acl step1 at_step SslBump1
acl step2 at_step SslBump2
acl step3 at_step SslBump3

ssl_bump peek step1  all
ssl_bump splice  step3 ssl_targets
ssl_bump terminate step2 !ssl_targets

coredump_dir /var/spool/squid
- SQUID 4.13 - Debian Bullseye - kein Squid Bauen mehr erforderlich (squid-openssl)
acl ssl_no_bump_targets ssl::server_name_regex -i google.at google.com www.google.at www.google.com

https_port 8082 intercept ssl-bump generate-host-certificates=on dynamic_cert_mem_cache_size=32MB cert=/var/lib/squid/myCA.pem

acl step1 at_step SslBump1

ssl_bump peek step1
ssl_bump splice ssl_no_bump_targets
ssl_bump stare all
ssl_bump bump all

sslcrtd_program /usr/lib/squid/security_file_certgen -s /var/lib/squid/certs -M 32MB
Firewall anpassen
- iptables Testkonfiguration (man kanns auch lokal testen durch das Redirect der Output Chains):
iptables -t nat -F
iptables -t nat -A OUTPUT  -m owner --uid proxy -j RETURN
iptables -t nat -A OUTPUT -p tcp --dport  443 -j REDIRECT --to 3129
iptables -t nat -A PREROUTING -p tcp --syn --dport 443 -j REDIRECT --to 3129
iptables -t nat -A POSTROUTING -j MASQUERADE
thunar
- System: Kali Linux / Linux Mint
- Mehrere cifs mounts werden unter /mnt gemounted
- Sobald über die grafische Oberfläche zB: thunar im XFCE zugegriffen wird bleibt alles hängen / Desktopsymbole verschwinden
- AutoMount=true auf AutoMount=false → reboot
root@mrWhiteGhost:/home/urnilxfgbez# cat /usr/share/gvfs/mounts/trash.mount
[Mount]
Type=trash
Exec=/usr/lib/gvfs/gvfsd-trash
AutoMount=false
- „smb“ pseudo mounts nicht über thundar möglich / direkt über Adresszeile

- Getestet auf: Linux Debian 11
apt-get install gvfs-backends gvfs-bin
gphotos-sync - install pip3
- Getestet auf Debian Buster
- Installiert wird auf „mrCloud“ für User „cloud-urnilxfgbez“ mit Home Verzeichnis unter “/mnt/storage/urnilxfgbez„
- Installation:
root@mrCloud:~# apt-get install python3-setuptools
Reading package lists... Done
Building dependency tree
Reading state information... Done
The following packages were automatically installed and are no longer required:
  dh-python libfile-copy-recursive-perl libgmime-2.6-0 libicu57 libnotmuch4 libperl5.24 libpython3.5-minimal
  libpython3.5-stdlib linux-image-4.9.0-4-amd64 python3.5 python3.5-minimal sgml-base tcpd update-inetd xml-core
Use 'apt autoremove' to remove them.
The following additional packages will be installed:
  python3-pkg-resources
Suggested packages:
  python-setuptools-doc
The following NEW packages will be installed:
  python3-pkg-resources python3-setuptools
0 upgraded, 2 newly installed, 0 to remove and 0 not upgraded.
Need to get 458 kB of archives.
After this operation, 1,900 kB of additional disk space will be used.
Do you want to continue? [Y/n] y
Get:1 http://ftp.at.debian.org/debian buster/main amd64 python3-pkg-resources all 40.8.0-1 [153 kB]
Get:2 http://ftp.at.debian.org/debian buster/main amd64 python3-setuptools all 40.8.0-1 [306 kB]
Fetched 458 kB in 2s (268 kB/s)
Selecting previously unselected package python3-pkg-resources.
(Reading database ... 39986 files and directories currently installed.)
Preparing to unpack .../python3-pkg-resources_40.8.0-1_all.deb ...
Unpacking python3-pkg-resources (40.8.0-1) ...
Selecting previously unselected package python3-setuptools.
Preparing to unpack .../python3-setuptools_40.8.0-1_all.deb ...
Unpacking python3-setuptools (40.8.0-1) ...
Setting up python3-pkg-resources (40.8.0-1) ...
Setting up python3-setuptools (40.8.0-1) ...
root@mrCloud:~# pip3 install https://codeload.github.com/gilesknap/gphotos-sync/zip/master
Collecting https://codeload.github.com/gilesknap/gphotos-sync/zip/master
  Downloading https://codeload.github.com/gilesknap/gphotos-sync/zip/master (11.1MB)
    100% |████████████████████████████████| 11.1MB 142kB/s
....
....
Successfully installed PyYaml-5.1.2 appdirs-1.4.3 certifi-2019.6.16 chardet-3.0.4 enum34-1.1.6 exif-0.8.1 gphotos-sync-2.10 idna-2.8 oauthlib-3.1.0 requests-2.22.0 requests-oauthlib-1.2.0 selenium-3.141.0 urllib3-1.25.3
- Spezifische Schritte für Google API / Auth aktivieren (https://pypi.org/project/gphotos-sync/)
- Projekt erstellen unter https://console.developers.google.com

- API - „Photos Library API“ aktivieren für das Projekt

- „Create Credentials“ um API benützen zu dürfen


- Credentials als „json“ File herunterladen

- Verzeichnisse für User auf Server vorbereiten
root@mrCloud:/mnt/storage/urnilxfgbez# mkdir -p .config/gphotos-sync
root@mrCloud:/mnt/storage/urnilxfgbez# chown cloud-urnilxfgbez:cloud-urnilxfgbez .config/gphotos-sync
root@mrCloud:/mnt/storage/urnilxfgbez# chmod 700 .config/gphotos-sync
- JSON Credentials herunterladen und umbenennen auf client_secret.json und kopieren nach /mnt/storage/urnilxfgbez/.config/gphotos-sync
- Synchronisiation erstmalig autorisieren und starten - Aufruf der Seite die unter „Please go here and authorize,“ angezeigt wird
cloud-urnilxfgbez@mrCloud:~$ gphotos-sync "/mnt/storage/urnilxfgbez/Google Photos"
Please go here and authorize, https://accounts.google.com/o/oauth2/v2/auth?....

Paste the response token here:RESPONSE_TOKEN_DER_ANGEZEIGT_WIRD
09-10 11:56:44 Indexing Google Photos Files ...
- zB: cron job anlegen zum Aktualisieren
root@mrCloud:~# cat /etc/cron.d/gphotos-sync
SHELL=/bin/bash
PATH=/usr/local/sbin:/usr/local/bin:/usr/bin:/bin:/usr/local/games:/usr/games:/usr/sbin


00 15          * * *           cloud-urnilxfgbez    gphotos-sync "/mnt/storage/urnilxfgbez/Google Photos" |& logger -t "gphotos-sync"
Simples Logfiles monitor / notify tool (monitor-management.sh)
- Anforderungen:
- Es soll eine einfache Möglichkeit geschaffen werden die Logfiles der Switches in „Echtzeit“ zu analysieren und beim Eintritt bestimmter Ereignisse zB: Switch Loops soll es zu einer Verständigung kommen
- Es gibt bereits ein Werkzeug dafür tenshi (http://manpages.ubuntu.com/manpages/bionic/man8/tenshi.8.html) - dieses hatte sich jedoch bei meinen Tests als unbrauchbar erwiesen (Ubuntu 18.04)
- /lib/systemd/system/monitor-management.service
[Unit]
Description=Monitoring management.log Logfiles

[Service]
Type=simple
RemainAfterExit=false
ExecStop=/bin/kill -SIGTERM $MAINPID
ExecStart=/usr/local/sbin/monitor-management.sh

[Install]
WantedBy=multi-user.target
- /usr/local/sbin/monitor-management.sh (https://superuser.com/questions/270529/monitoring-a-file-until-a-string-is-found)
#!/bin/bash

/usr/bin/tail -q --follow=name --retry -n 0 /var/log/management.log | while read LOGLINE
do

	echo $LOGLINE | grep -q "Loopback exists on"

	if  [ $? == "0" ]
	then
		echo $LOGLINE | mail -s "Critical: Switch LOOP DETECTED" root

	fi

done
systemd service beim shutdown bis zum Ende ausführen (systemd case)
- Anforderungen - Ich möchte dass mein Service beim shutdown bis zum Ende durchgeführt wird und nicht durch ein Timeout oder SIGTERM/SIGKILL von systemd abgeschossen wird
- Beispiel: systemd unit file für die Tests mit borg Backup , Zusätzlich möchte ich die Ausgabe des Service auf tty1
- Getestet mit systemd 242 (242) (Kali Linux / 5.2er Kernel)
- cat /lib/systemd/system/borg-backup.service
[Unit]
Description=BORG Backup of local machine

[Service]
Type=oneshot
RemainAfterExit=true
ExecStop=/usr/bin/borg create --one-file-system --numeric-owner --stats --progress --exclude /swap.img --exclude '/home/*/*.iso' --exclude '/home/*/*.ISO' --exclude '/home/urnilxfgbez/Downloads/'  --compression lz4 /mnt/backup/mrWhiteGhost::{now} / /boot
ExecStart=/usr/bin/borg prune --stats --keep-last 4 /mnt/backup/mrWhiteGhost/
KillMode=none
TimeoutStopSec=infinity
StandardOutput=tty
StandardError=tty
TTYPath=/dev/tty1

[Install]
WantedBy=multi-user.target
- systemctl status borg-backup
● borg-backup.service - BORG Backup of local machine
   Loaded: loaded (/lib/systemd/system/borg-backup.service; enabled; vendor pre>
   Active: active (exited) since Sun 2019-10-20 11:07:44 CEST; 14min ago
  Process: 698 ExecStart=/usr/bin/borg prune --stats --keep-last 4 /mnt/backup/>
 Main PID: 698 (code=exited, status=0/SUCCESS)

Oct 20 11:07:27 mrWhiteGhost systemd[1]: Starting BORG Backup of local machine.>
Oct 20 11:07:44 mrWhiteGhost systemd[1]: Started BORG Backup of local machine.
udev trigger für mount funktioniert nicht mehr (systemd case)
This is a systemd feature. The original udev command has been replaced by systemd-udevd (see its man page). One of the differences is that it creates its own filesystem namespace, so your mount is done, but it is not visible in the principal namespace. (You can check this by doing systemctl status systemd-udevd to get the Main PID of the service, then looking through the contents of /proc/<pid>/mountinfo for your filesystem).

If you want to go back to having a shared instead of private filesystem namespace, then create a file /etc/systemd/system/systemd-udevd.service with contents

.include /usr/lib/systemd/system/systemd-udevd.service
[Service]
MountFlags=shared

or a new directory and file /etc/systemd/system/systemd-udevd.service.d/myoverride.conf with just the last 2 lines, i.e.

[Service]
MountFlags=shared

and restart the systemd-udevd service. I haven't found the implications of doing this.
desinfect 201920 per PXE booten
- Ausgezeichnete Anleitung unter: http://www.gtkdb.de/index_7_3065.html
- Auszug aus den Logs von meinem Server:
mount -o loop /mnt/iso/hb_2019_03.iso /mnt/tmp
cd /mnt/tmp/software/
mount -o loop desinfect-201920-amd64.iso /mnt/tmp2/
cd /mnt/tmp2/
cp -a casper/ isolinux/ preseed/ /mnt/storage/nfs/desinfect/
cd casper/
cp vmlinuz /mnt/storage/nfs/tftp/vmlinuz64-desinfect
cp initrd.lz /mnt/storage/nfs/tftp/initrd64-desinfect.lz
- pxelinux.cfg/default
default menu.c32
prompt 1
timeout 50
....
....
label desinfect 201920
   menu label Desinfect 201920
   kernel vmlinuz64-desinfect
   append nfsroot=192.168.10.1:/mnt/storage/nfs/desinfect/ netboot=nfs ro BOOT_IMAGE=casper/vmlinuz file=/cdrom/preseed/ubuntu.seed boot=casper initrd=initrd64-desinfect.lz debian-installer/language=de console-setup/layoutcode=de

label desinfect 201920 easy
   menu label Desinfect 201920 easy
   kernel vmlinuz64-desinfect
   append nfsroot=192.168.10.1:/mnt/storage/nfs/desinfect/ netboot=nfs ro BOOT_IMAGE=casper/vmlinuz file=/cdrom/preseed/ubuntu.seed boot=casper initrd=initrd64-desinfect.lz easymode debian-installer/language=de console-setup/layoutcode=de

....
....
- /etc/exports
...
/mnt/storage/nfs/desinfect 192.168.10.0/24(ro,sync,insecure,no_subtree_check)
...
Allerlei - PXE Boot
- TFTP Linux PXE Server - Chainload Legacy Build on Windows WDS Server (getestet bei Windows 2022 )
- pxechn.c32 kommt von mbr - wget https://mirrors.edge.kernel.org/pub/linux/utils/boot/syslinux/6.xx/syslinux-6.03.zip
- WDS befindet sich unter 10.0.0.2
LABEL WDS
MENU DEFAULT
MENU LABEL WDS
COM32 pxechn.c32
APPEND 10.0.0.2::boot\x64\wdsnbp.com -W
UEFI - PXE Boot
- - sehr mühsam
- Ursprünglich wollte ich hierfür wie für BIOS - https://wiki.syslinux.org/wiki/index.php?title=PXELINUX nutzen mit den jeweiligen UEFI Binaries und Libraries - hier gibt es noch zu viele BUGS
- Reads
- Getestet wird clientseitig auf einem Debian Buster - KVM - apt-get install ovmf
/usr/bin/qemu-system-x86_64 -runas kvm -daemonize -enable-kvm -k de -pidfile /tmp/mrPXE.pid -chardev socket,id=mrPXE,path=/tmp/mrPXE_monitor.sock,server,nowait -monitor chardev:mrPXE -m 1024 -bios /usr/share/qemu/OVMF.fd -name mrPXE -boot order=n -vnc 127.0.0.1:8 -net nic,macaddr=00:11:24:53:f4:08,model=virtio -net tap,ifname=tap88,script=/usr/local/sbin/add_tap_buero,downscript=/usr/local/sbin/del_tap
UEFI - dnsmsasq Anpassungen
- Relevante dnsmasq.conf Einträge für UEFI 64
..
dhcp-match=set:efi-x86_64,option:client-arch,7
dhcp-boot=tag:efi-x86_64,efi64/efi64.efi,,10.0.24.254
..
UEFI - grub2
- Für das EFI Binary und die Konfigurationsoptionen wird nun grub2 genutzt / funktioniert für Linux Boots und lokale Windows Boot Verweise auf
debugging bei grub shell - echo $prefix -> muss auf tftp server verweisen

FIXME nochmals testen
grub-mkimage -d /usr/lib/grub/x86_64-efi/ -O x86_64-efi  -o /home/urnilxfgbez/Desktop/build-grub-efi64.efi -p '(tftp,10.0.24.254)' efinet tftp

root@mrStorage:/mnt/storage/nfs/tftp/efi64# ls -al
total 228
drwxr-xr-x 1 root root        54 Aug 14 09:13 .
drwxr-xr-x 1 root nogroup    640 Aug 14 09:01 ..
-rw-r--r-- 1 root root    229376 Aug 13 19:15 efi64.efi <- restellt mit grub-mkimage - nochmals testen
-rw-r--r-- 1 root root      1042 Aug 13 19:17 grub.cfg
drwxr-xr-x 1 root root      6018 Aug 14 09:12 x86_64-efi <- kopie von laufendem Debian Buster UEFI/EFI system
- debug prefix
grub> echo $prefix
(tftp,x.x.x.x)/grub
- grub.cfg - ohne WDS Server
#set default="0"
function load_video {
  insmod efi_gop
  insmod efi_uga
  insmod video_bochs
  insmod video_cirrus
  insmod all_video
}
load_video
set gfxpayload=keep
insmod net
insmod efinet
insmod tftp
insmod gzio
insmod part_gpt
insmod ext2
set timeout=60


menuentry 'Desinfect 201920 easy' --class debian --class gnu-linux --class gnu --class os {
   linuxefi  (tftp)/vmlinuz64-desinfect nfsroot=10.0.24.254:/mnt/storage/nfs/desinfect/ netboot=nfs ro BOOT_IMAGE=casper/vmlinuz file=/cdrom/preseed/ubuntu.seed boot=casper initrd=initrd64-desinfect.lz easymode debian-installer/language=de console-setup/layoutcode=de
   initrdefi (tftp)/initrd64-desinfect.lz

}


menuentry 'Urbackup restore Backup' --class debian --class gnu-linux --class gnu --class os {
  linuxefi  (tftp)/urbackup/live/vmlinuz boot=live config username=urbackup toram noswap fetch=tftp://10.0.24.254/urbackup/live/filesystem.squashfs
  initrdefi (tftp)/urbackup/live/initrd.img

}


menuentry 'Local Windows' --class os {
set root=(hd0,gpt1)
chainloader (${root})/EFI/Microsoft/Boot/bootmgfw.efi
boot

}
- grub.cfg - chainlink WDS Server
- Im Event Log des WDS Servers lädt er das EFI Boot File erfolgreich - Access Denied - entweder Bug im grub2 oder falscher Syntax - dead End mit grub2
...
menuentry 'WDS' --class os --unrestricted {
set root=(tftp,IP_WDS_SERVER)
chainloader (${root})/boot/x64/wdsmgfw.efi
...
}
UEFI - ipxe
- Leider war es mir mit grub2 nicht möglich auf den WDS Windows Server zu verweisen - dies war eine Voraussetzung für das Setup
- Entscheidender Nachteil dieser Variante - kein Secure Boot (https://ipxe.org/appnote/etoken) - der Weg führte leider schlussendlich zurück zum WDS Server
- Auf gehts mit IPXE - vielen Dank an:
- Achtung mit dem Standard EFI Binary auf der Homepage war es nicht möglich zB: Lenovo G2 ITL Geräte per PXE zu booten (Realtek Chipsatz)
- ipxe selber bauen (Dev System ist ein Debian Bullseye, gebaut am 19.09.2022)
  git clone https://github.com/ipxe/ipxe.git
 cd ipxe/src/
   make bin-x86_64-efi/ipxe.efi
 file bin-x86_64-efi/ipxe.efi
 sha1sum bin-x86_64-efi/ipxe.efi
945b2066b9c794a4bd891002049aa8584731b486
- Es wäre möglich gewesen die Konfiguration mit Menü gleich zu embedden d.h. ins Binary zu integrieren - da ich zuvor jedoch mit dem offiziellen Binary begann und den entsprechenden Anpassungen am Windows DHCP Server - am gleichen Ort wie ipxe.efi liegt main.ipxe
- main.ipxe - ich möchte den Chainlink zum Windows WDS Server und die Möglichkeit auf den Workstations plain Windows 11 oder Windows 10 zu installieren ohne Image am WDS Server
#!ipxe

#================ Main Menu =================
menu UEFI  boot menu
item abort      abort
item wds     WDS
item win10   Windows 10 Pro 21H2 Install
item win11   Windows 11 Pro 21H2 Install
choose --default wds --timeout 5000 target && goto ${target}

#============ Main Menu Options =============
:abort
exit

:wds
set wdsserver:ipv4 IP_WDS_SERVER
set net0/next-server IP_WDS_SERVER
chain tftp://IP_WDS_SERVER/boot\x64\wdsmgfw.efi

:win10
kernel /efi64/wimboot
initrd /efi64/winpe/instwin1021h2/install.bat  install.bat
initrd /efi64/winpe/instwin1021h2/winpeshl.ini  winpeshl.ini
initrd /efi64/winpe/media/Boot/BCD        BCD
initrd /efi64/winpe/media/Boot/boot.sdi     boot.sdi
initrd  /efi64/winpe/media/sources/boot.wim boot.wim
boot

:win11
kernel /efi64/wimboot
initrd /efi64/winpe/instwin1121h2/install.bat  install.bat
initrd /efi64/winpe/instwin1121h2/winpeshl.ini  winpeshl.ini
initrd /efi64/winpe/media/Boot/BCD        BCD
initrd /efi64/winpe/media/Boot/boot.sdi     boot.sdi
initrd  /efi64/winpe/media/sources/boot.wim boot.wim
boot

#============== Main Menu End ===============
- Automatisch installation Starten von ausgepackter ISO auf Netzlaufwerk zB: , install.bat winpeshl.ini
- Winpe boot.wim (https://learn.microsoft.com/en-us/windows-hardware/get-started/adk-install , ADK + Windows PE add-on , das vom TFTP Server gestartet wird wurde mit Windows ADK auf einem Windows System gebaut
- winpeshl.ini
[LaunchApps]
"install.bat"
- install.bat
wpeinit

ping -n 10 FILESERVER

net use \\FILESERVER\isos$\win10pro21h2 /User:USER PASSWORD_USER

\\FILESERVER\isos$\win10pro21h2\setup.exe /unattend:\\FILESERVER\isos$\win10pro21h2\unattended-uefi.xml
UEFI - WDS Read Filter Anpassungen
- Anpassen des READ Filters beim WDS Server damit die EFI Datei heruntergeladen werden kann mit / Syntax
Computer\HKEY_LOCAL_MACHINE\SYSTEM\CurrentControlSet\Services\WDSServer\Providers\WDSTFTP
ReadFilter:
\boot\*
\tmp\*
boot\*
tmp\*
/boot/*
/boot\*
boot/*
UEFI - TFTP Server
- atftpd TFTP Server
- Nicht vergessen über systemd aktivieren
apt-get install atftpd
- /etc/default/atftpd
USE_INETD=false
# OPTIONS below are used only with init script
OPTIONS="--tftpd-timeout 300 --retry-timeout 5  --maxthread 100 --verbose=5 /mnt/storage/nfs/tftp"
UEFI - grub-install - lokal
- / gebootet von grml / per rsync laufendes System kopiert 1:1 (debian buster) / EFI Boot sicherstellen
EFI install:
32 root@grml /mnt # mount -t proc none proc                                  :(
root@grml /mnt # mount -t sysfs none sys
root@grml /mnt # mount -o bind /dev dev
root@grml /mnt # chroot ./ /bin/bash
root@grml:/# grub-install
Installing for x86_64-efi platform.
Installation finished. No error reported.
root@grml:/# df -h
Filesystem      Size  Used Avail Use% Mounted on
/dev/sda2        45G  889M   41G   3% /
/dev/sda3       152G  329M  144G   1% /var
/dev/sda1       511M  5.1M  506M   1% /boot/efi <- vfat Partition (mkfs.vfat)
udev            2.0G     0  2.0G   0% /dev


root@grml:/# update-grub
root@grml:/# update-iniramfs -k all -u
bootstrapping Debian
- Bootstrapping von altem Notebook (/dev/sda) auf neues Notebook (/dev/sdb)
- Rsync des alten /home Verzeichnisses fehlt
Bootstrapping Debian with UEFI

https://wiki.debianforum.de/Debootstrap

I want GPT Partitions and UEFI boot

---
root@mrWhiteGhost:/home/urnilxfgbez# gdisk /dev/sdb
GPT fdisk (gdisk) version 1.0.5

Partition table scan:
  MBR: not present
  BSD: not present
  APM: not present
  GPT: not present

Creating new GPT entries in memory.

Command (? for help): ?
b	back up GPT data to a file
c	change a partition's name
d	delete a partition
i	show detailed information on a partition
l	list known partition types
n	add a new partition
o	create a new empty GUID partition table (GPT)
p	print the partition table
q	quit without saving changes
r	recovery and transformation options (experts only)
s	sort partitions
t	change a partition's type code
v	verify disk
w	write table to disk and exit
x	extra functionality (experts only)
?	print this menu

Command (? for help): o
This option deletes all partitions and creates a new protective MBR.
Proceed? (Y/N): y

Command (? for help): w

Final checks complete. About to write GPT data. THIS WILL OVERWRITE EXISTING
PARTITIONS!!

Do you want to proceed? (Y/N): y
OK; writing new GUID partition table (GPT) to /dev/sdb.
The operation has completed successfully.

-------------------------------------

root@mrWhiteGhost:/home/urnilxfgbez# gdisk /dev/sdb
GPT fdisk (gdisk) version 1.0.5

Partition table scan:
  MBR: protective
  BSD: not present
  APM: not present
  GPT: present

Found valid GPT with protective MBR; using GPT.

Command (? for help): p
Disk /dev/sdb: 1953525168 sectors, 931.5 GiB
Model: Tech
Sector size (logical/physical): 512/4096 bytes
Disk identifier (GUID): CA9A55BC-90E2-4B48-908E-AC417446BCB6
Partition table holds up to 128 entries
Main partition table begins at sector 2 and ends at sector 33
First usable sector is 34, last usable sector is 1953525134
Partitions will be aligned on 2048-sector boundaries
Total free space is 1953525101 sectors (931.5 GiB)

Number  Start (sector)    End (sector)  Size       Code  Name

Command (? for help): n
Partition number (1-128, default 1):
First sector (34-1953525134, default = 2048) or {+-}size{KMGTP}:
Last sector (2048-1953525134, default = 1953525134) or {+-}size{KMGTP}: +600M
Current type is 8300 (Linux filesystem)
Hex code or GUID (L to show codes, Enter = 8300): ef00
Changed type of partition to 'EFI system partition'

Command (? for help): n
Partition number (2-128, default 2):
First sector (34-1953525134, default = 1230848) or {+-}size{KMGTP}:
Last sector (1230848-1953525134, default = 1953525134) or {+-}size{KMGTP}: +1024M
Current type is 8300 (Linux filesystem)
Hex code or GUID (L to show codes, Enter = 8300):
Changed type of partition to 'Linux filesystem'

Command (? for help): n
Partition number (3-128, default 3):
First sector (34-1953525134, default = 3328000) or {+-}size{KMGTP}:
Last sector (3328000-1953525134, default = 1953525134) or {+-}size{KMGTP}:
Current type is 8300 (Linux filesystem)
Hex code or GUID (L to show codes, Enter = 8300): L
Type search string, or <Enter> to show all codes: cryp
8308 Linux dm-crypt                      a02e Android encrypt
a905 NetBSD encrypted                    e900 Veracrypt data
f801 Ceph dm-crypt OSD                   f803 Ceph dm-crypt journal
f805 Ceph dm-crypt disk in creation      f809 Ceph lockbox for dm-crypt keys
f810 Ceph dm-crypt block                 f811 Ceph dm-crypt block DB
f812 Ceph dm-crypt block write-ahead lo  f813 Ceph dm-crypt LUKS journal
f814 Ceph dm-crypt LUKS block            f815 Ceph dm-crypt LUKS block DB
f816 Ceph dm-crypt LUKS block write-ahe  f817 Ceph dm-crypt LUKS OSD

Hex code or GUID (L to show codes, Enter = 8300):
Changed type of partition to 'Linux filesystem'

Command (? for help): w

Final checks complete. About to write GPT data. THIS WILL OVERWRITE EXISTING
PARTITIONS!!

Do you want to proceed? (Y/N): Y
OK; writing new GUID partition table (GPT) to /dev/sdb.
The operation has completed successfully.

-----------------------------------------------

Partitions and Crypto:

root@mrWhiteGhost:/home/urnilxfgbez# mkfs.vfat -n EFI  /dev/sdb1
mkfs.fat 4.1 (2017-01-24)
root@mrWhiteGhost:/home/urnilxfgbez# mkfs.ext4 -L BOOT /dev/sdb2
mke2fs 1.45.6 (20-Mar-2020)
Creating filesystem with 262144 4k blocks and 65536 inodes
Filesystem UUID: 17843802-be7c-4fac-b4b8-70e8b71eabaf
Superblock backups stored on blocks:
	32768, 98304, 163840, 229376

Allocating group tables: done
Writing inode tables: done
Creating journal (8192 blocks): done
Writing superblocks and filesystem accounting information: done


root@mrWhiteGhost:/home/urnilxfgbez# cryptsetup luksFormat /dev/sdb3

WARNING!
========
This will overwrite data on /dev/sdb3 irrevocably.

Are you sure? (Type 'yes' in capital letters): YES
Enter passphrase for /dev/sdb3:
Verify passphrase:
root@mrWhiteGhost:/home/urnilxfgbez# cryptsetup luksOpen /dev/sdb3 ROOTIGES
Enter passphrase for /dev/sdb3:

----------
root@mrWhiteGhost:/home/urnilxfgbez# mkfs.ext4 -L ROOTIGES_PLAIN /dev/mapper/ROOTIGES
mke2fs 1.45.6 (20-Mar-2020)
Creating filesystem with 243770545 4k blocks and 60948480 inodes
Filesystem UUID: e3e418a6-eede-437f-9de5-a03ab67090b9
Superblock backups stored on blocks:
	32768, 98304, 163840, 229376, 294912, 819200, 884736, 1605632, 2654208,
	4096000, 7962624, 11239424, 20480000, 23887872, 71663616, 78675968,
	102400000, 214990848

Allocating group tables: done
Writing inode tables: done
Creating journal (262144 blocks): done
Writing superblocks and filesystem accounting information: done

----------------------------
CHROOT Environment Preparation
root@mrWhiteGhost:/home/urnilxfgbez# mkdir /tmp/foo
root@mrWhiteGhost:/home/urnilxfgbez# mount /dev/mapper/ROOTIGES /tmp/foo
root@mrWhiteGhost:/home/urnilxfgbez# mkdir /tmp/foo/boot
root@mrWhiteGhost:/home/urnilxfgbez# mount /dev/sdb2 /tmp/foo/boot
root@mrWhiteGhost:/home/urnilxfgbez# mkdir /tmp/foo/boot/efi
root@mrWhiteGhost:/home/urnilxfgbez# mount /dev/sdb1 /tmp/foo/boot/efi/

------
Debootstrap go Debian Buster

root@mrWhiteGhost:/home/urnilxfgbez# debootstrap --arch=amd64 buster /tmp/foo/ http://ftp.de.debian.org/debian

Retreiving ...
..
..
..
 I: Configuring ifupdown...
I: Configuring bsdmainutils...
I: Configuring whiptail...
I: Configuring libnetfilter-conntrack3:amd64...
I: Configuring iptables...
I: Configuring tasksel-data...
I: Configuring tasksel...
I: Configuring libc-bin...
I: Configuring systemd...
I: Base system installed successfully.
-------------------
CHROOT GRUB Requirements

root@mrWhiteGhost:/home/urnilxfgbez# mount -o bind /proc /tmp/foo/proc/
root@mrWhiteGhost:/home/urnilxfgbez# mount -o bind /dev /tmp/foo/dev
root@mrWhiteGhost:/home/urnilxfgbez# mount -o bind /dev/pts /tmp/foo/dev/pts
root@mrWhiteGhost:/home/urnilxfgbez# mount -o bind /sys /tmp/foo/sys
-----

DEBIAN BASIC Packages

root@mrWhiteGhost:/# apt-get install  console-data console-common tzdata locales keyboard-configuration linux-image-amd64
Reading package lists... Done
Building dependency tree... Done
tzdata is already the newest version (2020a-0+deb10u1).
The following additional packages will be installed:
  apparmor busybox bzip2 file firmware-linux-free initramfs-tools
  initramfs-tools-core kbd klibc-utils libc-l10n libexpat1 libklibc
  libmagic-mgc libmagic1 libmpdec2 libpython3-stdlib libpython3.7-minimal
  libpython3.7-stdlib libreadline7 libsqlite3-0 linux-base
  linux-image-4.19.0-9-amd64 mime-support pigz python3 python3-minimal
  python3.7 python3.7-minimal xz-utils
Suggested packages:
  apparmor-profiles-extra apparmor-utils bzip2-doc unicode-data
  bash-completion linux-doc-4.19 debian-kernel-handbook grub-pc
  | grub-efi-amd64 | extlinux python3-doc python3-tk python3-venv
  python3.7-venv python3.7-doc binutils binfmt-support
The following NEW packages will be installed:
  apparmor busybox bzip2 console-common console-data file firmware-linux-free
  initramfs-tools initramfs-tools-core kbd keyboard-configuration klibc-utils
  libc-l10n libexpat1 libklibc libmagic-mgc libmagic1 libmpdec2
  libpython3-stdlib libpython3.7-minimal libpython3.7-stdlib libreadline7
  libsqlite3-0 linux-base linux-image-4.19.0-9-amd64 linux-image-amd64 locales
  mime-support pigz python3 python3-minimal python3.7 python3.7-minimal
  xz-utils
0 upgraded, 34 newly installed, 0 to remove and 0 not upgraded.
Need to get 62.6 MB of archives.
After this operation, 333 MB of additional disk space will be used.
Do you want to continue? [Y/n] y

-----

CRYPTO Foo
root@mrWhiteGhost:/# apt-get install  cryptsetup


-----

VIM

root@mrWhiteGhost:/# apt-get install  vim


-------
FSTAB

root@mrWhiteGhost:/# cat /etc/fstab
# UNCONFIGURED FSTAB FOR BASE SYSTEM
/dev/mapper/ROOTIGES /               ext4    errors=remount-ro 0       1
UUID=17843802-be7c-4fac-b4b8-70e8b71eabaf	/boot	 ext4	defaults
UUID=E6B8-136A	/boot/efi	vfat	defaults


-------
Crypttab

root@mrWhiteGhost:/# cat /etc/crypttab
# <target name>	<source device>		<key file>	<options>
ROOTIGES	UUID=d4ccc7b9-2db5-42cb-ae66-7a623744b38d	none	luks,tries=0

root@mrWhiteGhost:/# apt-get install grub-efi-amd64

----
EFI
root@mrWhiteGhost:/# grub-install -d /usr/lib/grub/x86_64-efi /dev/sdb
Installing for x86_64-efi platform.
grub-install: warning: EFI variables are not supported on this system..
Installation finished. No error reported.
winexe - build
- Ziel: von Linux aus Windows cmd's absetzen , benötige Version mit SMB2 Unterstützung für Windows 10
- Gebaut und getestet auf Debian 10 Buster 64 Bit
UILD INSTRUCTIONS FOR DEBIAN
###########################################

This is the build instructions for Debian 8 (jessie) and Debian 10 (buster) and has been tested with Samba 4.3.13. The provided patches will NOT work with Samba 4.4.x or 4.5.x and need to be updated. We will provide the updated patches in the future.

Please note that compiled binaries on Debian 10 are compatible and work with with Debian 9.

1) Create a clean build chroot (Debian 8): debootstrap --arch="amd64" jessie debian-jessie/ http://deb.debian.org/debian/
   Create a clean build chroot (Debian 10): debootstrap --arch="amd64" buster debian-buster/ http://deb.debian.org/debian/

2) Chroot and install required packages:

   # chroot debian-jessie OR # chroot debian-buster
   # apt-get install wget locales build-essential git gcc-mingw-w64 comerr-dev libpopt-dev libbsd-dev zlib1g-dev libc6-dev python-dev libgnutls28-dev devscripts pkg-config autoconf libldap2-dev libtevent-dev libtalloc-dev libacl1-dev

3) Get the sources:

   git clone https://bitbucket.org/reevertcode/reevert-winexe-waf.git
   wget https://download.samba.org/pub/samba/stable/samba-4.3.13.tar.gz

4) cd reevert-winexe-waf

5) tar -xf ../samba-4.3.13.tar.gz && mv samba-4.3.13 samba

6) rm -r source/smb_static

7) cat patches/fix_smb_static.patch | patch -p1

8) If building for SMBv2:
        cat patches/smb2_nognutls_noaddc.patch | patch -p1
        cat patches/smb2_add_public_includes.patch | patch -p1

   If building for SMBv1:
        cat patches/smb1_nognutls_noaddc.patch | patch -p1

8a) Debian 10 only: cat patches/fix_samba_perl.py.patch | patch -p0

9) cd source && ln -s ../samba/bin/default/smb_static

10) ./waf --samba-dir=../samba configure build
- Fehler
..
[14/16] winexesvc64_exe.c: build/bin2c build/winexesvc64.exe -> build/winexesvc64_exe.c
[15/16] c: build/winexesvc64_exe.c -> build/winexesvc64_exe.c.6.o
[16/16] cprogram: build/winexe.c.6.o build/svcinstall.c.6.o build/async.c.6.o build/winexesvc32_exe.c.6.o build/winexesvc64_exe.c.6.o -> build/winexe-static
/usr/bin/ld: /root/winexe/reevert-winexe-waf/source/smb_static/build/libsmb_static.a(debug_8.o): in function `debug_systemd_log':
debug.c:(.text+0x173): undefined reference to `sd_journal_send_with_location'
collect2: error: ld returned 1 exit status
Waf: Leaving directory `/root/winexe/reevert-winexe-waf/source/build'
Build failed
 -> task in 'winexe-static' failed (exit status 1):
        {task 139736975737488: cprogram winexe.c.6.o,svcinstall.c.6.o,async.c.6.o,winexesvc32_exe.c.6.o,winexesvc64_exe.c.6.o -> winexe-static}
['/usr/bin/gcc', '-pthread', 'winexe.c.6.o', 'svcinstall.c.6.o', 'async.c.6.o', 'winexesvc32_exe.c.6.o', 'winexesvc64_exe.c.6.o', '-o', '/root/winexe/reevert-winexe-waf/source/build/winexe-static', '-Wl,-Bstatic', '-L/root/winexe/reevert-winexe-waf/source/smb_static/build', '-lsmb_static', '-lbsd', '-lz', '-lresolv', '-lrt', '-Wl,-Bdynamic', '-ldl']

..
- sd_journal_send_with_location wird definiert in libsystemd-dev - Installation brachte kein Ergebnis Fehler blieb weiterhin bestehen
- Lösung:
- → reevert-winexe-waf/samba/lib/util/debug.c:#include <systemd/sd-journal.h> , Einsatz der Funktion sd_journal_send_with_location suchen und auskommentieren mit /* funktion */
- Nach neuem Versuch → Beginn bei 3) und gleich editieren und erneut bauen , funktionierte es erfolgreich:
 9/16] cprogram: build/winexesvc_launch.c.1.o build/winexesvc_loop.c.1.o -> build/winexesvc32.exe
[10/16] cprogram: build/bin2c.c.3.o -> build/bin2c
[11/16] cprogram: build/winexesvc_launch.c.2.o build/winexesvc_loop.c.2.o -> build/winexesvc64.exe
[12/16] winexesvc64_exe.c: build/bin2c build/winexesvc64.exe -> build/winexesvc64_exe.c
[13/16] c: build/winexesvc64_exe.c -> build/winexesvc64_exe.c.6.o
[14/16] winexesvc32_exe.c: build/bin2c build/winexesvc32.exe -> build/winexesvc32_exe.c
[15/16] c: build/winexesvc32_exe.c -> build/winexesvc32_exe.c.6.o
[16/16] cprogram: build/winexe.c.6.o build/svcinstall.c.6.o build/async.c.6.o build/winexesvc32_exe.c.6.o build/winexesvc64_exe.c.6.o -> build/winexe-static
Waf: Leaving directory `/root/winexe/reevert-winexe-waf/source/build'
'build' finished successfully (3.274s)
...

root@develop-debian:~/winexe/reevert-winexe-waf/source/build# ./winexe-static
winexe version 1.1
This program may be freely redistributed under the terms of the GNU GPLv3
Usage: winexe-static [OPTION]... //HOST COMMAND
Options:
  -h, --help                                  Display help message
  -V, --version                               Display version number
....
- Beispielaufruf:
winexe-static -U foo/Administrator --interactive=0 --ostype=1 --system //10.0.27.9 tasklist
honeydb honeypot
- Ich möchte den Agent nicht als „root“ laufen lassen (mit systemctl edit –full kann das ganze systemd File einfach angepasst werden)
- systemctl edit honeydb-agent
### Anything between here and the comment below will become the new contents of the file

[Service]
ExecStart=
ExecStart=/usr/sbin/honeydb-agent
User=honeypot
Group=honeypot
Restart=on-failure
KillSignal=SIGQUIT
StandardOutput=syslog
StandardError=syslog

### Lines below this comment will be discarded

### /etc/systemd/system/honeydb-agent.service
# [Unit]
# Description=HoneyDB Agent
# Documentation=https://honeydb-agent-docs.readthedocs.io
# After=network.target
#
# [Service]
# Type=simple
# ExecStart=/usr/sbin/honeydb-agent
# Restart=on-failure
# KillSignal=SIGQUIT
# StandardOutput=syslog
# StandardError=syslog
heralding honeypot
- Honeypot (https://github.com/johnnykv/heralding) um bei unterschiedlichen Diensten Zugangsdaten zu sammeln
- getestet auf Kali Linux
kali linux:

pip install heralding

error wegen python 3.9 - funktion gibt es nicht mehr

vim /usr/local/lib/python3.9/dist-packages/heralding/honeypot.py +33

#from ipify import get_ip

vim /usr/local/lib/python3.9/dist-packages/heralding/honeypot.py +56

Honeypot.public_ip = '1.2.3.4'

ssh geht nicht wegen python 3.9

vim /usr/local/lib/python3.7/dist-packages/heralding/honeypot.py +152

ändern auf:
                        server_coro = asyncssh.create_server(lambda: SshClass(ssh_options, self.loop),
                                                             bind_host, port, server_host_keys=[ssh_key_file],
                                                             login_timeout=cap.timeout)


Systemd service erstellen & User :

useradd honeypot / volle Rechte auf /var/lib/honeypot für honeypot

/var/lib/honeypot/heralding.yml:
====
# will request and log the public ip every hours from ipify
public_ip_as_destination_ip: false

# ip address to listen on
bind_host: 0.0.0.0

# logging of sessions and authentication attempts
activity_logging:
  file:
    enabled: true
    # Session details common for all protocols (capabilities) in CSV format,
    # written to file when the session ends. Set to "" to disable.
    session_csv_log_file: "log_session.csv"
    # Complete session details (including protocol specific data) in JSONL format,
    # written to file when the session ends. Set to "" to disable
    session_json_log_file: "log_session.json"
    # Writes each authentication attempt to file, including credentials,
    # set to "" to disable
    authentication_log_file: "log_auth.csv"

  syslog:
    enabled: true

  hpfeeds:
    enabled: false
    session_channel: "heralding.session"
    auth_channel: "heralding.auth"
    host:
    port: 20000
    ident:
    secret:

  curiosum:
    enabled: false
    port: 23400

hash_cracker:
  enabled: true
  wordlist_file: 'wordlist.txt'

# protocols to enable
capabilities:
  ftp:
    enabled: true
    port: 10021
    timeout: 30
    protocol_specific_data:
      max_attempts: 3
      banner: "pureftpd Server"
      syst_type: "Linux"

  telnet:
    enabled: true
    port: 10023
    timeout: 30
    protocol_specific_data:
      max_attempts: 3

  pop3:
    enabled: false
    port: 110
    timeout: 30
    protocol_specific_data:
      max_attempts: 3

  pop3s:
    enabled: false
    port: 995
    timeout: 30
    protocol_specific_data:
      max_attempts: 3
      # if a .pem file is not found in work dir, a new pem file will be created
      # using these values
      cert:
        common_name: "*"
        country: "US"
        state: None
        locality: None
        organization: None
        organizational_unit: None
        # how many days should the certificate be valid for
        valid_days: 365
        serial_number: 0

  postgresql:
    enabled: false
    port: 5432
    timeout: 30

  imap:
    enabled: false
    port: 143
    timeout: 30
    protocol_specific_data:
      max_attempts: 3
      banner: "* OK IMAP4rev1 Server Ready"

  imaps:
    enabled: false
    port: 993
    timeout: 30
    protocol_specific_data:
      max_attempts: 3
      banner: "* OK IMAP4rev1 Server Ready"
      # if a .pem file is not found in work dir, a new pem file will be created
      # using these values
      cert:
        common_name: "*"
        country: "US"
        state: None
        locality: None
        organization: None
        organizational_unit: None
        # how many days should the certificate be valid for
        valid_days: 365
        serial_number: 0

  ssh:
    enabled: true
    port: 10022
    timeout: 30
    protocol_specific_data:
      banner: "SSH-2.0-OpenSSH_7.9p1 Debian-10+deb10u2"

  http:
    enabled: false
    port: 80
    timeout: 30
    protocol_specific_data:
      banner: ""

  https:
    enabled: false
    port: 443
    timeout: 30
    protocol_specific_data:
      banner: ""
      # if a .pem file is not found in work dir, a new pem file will be created
      # using these values
      cert:
        common_name: "*"
        country: "US"
        state: None
        locality: None
        organization: None
        organizational_unit: None
        # how many days should the certificate be valid for
        valid_days: 365
        serial_number: 0

  smtp:
    enabled: false
    port: 25
    timeout: 30
    protocol_specific_data:
      banner: "Microsoft ESMTP MAIL service ready"
      # If the fqdn option is commented out or empty, then fqdn of the host will be used
      fqdn: ""

  smtps:
    enabled: false
    port: 465
    timeout: 30
    protocol_specific_data:
      banner: "Microsoft ESMTP MAIL service ready"
      # If the fqdn option is commented out or empty, then fqdn of the host will be used
      fqdn: ""
      cert:
        common_name: "*"
        country: "US"
        state: None
        locality: None
        organization: None
        organizational_unit: None
        # how many days should the certificate be valid for
        valid_days: 365
        serial_number: 0

  vnc:
    enabled: false
    port: 5900
    timeout: 30

  socks5:
    enabled: false
    port: 1080
    timeout: 30

  mysql:
    enabled: false
    port: 3306
    timeout: 30

  rdp:
    enabled: true
    port: 3389
    timeout: 30
    protocol_specific_data:
      banner: ""
      # if a .pem file is not found in work dir, a new pem file will be created
      # using these values
      cert:
        common_name: "*"
        country: "AT"
        state: Austria
        locality: Austria
        organization: None
        organizational_unit: None
        # how many days should the certificate be valid for
        valid_days: 365
        serial_number: 0

===

Prerouting rules für user space daemon:
root@pentest:~#  iptables -t nat -L PREROUTING -vn
Chain PREROUTING (policy ACCEPT 3322 packets, 740K bytes)
 pkts bytes target     prot opt in     out     source               destination
    0     0 REDIRECT   tcp  --  eth0   *       0.0.0.0/0            0.0.0.0/0            tcp dpt:23 flags:0x17/0x02 redir ports 10023
    0     0 REDIRECT   tcp  --  eth0   *       0.0.0.0/0            0.0.0.0/0            tcp dpt:21 flags:0x17/0x02 redir ports 10021
    0     0 REDIRECT   tcp  --  eth0   *       0.0.0.0/0            0.0.0.0/0            tcp dpt:22 flags:0x17/0x02 redir ports 10022

====

systemd service:
root@pentest:~# cat /etc/systemd/system/heralding.service
[Unit]
Description=heralding
Documentation=https://github.com/johnnykv/heralding
After=network.target

[Service]
User=honeypot
Group=honeypot
Type=simple
WorkingDirectory=/var/lib/honeypot
ExecStart=/usr/local/bin/heralding -c /var/lib/honeypot/heralding.yml
ExecReload=/bin/kill -s TERM $MAINPID
ExecStop=/bin/kill -s TERM $MAINPID
Restart=on-failure

[Install]
WantedBy=multi-user.target

======
- Achtung Python 3.10 ändert sich die async Funktionen - der loop Parameter fällt weg
vim /usr/local/lib/python3.10/dist-packages/heralding/honeypot.py +188

          elif cap_name == 'rdp':
            pem_file = '{0}.pem'.format(cap_name)
            self.create_cert_if_not_exists(cap_name, pem_file)
            server_coro = asyncio.start_server(
#                cap.handle_session, bind_host, port, loop=self.loop)
                 cap.handle_session, bind_host, port)
          else:
            server_coro = asyncio.start_server(
#               cap.handle_session, bind_host, port, loop=self.loop)
                cap.handle_session, bind_host, port)
- vim /usr/local/lib/python3.10/dist-packages/heralding/libs/telnetsrv/telnetsrvlib.py +117 / vim /usr/local/lib/python3.10/dist-packages/heralding/capabilities/handlerbase.py +86
Apache2 DoS Protection
- Rundimentärer DoS Schutz auf Apache2 Ebene über Modul / Achtung sollte PHP als Modul eingsetzt werden
- Getestet auf Debian Buster
 apt-get install libapache2-mod-evasive

a2enmod evasive

-> Tests mit zB: ab -n 200  https://website / hydra auf kali bei basic auth über https zB: hydra -l username  -P /usr/share/wordlists/nmap.lst website https-get


Konfiguration:

 cat /etc/apache2/mods-enabled/evasive.conf
<IfModule mod_evasive20.c>
    DOSHashTableSize    3097

    #2021-06-29 cc: Anzahl Requests auf bestimmte URI Requests pro Sekunde (Interval 1)
    DOSPageCount        4

    #2021-06-29 cc: ganzer "Webserver" Requests pro Sekunde (Interval 1)
    DOSSiteCount        20

    DOSPageInterval     1
    DOSSiteInterval     1

    DOSBlockingPeriod   60

    DOSWhiteList 1.2.3.*

    DOSSystemCommand    "echo 'IP: %s blocked' | mail -s 'Evasive Blocked Apache2' support@pannoniait.at"

</IfModule>

--

Mit prefork apache2 mpm greift es nicht !

a2dismod mpm_prefork
a2dismod php <- PHP is not threat safe / PHP als Modul muss deaktiviert werden ggf. auf php-fpm umsteigen

a2enmod mpm_event

systemctl restart apache2
MINT
- Keyboard auf DE stellen bei Live Linux MINT ISO - getestet unter: Mint XFCE 21.2


- Mintupgrade von 19 auf 20 - Window Manager wurde nicht mehr gestartet / es ging jedoch manuell mit eingeloggtem User und startx → apt-get install lightdm-gtk-greeter
Western Digital WD my Cloud Mirror
- SSH aktivieren damit sich die „Specials“ entfalten .. zusammen gebasteltes embedded Linux von WD
root@nas root # cat /proc/version
Linux version 3.2.40 (kman@kmachine) (gcc version 4.6.4 (Linaro GCC branch-4.6.4. Marvell GCC Dev 201310-2126.3d181f66 64K MAXPAGESIZE ALIGN) ) #1 Fri Nov 16 12:28:49 CST 2018
- Konfiguration wird in XML Dateien gehalten / Ich wollte einen Cron Job hinzufügen der alte nur lesbare Backup Kopien löscht, die älter als 2 Wochen sind - go for the mission :)
- Konfiguration befindet sich unter /usr/local/config/config.xml / in /usr/local/config/ befindet sich persistierbarer Speicher d.h. hier können Dateien erstellt werden die auch einen reboot überleben
- Vom Share backup wird auf share backups/workstations kopiert (wöchtentlich / Cron Job hier über die Web GUI - „kopieren“)
- /usr/local/config/delete_old_backups.sh
 #!/bin/bash

find /mnt/HD/HD_a2/backups/workstations/workstations/   -mindepth 1 -maxdepth 1 -ctime +14 -exec rm -rf {} \; |  msmtp --host=xxx recipient_mail  --from sender_mail


echo "Finished cleaning backups" |   msmtp --host=xxx recipient_mail  --from sender_mail
- Im XML File einbauen damit nach Reboot der crontab Eintrag erstellt wird /usr/local/config /config.xml :
-> bei <crond> <list> <name id="NUMMER_EINFACH_ZÄHLEN">clean_backup</name> </list>
-> eigener Eintrag für <clean_backup> im gleichen Schema wie die Anderen - <run>/usr/local/config/delete_old_backups.sh</run>
- crontab -l | grep -i backup
0 1 * * 6 internal_backup -a 'workstations' -c jobrun &
0 2 * * 7 /usr/local/config/delete_old_backups.sh
Big RAM
- With more RAM comes more performance possibility :)
- Ich möchte Teile meines Filesystems (caching) in den RAM laden und dort persistent zur Verfügung haben
- Getestet unter: Kali Rolling / Debian 11 / Debian 12
apt-get install vmtouch
- systemd Beispiel - Achtung bei Type=forking zeigt er den Realverbrauch bei Type=simple nicht / Lade bis zu 512MB größe Dateien in den RAM aus den Verzeichnissen /usr/bin /bin /lib /usr/lib - Achtung Da kann der OOM Killer vorbeischaun :)
cat /lib/systemd/system/vmtouch-sysd.service
[Unit]
Description=vmtouch load into ram
After=multi-user.target

[Service]
Type=simple
ExecStart=/usr/bin/vmtouch -v -l -m 512M /usr/bin /bin /lib/ /usr/lib
#2023-10-16 cc: Try terminate first and not kill - 9
KillSignal=15

[Install]
WantedBy=multi-user.target
- Kernel Tweaks - danke : https://gist.github.com/Nihhaar/ca550c221f3c87459ab383408a9c3928
- per Default liegt der Wert bei 100
root@mrChief:/home/urnilxfgbez# cat /proc/sys/vm/vfs_cache_pressure
50
- Je geringer der Wert desto länger hält der Kernel den Cache im RAM
vm.vfs_cache_pressure = 50
- TMPFS nutzen / Hier müssen die Programme oder mount Points entsprechend am ramfs landen damit sie aus dem RAM geladen werden zB: /etc/fstab
tmpfs   /tmp	    tmpfs	defaults,size=512m	0	0
tmpfs   /var/log    tmpfs    defaults,size=256m    0 0
Zabbix
- Installiert auf Debian 11 (Bullseye) - Zabbix 6 aus Zabbix Repositories - LTS Version
- Da pnp4nagios schon länger nicht mehr weiter entwickelt wird braucht es eine Alternative für die Graphen / Ich möchte Performancedaten zur Netzwerkauslastung
- Ideal bei pauschalisierten Überprüfungen zB: Linux Server , HPE Enterprise SNMP Check von Switch usw..

Installation
- Zabbix Scratchpad zur Installation:
- Ich würde ausschließlich auf dem Monitoring Server das Repository von Zabbix empfehlen / die Repo Agents von Debian 10 u. Debian 11 funktionieren ohne Probleme
- Default Username und Password: Admin zabbix / Achtung: Konfiguration von apache2 beachten /etc/apache2/conf.d/
- wollte Default Database Engine ändern - er installiert mit InnoDB
Install and configure Zabbix for your platform
a. Install Zabbix repository
Documentation
# wget https://repo.zabbix.com/zabbix/6.0/debian/pool/main/z/zabbix-release/zabbix-release_6.0-4+debian11_all.deb
# dpkg -i zabbix-release_6.0-4+debian11_all.deb
# apt update
b. Install Zabbix server, frontend, agent
# apt install zabbix-server-mysql zabbix-frontend-php zabbix-apache-conf zabbix-sql-scripts zabbix-agent
c. Create initial database
Documentation


Install mariadb server

apt-get install mariadb-server

Choose Aria (crash safe) table/database default format

mysqld server section config file: add default-storage-engine=Aria

root@mrMonitoring:/etc/mysql/mariadb.conf.d# systemctl restart mariadb
root@mrMonitoring:/etc/mysql/mariadb.conf.d# mysql
Welcome to the MariaDB monitor.  Commands end with ; or \g.
Your MariaDB connection id is 30
Server version: 10.5.21-MariaDB-0+deb11u1 Debian 11

Copyright (c) 2000, 2018, Oracle, MariaDB Corporation Ab and others.

Type 'help;' or '\h' for help. Type '\c' to clear the current input statement.

MariaDB [(none)]> select @@global.storage_engine;
+-------------------------+
| @@global.storage_engine |
+-------------------------+
| Aria                    |
+-------------------------+
1 row in set (0.000 sec)


Make sure you have database server up and running.

Run the following on your database host.
# mysql -uroot -p
password
mysql> create database zabbix character set utf8mb4 collate utf8mb4_bin;
mysql> create user zabbix@localhost identified by 'password';
mysql> grant all privileges on zabbix.* to zabbix@localhost;
mysql> set global log_bin_trust_function_creators = 1;
mysql> quit;


--
MariaDB [(none)]> create database zabbix character set utf8mb4 collate utf8mb4_bin;
Query OK, 1 row affected (0.001 sec)

MariaDB [(none)]>  create user zabbix@localhost identified by 'PASSWORD';
Query OK, 0 rows affected (0.012 sec)

MariaDB [(none)]> grant all privileges on zabbix.* to zabbix@localhost;
Query OK, 0 rows affected (0.012 sec)

MariaDB [(none)]> set global log_bin_trust_function_creators = 1;
Query OK, 0 rows affected (0.000 sec)

MariaDB [(none)]> quit


--


On Zabbix server host import initial schema and data. You will be prompted to enter your newly created password.
# zcat /usr/share/zabbix-sql-scripts/mysql/server.sql.gz | mysql --default-character-set=utf8mb4 -uzabbix -p zabbix

--
root@mrMonitoring:/etc/mysql/mariadb.conf.d#  zcat /usr/share/zabbix-sql-scripts/mysql/server.sql.gz | mysql --default-character-set=utf8mb4 -uzabbix zabbix -p
Enter password:
root@mrMonitoring:/etc/mysql/mariadb.conf.d#

--
Disable log_bin_trust_function_creators option after importing database schema.
# mysql -uroot -p
password
mysql> set global log_bin_trust_function_creators = 0;
mysql> quit;
d. Configure the database for Zabbix server

Edit file /etc/zabbix/zabbix_server.conf
DBPassword=password
e. Start Zabbix server and agent processes

Start Zabbix server and agent processes and make it start at system boot.
# systemctl restart zabbix-server zabbix-agent apache2
# systemctl enable zabbix-server zabbix-agent apache2
f. Open Zabbix UI web page

The default URL for Zabbix UI when using Apache web server is http://host/zabbix
Agent - Konfiguration
- ActiveAgent / Der Agent stellt eine Verbindung zum Monitoring Server her (TCP Port 10051) , per Default unverschlüsselt
- PassiveAgent / Der Monitoring Server stellt eine Verbindung mit dem Agent her (TCP Port 10050 ) , per Default unverschlüsselt
root@mrGodfather:~# grep ^[^#] /etc/zabbix/zabbix_agentd.conf
PidFile=/var/run/zabbix/zabbix_agentd.pid
LogFile=/var/log/zabbix-agent/zabbix_agentd.log
LogFileSize=0
Server=IP_MONITORING_SERVER
Include=/etc/zabbix/zabbix_agentd.conf.d/*.conf
* PassiveAgent / Der Monitoring Server stellt eine Verbindung mit dem Agent her (TCP Port 10050 ) , verschlüsselt mit PSK (https://www.zabbix.com/documentation/current/en/manual/encryption/using_pre_shared_keys)
root@foo:~# grep ^[^#] /etc/zabbix/zabbix_agentd.conf
PidFile=/run/zabbix/zabbix_agentd.pid
LogFile=/var/log/zabbix-agent/zabbix_agentd.log
LogFileSize=0
Server=IP_MONITORING_SERVER
ListenPort=10050
Include=/etc/zabbix/zabbix_agentd.conf.d/*.conf
TLSConnect=psk
TLSAccept=psk
TLSPSKIdentity=UNIQUE_ID_KEY_FOO
TLSPSKFile=/etc/zabbix/agentd.psk
- Random agentd.psk Key: openssl rand -hex 32
Custom Item - Konfiguration
- Am Beispiel der Brennenstuhl IP Leiste für den Verbrauch / Ich möchte den Verbrauch ebenfalls im Zabbix erfassen um entsprechende Grafiken zu gewinnen


HPE 1950 OfficeConnect
- Grundsätzlich ein H3C Switch - Template: HP Comware HH3C by SNMP
- Achtung , Anpassung bei Network Interface Discovery notwendig für Bits sent / Bits received
- snmpwalk ist dein Freund :)


know-how/linux.txt · Zuletzt geändert: 2024/03/20 12:44 von cc